Create a private build agent using Azure Container Instances
I’ve been complaining for a while about how slow the hosted build agent in Azure DevOps is. The reason for this is simple, as it’s a shared, free, hosted agent.
A solution for this is to host your agents, for example, via a virtual machine.
I’m not a big fan of maintaining virtual machines, and then it struck me that we now have containers that are sort of the same but easier to manage.
A container is based on a specific image, and every time you spin it up, it uses the same image (baseline). This makes sure no funny business is happening in the container, and manual modifications to the system will are deleted whenever a new container is spun up.
The build agent image
As a .NET developer, we needed Windows agents. Nowadays, we can build our solutions on a Linux machine. A great benefit from this is, Linux images are much smaller compared to their Windows counterparts. Another benefit, which I learned from experience, builds are much faster on a Linux machine. File operations in specific are way faster on a Linux operating system (NuGet/NPM).
There is a step-by-step sample on the Azure DevOps documentation site on how to create an Azure DevOps build agent, which I’ve also used myself.
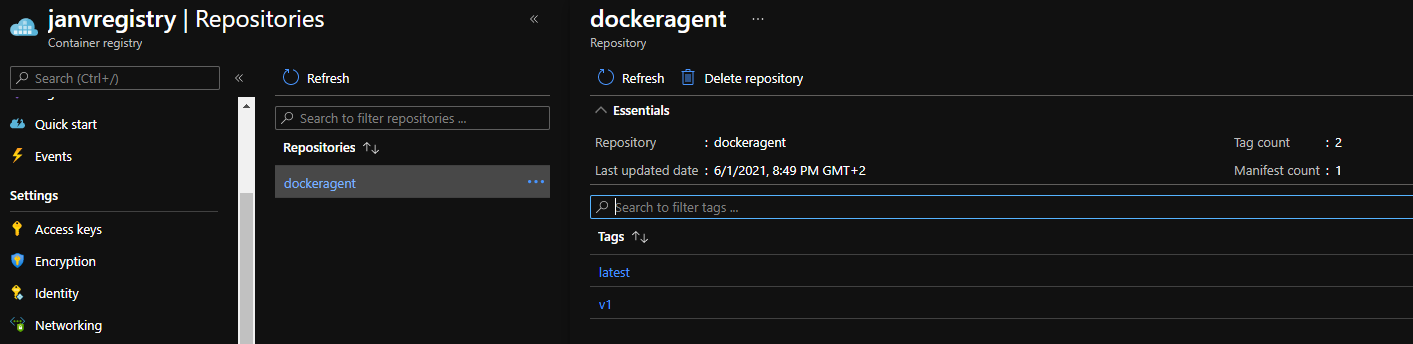
Once the image is built, it’s time to upload it to the Azure Container Registry, or your registry of choice.
To perform this action, I’ve created the following script.
$imageName = "dockeragent"
$imageVersion = "v1"

$acrName = "janvregistry"
$acrHostname = "$($acrName).azurecr.io"
$adminUsername = "janvregistry"
$adminPassword = "" # The password of your Container Registry

# Build the Docker image from the folder `dockeragent`
docker build -t "$($imageName):latest" -t "$($imageName):$($imageVersion)" .\dockeragent
# Tag the image with the ACR hostname
docker tag "$($imageName):$($imageVersion)" "$($acrHostname)/$($imageName):$($imageVersion)"
docker tag "$($imageName):latest" "$($acrHostname)/$($imageName):latest"
# Login to ACR
az acr login --name $acrName --username $adminUsername --password $adminPassword
# Push the images to ACR
docker push "$($acrHostname)/$($imageName):$($imageVersion)"
docker push "$($acrHostname)/$($imageName):latest"
# Remove the local ACR tagged images
docker rmi "$($acrHostname)/$($imageName):$($imageVersion)"
docker rmi "$($acrHostname)/$($imageName):latest"
Now the image is registered in the registry, it’s time to spin up the agent’s environment.
Create the build agent environment
There are dozens of ways to run containers in Azure, and all of them have their advantages & disadvantages.
For now, I wanted to use out Azure Container Instances because I didn’t have any experience with it yet, and the pricing model is quite interesting. You only need to pay per second of usage. Seeing I don’t need the build agents to run all the time, this pricing model makes a lot of sense to me. I’ll spin up the agents whenever I need them and turn them off afterward, and only get billed for the time the containers were running.
There is one requirement I want to meet, and that’s being able to run the agents inside a virtual network. I find it a good practice to have your Azure services not accessible via the public internet by using a virtual network. This does mean a build agent needs to have some way to connect to this. By placing them inside a virtual network themselves, they can connect to your services via VNet Peering, if you like.
For the sake of brevity, I won’t go into details on how to set this up in this post.
The scripts I used to set up my Azure Container Registry and the used VNet is the following.
$acrName = "janvregistry"
$registryUsername = "janvregistry" # By default the same as the name of ACR
$registryPassword = ""
$vnetName = "janv-vnet"
$agentSubnet = "agent-subnet"
$agentSubnetPrefix = "10.0.2.0/27"

# Creating the Container Registry
az acr create -g $resourceGroup -n $acrName --sku Basic --admin-enabled
# Creating the Virtual Network
az network vnet create -g $resourceGroup -n $vnetName
# Creating the Subnet used by Azure Container Instances
az network vnet subnet create -g $resourceGroup `
    -n $agentSubnet `
    --vnet-name $vnetName `
    --address-prefixes $agentSubnetPrefix `
    --delegations "Microsoft.ContainerInstance.containerGroups"

$buildAgentContainerName = "build-container"
$azureDevOpsPool = "Default"
$azureDevOpsAccountName = "myAccount"
$azureDevOpsToken = ""
# Creating the ACI with a container of my build agent image
az container create -g $resourceGroup -n $buildagentContainerName `
    --image janvregistry.azurecr.io/dockeragent:latest `
    --cpu 2 `
    --memory 4 `
    --vnet $vnetName `
    --subnet $agentSubnet `
    --registry-username $registryUsername `
    --registry-password $registryPassword `
    --environment-variables AZP_URL="https://dev.azure.com/$($azureDevOpsAccountName)" AZP_TOKEN=$azureDevOpsToken AZP_AGENT_NAME=$buildagentContainerName AZP_POOL=$azureDevOpsPool
You are free to do the above via ARM templates or any other IaC framework of your liking. However, I chose to use the Azure CLI because it’s a bit easier to comprehend.
The above will create an Azure Container Group with a single container connected to the earlier created subnet.
The AZP_* parameters are necessary to specify the connection to the Azure DevOps instance.
In essence, this is all you need to run a build agent in ACI, and you can turn them on/off at your convenience.
There are a couple of problems with this, though.
The most important one is only one container is running, so only one agent is added to my pool. Before I started working with ACI, I was under the impression you would be able to scale them automatic or manual.
This isn’t the case at all!
While researching the matter, I read a post by Tom Kerkove who has ‘implemented’ autoscaling of ACI by using Azure Logic Apps.
What he’s doing over there is deploying ARM templates whenever he needs to scale his ACI because you can only specify the number of containers you want when creating the container group.
If you need this autoscaling approach, I’d advise you to follow Tom his workflow. I decided the autoscaling is more of a nice-to-have compared to a must-have. Having all build agents active is good enough for me as they all turn off when I don’t need them anymore.
I couldn’t find a way to create a container group with three active containers inside using the Azure CLI, so I resorted to creating an ARM template.
The following ARM Template sample will create an ACI instance with three build agents inside.
{
  "name": "[variables('containerGroupName')]",
  "type": "Microsoft.ContainerInstance/containerGroups",
  "apiVersion": "2019-12-01",
  "location": "[resourceGroup().location]",
  "properties": {
    "containers": [
      {
        "name": "agent-1",
        "properties": {
          "image": "[variables('buildAgentContainerImage')]",
          "resources": {
            "requests": {
              "cpu": 0.5,
              "memoryInGb": 1.5
            }
          },
          "environmentVariables": [
            {
              "name": "AZP_URL",
              "secureValue": "[parameters('azureDevOpsUrl')]"
            },
            {
              "name": "AZP_TOKEN",
              "secureValue": "[parameters('azureDevOpsToken')]"
            },
            {
              "name": "AZP_AGENT_NAME",
              "secureValue": "agent-1"
            },
            {
              "name": "AZP_POOL",
              "secureValue": "Default"
            }
          ]
        }
      },
      {
        "name": "agent-2",
        "properties": {
          "image": "[variables('buildAgentContainerImage')]",
          "resources": {
            "requests": {
              "cpu": 0.5,
              "memoryInGb": 1.5
            }
          },
          "environmentVariables": [
            {
              "name": "AZP_URL",
              "secureValue": "[parameters('azureDevOpsUrl')]"
            },
            {
              "name": "AZP_TOKEN",
              "secureValue": "[parameters('azureDevOpsToken')]"
            },
            {
              "name": "AZP_AGENT_NAME",
              "secureValue": "agent-2"
            },
            {
              "name": "AZP_POOL",
              "secureValue": "Default"
            }
          ]
        }
      },
      {
        "name": "agent-3",
        "properties": {
          "image": "[variables('buildAgentContainerImage')]",
          "resources": {
            "requests": {
              "cpu": 0.5,
              "memoryInGb": 1.5
            }
          },
          "environmentVariables": [
            {
              "name": "AZP_URL",
              "secureValue": "[parameters('azureDevOpsUrl')]"
            },
            {
              "name": "AZP_TOKEN",
              "secureValue": "[parameters('azureDevOpsToken')]"
            },
            {
              "name": "AZP_AGENT_NAME",
              "secureValue": "agent-2"
            },
            {
              "name": "AZP_POOL",
              "secureValue": "Default"
            }
          ]
        }
      }
    ],
    "osType": "Linux",
    "restartPolicy": "Always",
    "imageRegistryCredentials": [
      {
        "server": "[parameters('imageRegistryServerName')]",
        "username": "[parameters('imageRegistryUsername')]",
        "password": "[parameters('imageRegistryPassword')]"
      }
    ]
  }
}
Or if you like Bicep templates (thanks to Eduard Keilholz):
var agents = [
  {
    name: 'agent-1'
  }
  {
    name: 'agent-2'
  }
  {
    name: 'agent-3'
  }
]

resource containerGroups 'Microsoft.ContainerInstance/containerGroups@2021-03-01' = {
  name: 'buildAgentContainerGroup'
  location: resourceGroup().location
  properties: {
    containers: [for agent in agents: {
      name: agent.name
      properties: {
        image: buildAgentContainerImage
        resources: {
          requests: {
            cpu: 1
            memoryInGB: 2
          }
        }
        environmentVariables: [
          {
            name: 'AZP_URL'
            secureValue: azureDevOpsUrl
          }
          {
            name: 'AZP_TOKEN'
            secureValue: azureDevOpsPatToken
          }
          {
            name: 'AZP_AGENT_NAME'
            secureValue: agent.name
          }
          {
            name: 'AZP_POOL'
            secureValue: 'Default'
          }
        ]
      }
    }]
    osType: 'Linux'
    restartPolicy: 'Always'
    imageRegistryCredentials: [
      {
        server: imageRegistryServer
        username: imageRegistryUsername
        password: imageRegistryPassword
      }
    ]
  }
}
The first time I tried to deploy this, I had five build agents defined over here. While trying to deploy this, I got the following error message:
Deployment failed. Correlation ID: b3de3b4b-d4b6-46c5-bcaf-5fd0f17641a5. `{ “error”: {
"code": "ServiceUnavailable",
"message": "The requested resource is not available in the location 'westeurope' at this moment. Please retry with a different resource request or in another location. Resource requested: '5' CPU '7.5' GB memory 'Linux' OS"
} }`
It looks like all containers inside a single container group are hosted inside a single VM. That’s quite a bummer as I’d like my agents to have at least 2 vCPU’s and 2+ GB of memory.
In West Europe, we can only deploy 4 cores & 16GB in total.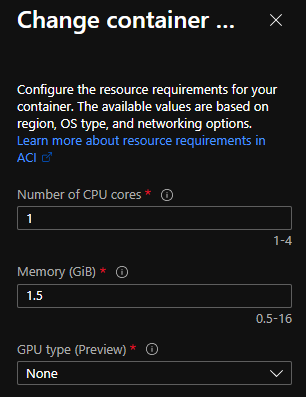
Because I had deployed my ACI instance via the Azure CLI the first time, I tried ‘updating’ this instance. This also failed with the following message:
Deployment failed. Correlation ID: 43ce5eb8-02e8-48df-9810-e06ee72892d5. `{ “error”: {
"code": "InvalidContainerGroupUpdate",
"message": "The updates on container group 'build-container' are invalid. If you are going to update the os type, restart policy, network profile, CPU, memory or GPU resources for a container group, you must delete it first and then create a new one."
} }`
Scaling the underlying VM isn’t possible either. So I ended up deleting the existing instance and creating a new one altogether.
As you can see, I omitted the VNet integration in the template above to make the template a bit more concise, but you can always add this if you want.
The Azure DevOps environment
Depending on your setup, the Default pool in Azure DevOps will now have multiple agents configured inside.
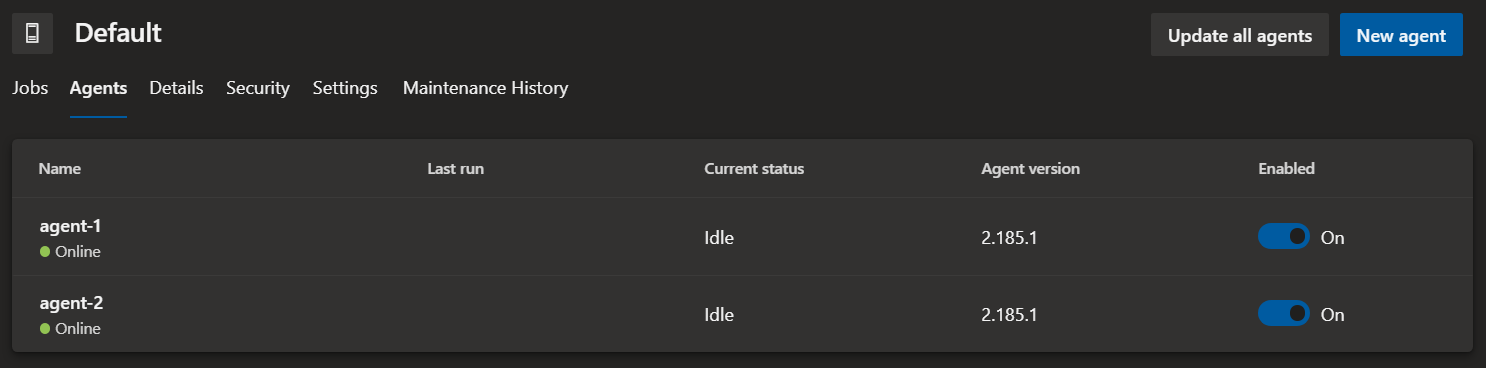
Remember, the agents are empty and only have the Azure DevOps agent installed. Therefore, you need to make sure the correct tooling is installed first, for example, .NET 5.
When a build is triggered on a specific agent, the tooling is installed and takes a bit of time.
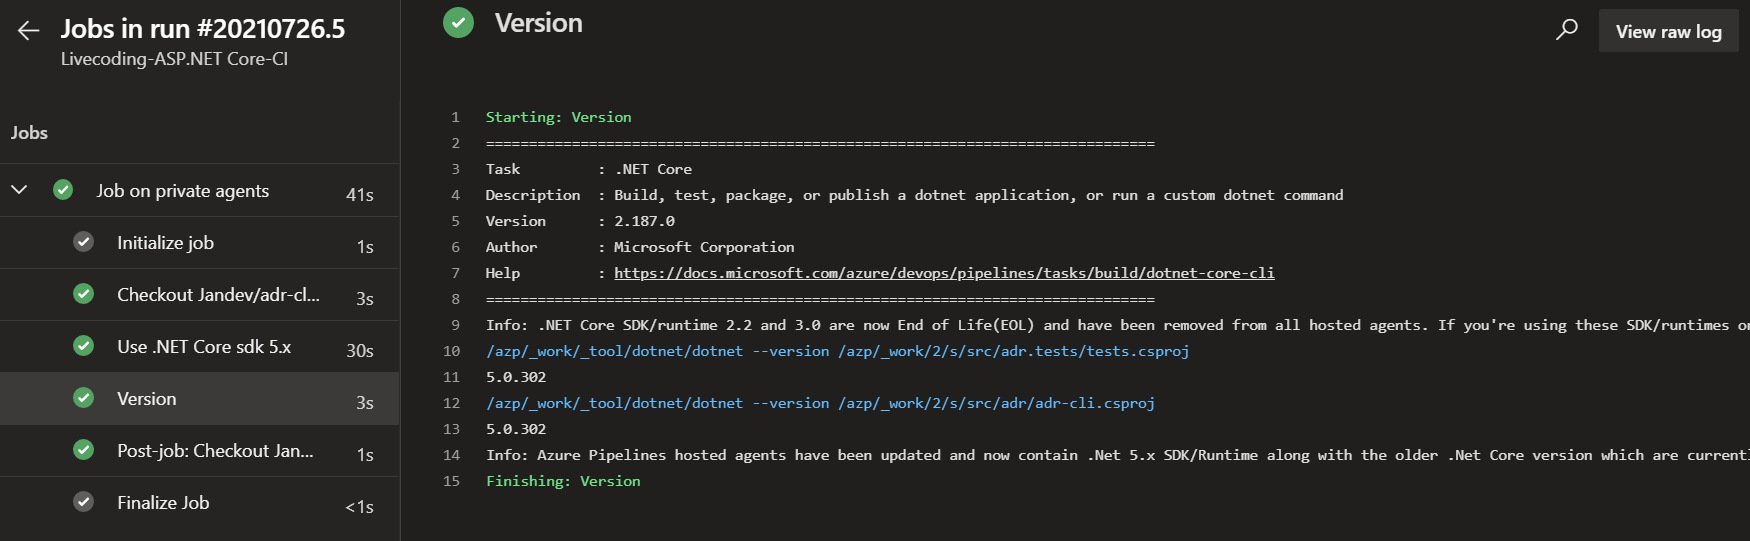
The second time a build is triggered, the cache is used for .NET solutions, but I’m sure this also applies to NPM & NuGet packages.
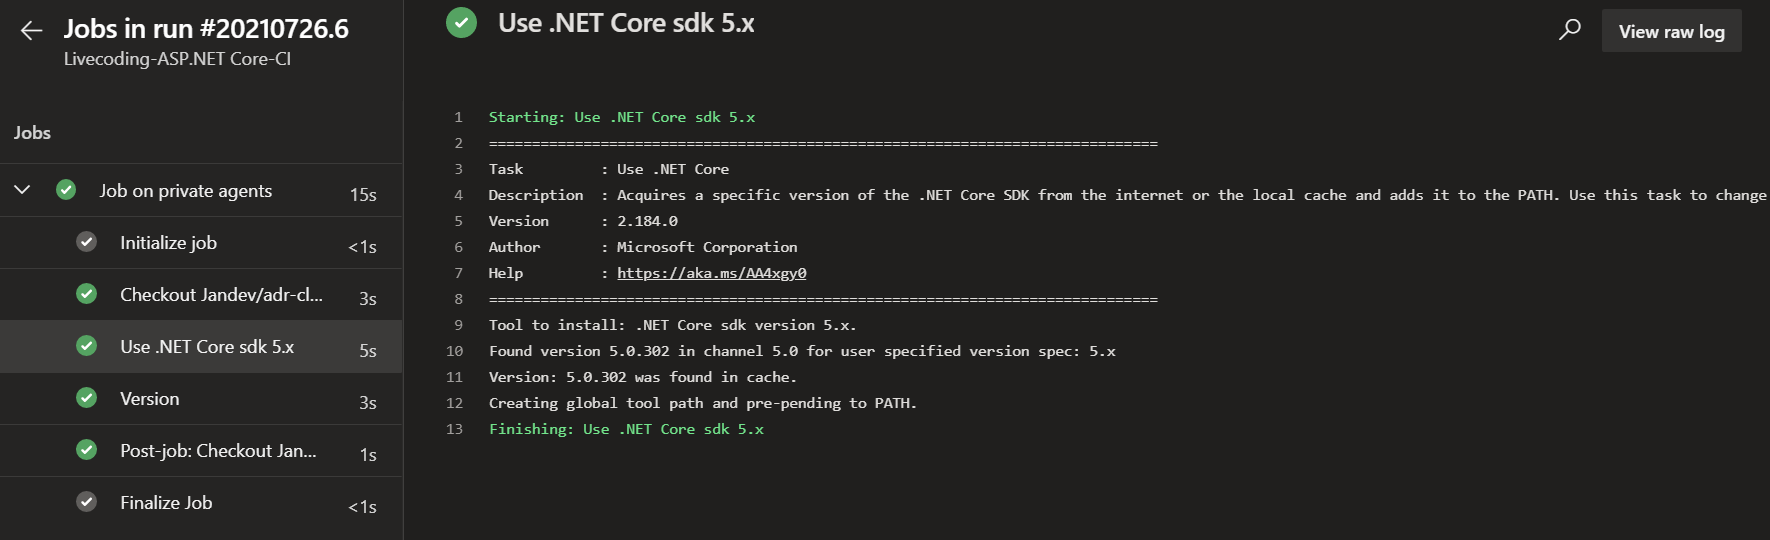
This will save a ton of time compared to the Hosted agents, which need to re-download & install the tooling every time a build is run.
You can also state this is a downside as the agents might get cluttered with installed software after a couple of builds. But that’s up to you, of course.