Another small post, but a solution to a problem which has annoyed me a lot.
Changing the power profile or power scheme in Windows is quite a hassle if you ask me. I have created a ‘High Performance’ profile on my laptop for when I’m doing development work on the machine and also have the ‘Balanced’ profile, which is the default in Windows. However, switching between these profiles is a lot of work (in my opinion).
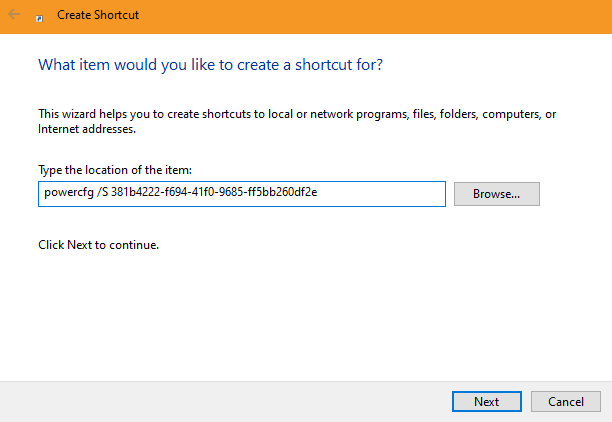
I found out switching profiles can also be done with the powercfg tool, via the command-line. To do so, you first need to know which profiles are configured on your system. You can do this by running the powercfg /L command from the terminal.
The output will be something similar to the one below.
 pwsh> powercfg /L

Existing Power Schemes (* Active)
-----------------------------------
Power Scheme GUID: 381b4222-f694-41f0-9685-ff5bb260df2e  (Balanced) *
Power Scheme GUID: 8c5e7fda-e8bf-4a96-9a85-a6e23a8c635c  (High performance)
Power Scheme GUID: a1841308-3541-4fab-bc81-f71556f20b4a  (Power saver)
You can use these unique identifiers to switch between profiles. Run powercfg /S 8c5e7fda-e8bf-4a96-9a85-a6e23a8c635c to switch to the ‘High performance’ profile and powercfg /S 381b4222-f694-41f0-9685-ff5bb260df2e to switch back to ‘Balanced’.
Remembering GUIDs isn’t very user-friendly either, so what can you do more? Well, creating shortcuts on the desktop or in the start menu!
Read more →With the new Windows Terminal available I’ve been searching on how to upgrade my console experience. I see a lot of people improving their terminal to show important information, like which Git branch you are working on, which Azure subscription, the actual location on disk, etc.
A couple of months ago I came across Brad Wilson his post on the matter and I like the way his terminal looks. His post, is rather straightforward, but there was some information missing. Well, ‘missing’ isn’t the correct word. In his post he has assumed some prerequisites which I hadn’t set up on my machine(s).
For reference sake, I’ll repeat some steps over here from Brad his post and add some of myself which were unclear to me.
First of all, you need to install posh-git. This is a small PowerShell module which integrates Git in PowerShell. It’s very useful and now that I know of it I advise everyone to use it!
I did have some versioning issues when installing this though. The first time when I ran the command PS> install-module posh-git I got the following message(s).
PowerShellGet requires NuGet provider version '2.8.5.201' or newer to interact with NuGet-based repositories. The NuGet provider must be available in 'C:\Program Files\PackageManagement\ProviderAssemblies' or 'C:\Users\jan\AppData\Local\PackageManagement\ProviderAssemblies'. You can also install the NuGet provider by running 'Install-PackageProvider -Name NuGet -MinimumVersion 2.8.5.201 -Force'. Do you want PowerShellGet to install and import the NuGet provider now?

[Y] Yes  [N] No  [S] Suspend  [?] Help (default is "Y"): y

Untrusted repository

You are installing the modules from an untrusted repository. If you trust this repository, change its InstallationPolicy value by running the Set-PSRepository cmdlet. Are you sure you want to install the modules from 'PSGallery'?

[Y] Yes  [A] Yes to All  [N] No  [L] No to All  [S] Suspend  [?] Help (default is "N"):
Eventually, I was able to get this to work, but I had to update my PowerShellGet repository first. As you can see from the script below, this also failed.
Read more →When doing modern web development you will probably have to start using NPM sooner, rather than later. Not a big deal of course, since it’s a great addition to the frontend development environment.
However, most NPM packages have quite a bit of dependencies to other packages. All of these dependencies get pulled towards your system also. Still not a big problem as you want a working solution.
The problem arises when you are on a Windows environment, there are a lot of dependencies and you want to delete a project folder on your system. You will stumble across the fact that Windows has a rather low limit on how long a path can be. When all dependencies are loaded, you will probably have some paths which are too long for Windows to handle properly.
This will give you quite a bit of a problem as you can’t delete the folder(s) anymore. One way of solving this is by using PowerShell. By executing the following script you will be able to delete the NPM modules in your project.
ls node_modules | foreach {
	echo $("Deleting module..." + $_.Name)
	& npm rm $_.Name
}
This will iterate through the node_modules folder and remove each module inside it.
Read more →As of late I’ve started using the VMWare products for virtualizing my development environments again as a replacement for Hyper-V.
Today I wanted to access some files of my virtual machine on the host in order to write a blog post on some code I had saved in there. The VMWare disk files are stored as a VMDK file and it’s not possible to mount these type of files in Windows like a VHD file.
In order to mount a VMDK file you’ll need some third party software. Most people tell you to download the VMWare Disk Mount Utility (note the date: 2005-11-29). This probably was a valid solution back in the day, but it appears this software isn’t compatible with the recent versions of the Microsoft Windows operating system.
When installing the VMWare Disk Mount Utility I’m receiving the following event when checking out the event viewer:
Windows Installer installed the product. Product Name: VMware DiskMount Utility. Product Version: 1.00.0000. Product Language: 1033. Manufacturer: VMware, Inc.. Installation success or error status: 1603.
While troubleshooting this error you’ll probably stumble across the following KB article which tells you to set the appropriate security permissions on the Program Files folder. I’ve tried setting these permissions for both the SYSTEM account as the Administrators group, but to no avail. So I think it’s safe to assume this software doesn’t work properly anymore.
Read more →With Windows 10 we’ve gotten a lot of nice little features which help us modifying the theme. There is however 1 option which the team hasn’t implemented (yet). The option to select different wallpapers for all of your connected displays.
I’m working with a triple monitor setup at home and at work most of the time with a dual or also a triple setup. Of course I don’t really need different wallpapers on all of my monitors, but it’s a nice feature.
Luckily we are still able to do this, using the ‘old’ control panel pages which are still available in Windows 10. If you type in the following command inside a Windows Explorer address bar or the Run command window you’ll be able to get there.
control /name Microsoft.Personalization /page pageWallpaper
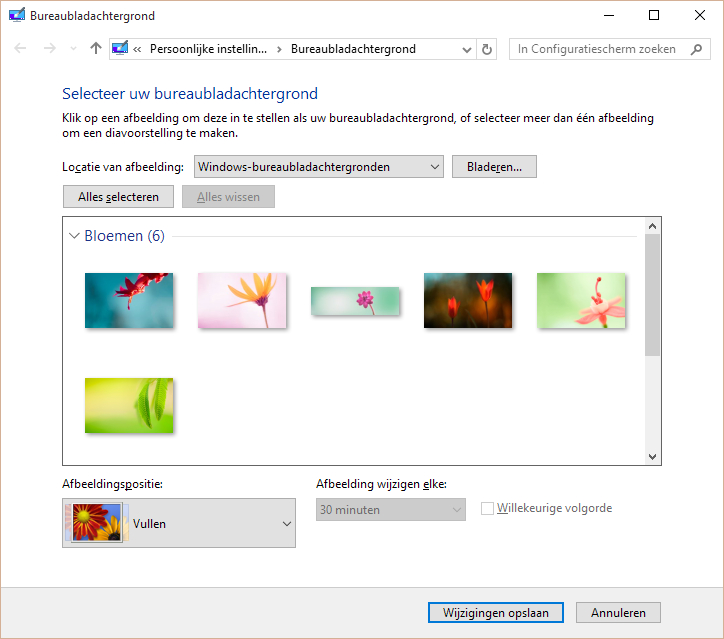
On this screen you are still able to select your wallpaper for every connected display.
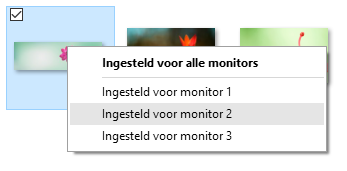
Just a little tip, hope it helps.
Read more →While I was setting up a VPN connection to my Azure Virtual Network I wanted to uncheck the option to use the Default Gateway of the connected network. Normally you’d do this by clicking on the Properties button of the selected protocol.
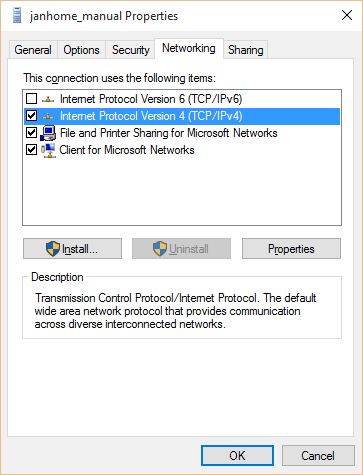
However, there appears to be a bug in Windows 10 and VPN connections for this button which causes the Properties window not to appear.
I have solved this with the help of Todorovic Dragan’s post about this matter. Over there he states you can change the Default Gateway setting manually.
Just navigate to the folder C:\Users\[YourUsername]\AppData\Roaming\Microsoft\Network\Connections\Pbk and open the file rasphone.pbk file in your favourite text editory.
This file contains all configuration settings of your dial-in connections, like VPN’s. Search for the configuration block of your connection. For me it’s [janhome_manual] and change the option IpPrioritizeRemote to 0.
Changing this setting will disable the checkbox for using the gateway of the remote network.
Read more →There are some cool features available in Linux. In an earlier post I already mentioned the apt-get functionality which is now also offered in Windows via Chocolatey. One of the other cool features is being able to execute something in the terminal as an Administrator by specifying sudo in the command.
Lucky for us Windows people, someone has created a tool which is able to do something similar as the Linux sudo-command. The tool is called Elevate and can be downloaded from over here: https://code.kliu.org/misc/elevate/
After you have downloaded the zip-file from the website, copy the appropriate executable to your System32-folder and you are good to go!
By specifying the Elevate command in the command prompt, PowerShell window, Windows Search or Run-window the command will now be executed as an Administrator.
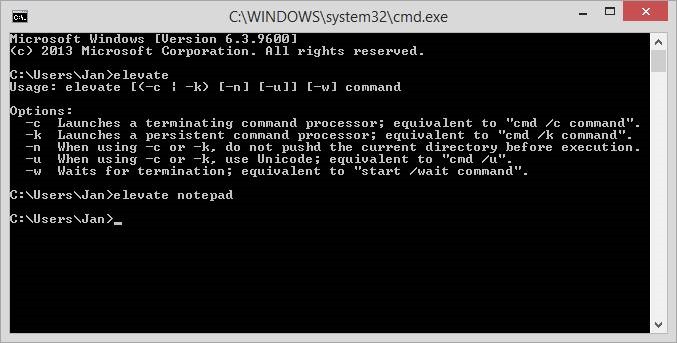
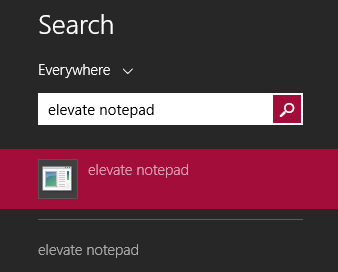
![clip_image002[6]](https://jan-v.nl/Media/Default/Windows-Live-Writer/Doing_D658/clip_image002%5B6%5D.jpg)
Depending on your UAC settings, you are still prompted with the question if you really want to run the application (Notepad) as an Administrator.
I think this functionality could be extremely useful if you want to run specific commands of a script as an Administrator.
Read more →One of my development machines has a dual-boot to a 2008R2 environment via the Boot from VHD technique. This works all quite well, but today I received the message the C-drive was getting a bit full. Most of the time this isn’t much of a problem, just delete some log files, do a disk cleanup, empty the recycle bin and maybe use SpaceMonger to see what’s using up the rest of the space. Also, most of the time there’s about 500MB left free on the disk.
Today was different. Visual Studio wasn’t able to build my solution due to insufficient free disk space on the C-drive. Upon further inspection I saw a total of 0 free bytes were available. After doing the regular cleanup I had a stunning 119MB free on my C-drive. SpaceMonger had already shown me there was a hibernate file on the C-drive which took up 8GB. Quite strange considering I had turned off all of my hibernate options in Windows (I really don’t like hibernating). Also, this hibernate file doesn’t get generated when booting the machine in VMWare Player or VMWare Workstation.
All of my internet sources say you have to run powercfg -h off and reboot to completely remove the file. Problem with that is it gave (and still gives) me the following error:
Read more →Na lange tijd van ontwikkelen in virtuele machines, was ik vandaag ook weer eens bezig op m’n lokale systeem iets te ontwikkelen. Hoewel ik de UAC al eens eerder had uitgeschakeld, kon ik toch niet echt goed m’n werk doen.
Zo kon ik nog steeds niet bestanden van de Windows verkenner naar Visual Studio slepen, had ik niet voldoende rechten om websites in IIS te maken via Visual Studio en nog meer van dat soort dingen.
Wat blijkt, onder de gebruiker instellingen kun je nog wat extra’s configureren voor de beveiliging van je systeem.
Wanneer je naar je account toe gaat in het configuratiescherm, dan krijg je iets te zien wat vergelijkbaar met de volgende afbeelding:

Bij de optie Change User Account settings is ook een slider te zien. Normaal staat deze op het derde niveau van onder. Nu heb ik hem helemaal naar beneden gesleept, zoals hieronder is te zien.
 Na een herstart van het systeem was ik eindelijk een ’echte’ administrator op het systeem. Zonder problemen kan ik nu het hosts bestand aanpassen, websites maken vanuit VS2010, etc.
Wel jammer dat dit noodzakelijk is om een beetje fatsoenlijk te kunnen ontwikkelen op je lokale systeem, maar het is niet anders.
Read more →Nog iets leuks dat ik tegen kwam, is het draaien van Windows XP of Vista op je pocket pc.
Uiteraard draai je het OS niet zelf op de kleine apparaatjes, maar heeft het een skin die er op lijkt.
De theme’s zijn al geschikt voor apparaten vanaf Windows Mobile 2002. Dus iedereen kan ze draaien.
https://www.downloadsquad.com/2007/06/11/how-to-make-windows-mobile-more-like-windows-mobile-minute/
Toch leuk

Read more →