You might remember me writing on how to warm up your App Service instances when moving between slots
. The use of the applicationInitialization-element is implemented on nearly every IIS webserver nowadays and works great, until it doesn’t.
I’ve been working on a project which has been designed, as I’d like to call it, a distributed monolith
. To give you an oversimplified overview, here’s what we have.
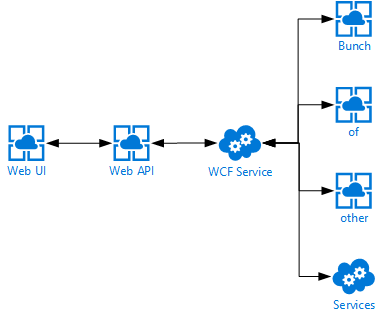
First off we have a single page web application which communicates directly to an ASP.NET Web API, which in turn communicates to a backend WCF service, which in turn also communicates with a bunch of other services. You can probably imagine I’m not very happy with this kind of a design, but I can’t do much about it currently.
One of the problems with this design is having cold-starts whenever a service is being deployed.
Since we’re deploying continuously to test & production there are a lot of cold starts. Using the applicationInitialization-element really helped spinning up our App Services, but we were still facing some slowness whenever the WCF service was being deployed to any of our environments. This service is being deployed to an ‘old-fashioned’ Cloud Service so we figured the applicationInitialization-element should just work as it’s still running on IIS.
Read more →Warming up your web applications and websites is something which we have been doing for quite some time now and will probably be doing for the next couple of years also. This warmup is necessary to ‘spin up’ your services, like the just-in-time compiler, your database context, caches, etc.
I’ve worked in several teams where we had solved the warming up of a web application in different ways. Running smoke-tests, pinging some endpoint on a regular basis, making sure the IIS application recycle timeout is set to infinite and some more creative solutions.
Luckily you don’t need to resort to these kind of solutions anymore. There is built-in functionality inside IIS and the ASP.NET framework. Just add an applicationInitialization-element inside the system.WebServer-element in your web.config file and you are good to go! This configuration will look very similar to the following block.
<system.webServer>

  ...
	<applicationInitialization>
		<add initializationPage="/Warmup" />
  </applicationInitialization>
</system.webServer>
What this will do is invoke a call to the /Warmup-endpoint whenever the application is being deployed/spun up. Quite awesome, right? This way you don’t have to resort to those arcane solutions anymore and just use the functionality which is delivered out of the box.
The above works quite well most of the time.
However, we were noticing some strange behavior while using this for our Azure App Services. The App Services weren’t ‘hot’ when a new version was deployed and swapped. This probably isn’t much of a problem if you’re only deploying your application once per day, but it does become a problem when your application is being deployed multiple times per hour.
Read more →You might remember me writing a post on how you can set up your site with SSL while using Let’s Encrypt and Azure App Services
.
Well, as it goes, the same post applies for Azure Functions. You just have to do some extra work for it, but it’s not very hard.
Simon Pedersen
, the author of the Azure Let’s Encrypt site extension
, has done some work in explaining the steps on his GitHub wiki page
. This page is based on some old screenshots, but it still applies.
The first thing you need to do is create a new function which will be able to do the ACME challenge
. This function will look something like this.
public static class LetsEncrypt
{
    [FunctionName("letsencrypt")]
    public static HttpResponseMessage Run(
        [HttpTrigger(AuthorizationLevel.Anonymous, "get", "post", Route = "letsencrypt/{code}")]
        HttpRequestMessage req,
        string code,
        TraceWriter log)
    {
        log.Info($"C# HTTP trigger function processed a request. {code}");
        var content = File.ReadAllText(@"D:\home\site\wwwroot\.well-known\acme-challenge\" + code);
        var resp = new HttpResponseMessage(HttpStatusCode.OK);
        resp.Content = new StringContent(content, System.Text.Encoding.UTF8, "text/plain");
        return resp;
    }
}
As you can see, this function will read the ACME challenge file from the disk of the App Service it is running on and return the content of it. Because Azure Functions run in an App Service (even the functions in a Consumption plan), this is very possible. The Principal (created in the earlier post) can create these type of files, so everything will work just perfectly.
Read more →It has become increasingly important to have your site secured via some kind of certificate. Even your Google ranking
is affected by it.
The main problem with SSL/TLS certificates is the fact most of them cost money. Now, I don’t have any problem with paying some money for something like a certificate, but it will cost quite a lot if I want to set this up for all of my sites & domains. In theory it’s possible to create a self-signed certificate
and publish your site with it, but that’s not a very good idea as there’s no one who trusts your self-signed certificate besides yourself.
Luckily Mozilla is helping us, poor content-creators, out with their service called Let’s Encrypt. Let’s Encrypt
is a rather new Certificate Authority
which is offering a free, open and automated service to create certificates. Their Getting Started
guide contains some details on how to set this up for your website or hosting provider.
This is all fun and games, but when hosting your site(s) in the Azure App Service ecosystem you can’t do much with the steps defined in the Getting Started guide. At least, I couldn’t make any sense off it.
There’s a developer who has been so kind to create a so called Site extension for an Azure App Service called Azure Let’s Encrypt. It comes in two flavors for both x86 and x64 systems. Depending on which platform you have deployed your site to, you need to activate one corresponding this platform.
Read more →Including a lot of files in your website can impact the performance of your site. Your browser needs to request all those files from the webserver(s) and download them individually. Luckily this fetching is pretty fast and your browser can do multiple requests at once. However, there is a maximum to the number of requests a browser can make, so if you include 100 external files, will probably be (relatively) slow.
I’ve tested this by creating a new MVC 3 web application, copying the Site.css file 12 times and include all of them in the head-element of the page. Below you can see the FireBug
and YSlow
reports for this test page.
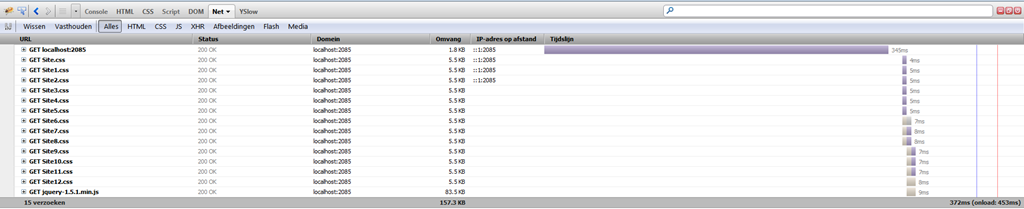
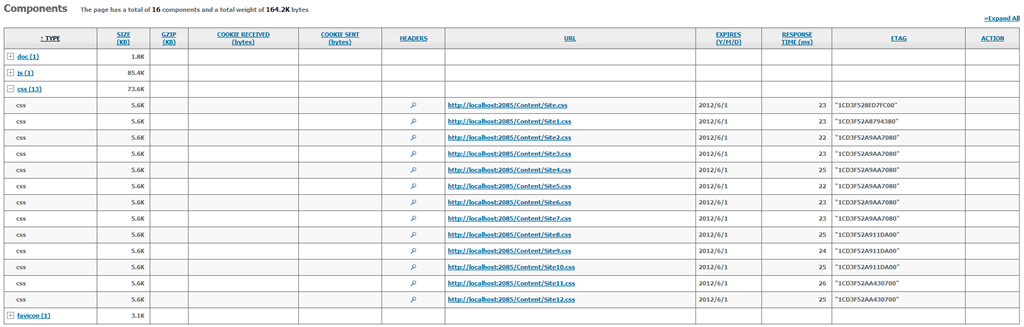
I’ve pressed the Refresh-button several times and came to the conclusion each individual file has a loading time between 5ms and 25ms.
Even though 13x25ms still is pretty fast, you probably understand it’s better to minimize the number of requests, because each request has some overhead and some have to wait for the other to be completed.
To minimize the number of files which need to be included in a website, devigners
often create one huge CSS file and one huge JavaScript file which contains everything needed for the website to work. This way the browser only needs to make 3 requests to load the page, the HTML, the CSS and the JavaScript. An additional request will be made for the JavaScript framework you are using (if any) and some more additional requests will be made to fetch the images of the page you are loading.
Read more →Tijdens het werk zat ik weer eens in een CSS bestand wat wijzigingen aan te brengen. Hier stuitte ik ineens op een regel met
@media screen
{
_css stuff_
}
Zoiets had ik nog nooit gezien en vroeg me dan ook af wat dit betekende. De ontwikkelaar in kwestie wist ook niet meer precies wat dit deed, dus heb ik even gezocht naar dit soort statements.
Blijkbaar kun je in CSS aangeven welk type ‘scherm’ welke stijl moet hebben. Zo kun je bijvoorbeeld voor een projector, beeldscherm, printer en pocket pc hetzelfde CSS-bestand gebruiken, maar met andere waarden. Dit is wel enorm gaaf.
Door bijvoorbeeld dit te gebruiken:
p { color: green; }
@media screen, projection, tv {
  #foo { position: absolute; }
}

@media print {
  #navi { display: none; }
}

@media handheld {
  #foo { position: static; }
}
Heb je de p-tag voor een handheld, printer, scherm, beamer en televisie anders gedefinieerd.
Je moet wel uitkijken dat je geen idioot moeilijke en onoverzichtelijke code aan het maken bent, maar dit biedt toch potenties.
Volledige uitleg is op deze website te vinden https://www.howtocreate.co.uk/tutorials/css/mediatypes/
Behalve de leuke media-types kun je ook nog gebruik maken van een *, # en .-teken.
Het .-teken was bij mij al bekend. Dit heeft volgens mij betrekking op de namen van de klassen.
Read more →