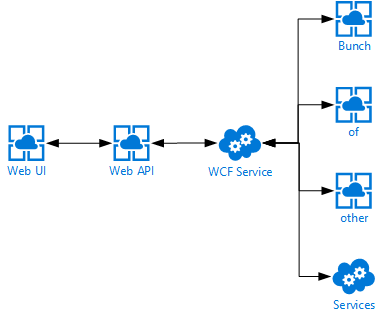
I’ve been working on a project which has been designed, as I’d like to call it, a distributed monolith. To give you an oversimplified overview, here’s what we have.
First off we have a single page web application which communicates directly to an ASP.NET Web API, which in turn communicates to a backend WCF service, which in turn also communicates with a bunch of other services. You can probably imagine I’m not very happy with this kind of a design, but I can’t do much about it currently.
One of the problems with this design is having cold-starts whenever a service is being deployed.
Since we’re deploying continuously to test & production there are a lot of cold starts. Using the applicationInitialization-element really helped spinning up our App Services, but we were still facing some slowness whenever the WCF service was being deployed to any of our environments. This service is being deployed to an ‘old-fashioned’ Cloud Service so we figured the applicationInitialization-element should just work as it’s still running on IIS.
As I mentioned in my earlier post, there are 2 options available to you out of the box for logging. You can either use the TraceWriter or the ILogger. While this is fine when you are doing some small projects or Functions, it can become a problem if you want your Azure Functions to reuse earlier developed logic or modules used in different projects, a Web API for example.
In these shared class libraries you are probably leveraging the power of a ‘full-blown’ logging library. While it is possible to wire up a secondary logging instance in your Azure Function, it’s better to use something which is already available to you, like the ILogger or the TraceWriter.
I’m a big fan of the log4net logging library, so this post is about using log4net with Azure Functions. As it goes, you can apply the same principle for any other logging framework just the implementation will be a bit different.
Creating an appender
One way to extend the logging capabilities of log4net is by creating your own logging appender. You are probably already using some default file appender or console appender in your projects. Because there isn’t an out-of-the-box appender for the ILogger, yet, you have to create one yourself.
Warming up your web applications and websites is something which we have been doing for quite some time now and will probably be doing for the next couple of years also. This warmup is necessary to ‘spin up’ your services, like the just-in-time compiler, your database context, caches, etc.
I’ve worked in several teams where we had solved the warming up of a web application in different ways. Running smoke-tests, pinging some endpoint on a regular basis, making sure the IIS application recycle timeout is set to infinite and some more creative solutions.
Luckily you don’t need to resort to these kind of solutions anymore. There is built-in functionality inside IIS and the ASP.NET framework. Just add an applicationInitialization-element inside the system.WebServer-element in your web.config file and you are good to go! This configuration will look very similar to the following block.
What this will do is invoke a call to the /Warmup-endpoint whenever the application is being deployed/spun up. Quite awesome, right? This way you don’t have to resort to those arcane solutions anymore and just use the functionality which is delivered out of the box.
The above works quite well most of the time.
However, we were noticing some strange behavior while using this for our Azure App Services. The App Services weren’t ‘hot’ when a new version was deployed and swapped. This probably isn’t much of a problem if you’re only deploying your application once per day, but it does become a problem when your application is being deployed multiple times per hour.
The first thing you need to do is create a new function which will be able to do the ACME challenge. This function will look something like this.
publicstaticclassLetsEncrypt{
[FunctionName("letsencrypt")]publicstatic HttpResponseMessage Run(
[HttpTrigger(AuthorizationLevel.Anonymous, "get", "post", Route = "letsencrypt/{code}")] HttpRequestMessage req,
string code,
TraceWriter log)
{
log.Info($"C# HTTP trigger function processed a request. {code}");
var content = File.ReadAllText(@"D:\home\site\wwwroot\.well-known\acme-challenge\" + code);
var resp = new HttpResponseMessage(HttpStatusCode.OK);
resp.Content = new StringContent(content, System.Text.Encoding.UTF8, "text/plain");
return resp;
}
}
As you can see, this function will read the ACME challenge file from the disk of the App Service it is running on and return the content of it. Because Azure Functions run in an App Service (even the functions in a Consumption plan), this is very possible. The Principal (created in the earlier post) can create these type of files, so everything will work just perfectly.
(Almost) No one likes writing code meant to store data to a repository, queues, blobs. Let alone triggering your code when some event occurs in one of those areas. Luckily for us the Azure Functions team has decided to use bindings for this. By leveraging the power of bindings, you don’t have to write your own logic to store or retrieve data. Azure Functions provides all of this functionality out of the box!
Bindings give you the possibility to retrieve data (strong-typed if you want) from HTTP calls, blob storage events, queues, CosmosDB events, etc. Not only does this work for input, but also for output. Say you want to store some object to a queue or repository, you can just use an output binding in your Azure Function to make this happen. Awesome, right?
Most of the documentation and blogposts out there state you should define your bindings in a file called function.json. An example of these bindings is shown in the block below.
The above sample specifies an input binding for a Queue and an output binding for a some Table Storage. While this works perfectly, it’s not the way you want to implement this when using C# (or F# for that matter), especially if you are using Visual Studio!
In the past couple of years the software industry has come a long way in professionalizing the development environment. One of the things which has improved significantly is automating the builds and being able to continuously deploy software.
Having a continuous integration and -deployment environment is the norm nowadays, which means I (and probably you as a reader also) want to have this when creating Azure Functions also!
There are dozens of build servers and deployment tools available, but because Azure Functions are highly likely being deployed in Microsoft Azure, it makes sense to use Visual Studio Team Services with Release Management. I’m not saying you can’t pull this off with any of the other deployment environment, but for me it doesn’t make sense because I already have a VSTS environment and this integrates quite well.
In order for you to deploy your Function App, the first thing you have to make sure is to have an environment (resource group) in your Azure subscription to deploy to. It is advised to use ARM templates for this. There is one big problem with ARM templates though, I genuinely dislike ARM templates. It’s something about the JSON, the long list of variables and ‘magic’ values you have to write down all over the place.
Lately, I’ve been busy learning more about creating serverless solutions. Because my main interest lies within the Microsoft Azure stack I surely had to check out the Azure Functions offering.
Azure Functions enable you to create a serverless solutions which are completely event-based. As it’s located within the Azure space, you can integrate easily with all of the other Azure services, like for example the service bus, Cosmos DB, storage, but also external services like SendGrid and GitHub!
All of these integrations are fine and all, but seeing Azure Functions perform in action is still easiest with regular HTTP triggers. You can just navigate with a browser (or Postman) to a URL and your function will be activated immediately. I guess most people will create these kind of functions in order to learn to work with them, at least that’s what I did.
Creating your Azure Functions App
In order to create Azure Functions, you first have to create a so called Function App in the Azure Portal. Creating such an app is quite easy, the only thing you have to think about is which type of Hosting Plan you want to use. At this time there are 2 options, the Consumption Plan or the App Service Plan.
You’ve probably heard a lot of talk around a new buzzword serverless. It’s a pretty confusing name for an awesome technology/technique.
The main reason the word serverless isn’t a very good one is because it implies there aren’t any servers when using this technique. I found a fairly funny CommitStrip about this topic.
Well, it means you don’t have to worry about servers anymore. You just upload your software to the cloud provider of your choice and it runs on-demand/by-request. As Mark Russinovich said in an interview with InfoWorld _“I don’t have to worry about the servers. The platform gives me the resources as I need them.”. _Of course the hardware, operating system, webserver, firewall, etc. is all still there, but as a developer and operational person you don’t really have to care about it.
Isn’t this the same as PaaS from a couple of years ago?
The answer is: Yes and no!
Yes, there are a lot of similarities and the serverless offerings from each cloud provider are based upon their current PaaS offerings. Therefore, you could call it an evolution of PaaS.
There are dozens of blog posts, articles and books talking about microservices. Some of them talk about the design, other on how to implement and even others talk about why and when to use them.
This post will be a combination of them all. I won’t claim to be the all-time-expert on the matter, but I have read quite a bit on the subject, attended some talks and have had the honor to design (and implement) such a solution a couple of years ago.
First and foremost, it’s important to understand a microservices design is just another standard architectural design pattern. This pattern can help you to create a high-performance, scalable software solution, but it can also bankrupt your company!
The short explanation
If you don’t have much time to read, or don’t really want to, here’s the elevator pitch for microservices:
It’s a set of small (independent) services, each of them able to carry out their own (functional/business) responsibility without having direct dependencies to other services.
The long explanation
Of course, such a short explanation is a bit short, to say the least.