When working in Azure, storing secrets in Key Vault is a good idea. And to make it better, there’s the Key Vault Reference notation. This feature makes sure no one can read the secret(s) unless someone grants permission.
For storing configuration, values a different service is available, called Azure App Configuration.
Both services are excellent for storing & sharing the values of your cloud services.
Wouldn’t it be great to be able to combine the two? What I mean by that is to use Key Vault references inside your App Configuration. Well, you can!
There is some work involved as you need to set up access to Key Vault from within the application.
Key Vault References in App Configuration
If you’re using the Azure Portal, it’s easy to add a new Key Vault reference in the App Configuration.
Head to the Configuration Explorer and press the Create button.
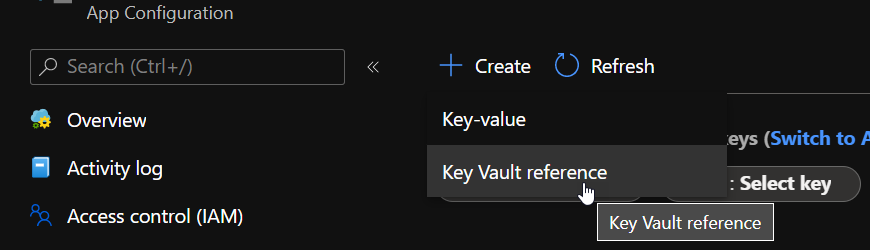
It will bring a small blade to the side of the screen from which you can add the secret with an appropriate name.
Having finished this, press the Apply button, and you’ll see the reference added and visible in the Configuration Manager.
Read more →A couple of weeks ago, I was tasked to implement authentication between the services we have in our Azure landscape. I knew this can be done by using the Managed Identity, as we were doing this on a project I was involved with in the past.
However, I had never actually done this myself. Most of the time the System Administrators were configuring everything and I just had to copy-paste some Guids in a configuration file. After doing some digging into the matter, it was a bit harder to set this up as I had expected at the start.
Lucky for me, Joonas Westlin has some excellent posts on the matter which have helped me enormously. He was also able to help me out on Stack Overflow when I was stuck and couldn’t find out why the authentication wasn’t working correctly.
Much of what I’ll be writing down here will be similar to Joonas his posts on the matter. I’ll be using some different wording.
The posts I’ve used to learn this stuff were:
I started working on some internal web applications for a customer. For these types of applications, it makes a lot of sense to use Azure Active Directory to authenticate users and use their AAD groups/roles to authorize them on specific pages.
I wanted to authorize users by the AAD groups they are placed in. Some users can access Production data, while others are only allowed to access data from the Test environment, all based on the groups they are in. Because this is already configured by our system administrators, I want to use these groups for my application(s) also.
This sounds easy enough, and it is, but you have to do some manual work in Azure Active Directory to make this possible. It took me too much time for my liking, so I hope this post helps others (and myself) in the future.
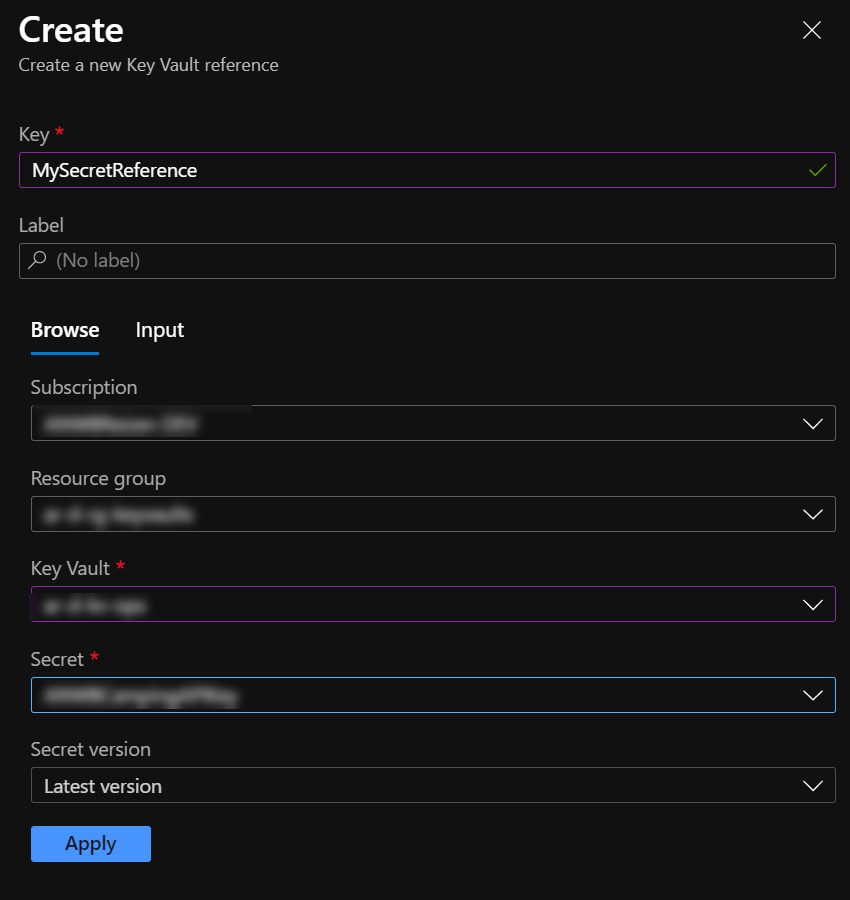
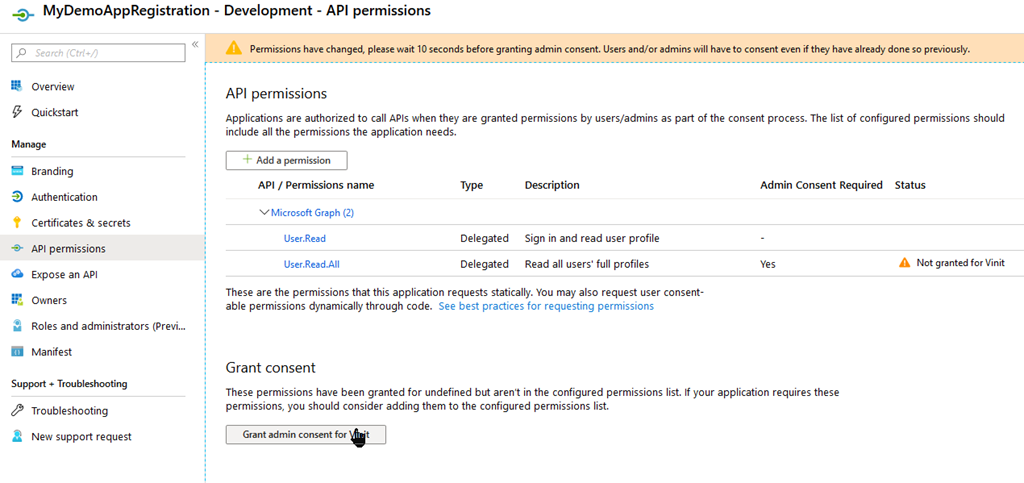
One of the first things you need to do is create a new App Registration in the AAD and give it permission to User.Read.All to read the users’ claims.
This requires consent from your Administrator, so make sure they are available or you have enough permissions yourself to do this.
When this is set up correctly, head to the Manifest blade.
Read more →Being able to create Message Cards or Actionable Messages in Microsoft Teams via a Logic App or an Azure Function is great. Especially if you can use this to invoke logic on your API and update the message in the Teams channel.
However, you don’t want everyone to invoke a management API endpoint you’ve exposed to ‘do stuff’ in your cloud environment. Normally, you’d want to authenticate if the user pressing the button (read: invoking the endpoint).
Lucky for us, this is very doable when invoking the endpoint via a Teams MessageCard/Actionable Message.
The token
Because Microsoft Teams is part of the Office 365 suite, you will be logged in as a user on the tenant. Therefore, the software has a user context and is able to pass this along to your API via a JWT Bearer token.
If you log in to the web client of Microsoft Teams (https://teams.microsoft.com) with your favorite browser you’ll be able to find the token which belongs to you.
In order to test this, I’ve created a new MessageCard in my Teams channel with 1 potentialAction which will invoke an Azure Function.
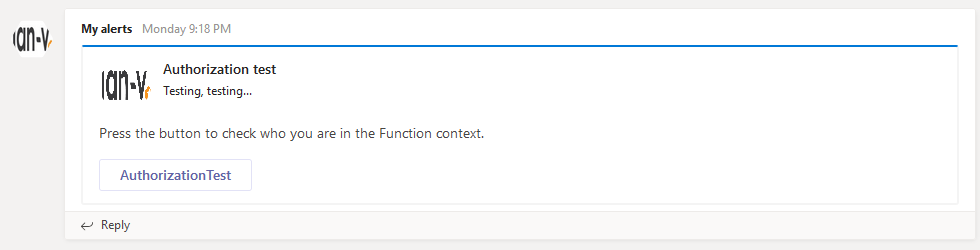
If you open up the network tab of your browser’s Developer Tools and press the AuthorizationTest button you’ll see the request is made to a Teams endpoint called executeAction with a bearer token in the Authorization header.
Read more →In my latest post, I’ve shown you how you can use Azure Functions in your Microsoft Teams flow to handle errors in your environment. This stuff works great in a couple of projects I’ve worked on, but what would be even more awesome is to reply to a message in Teams when an action has completed after a button is pressed.
Well, replying & modifying the original message with a status update is quite possible and I’ll show you how in this post.
How do I send a reply to Microsoft Teams?
In the image below you can see a message having posted on my Teams channel and a reply is posted.
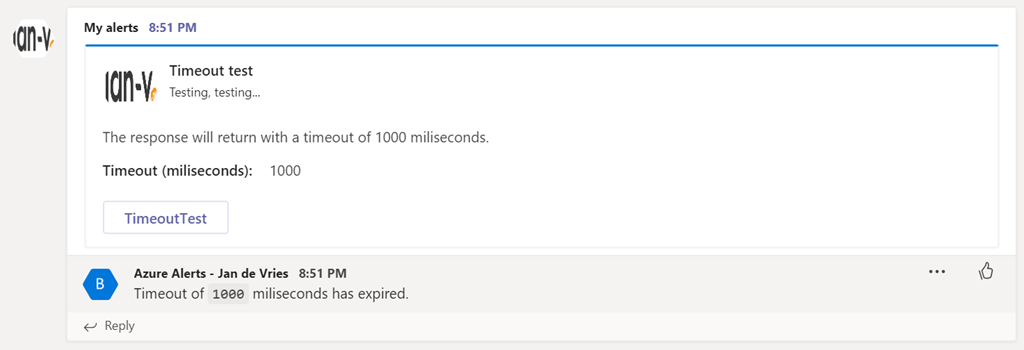
This reply has been sent from my Azure Function. If you want to do this, you need to send a HttpResponseMessage with a status code 200 and a specific header value. This header value is CARD-ACTION-STATUS and the value will be the message which you will see in the reply.
The code for this will look something similar to the following.
public static async Task<HttpResponseMessage> Run(
	[HttpTrigger(AuthorizationLevel.Function, "post", Route = null)] HttpRequest req,
	ILogger log)
{
	// Do your stuff...

	var result = new HttpResponseMessage
	{
		Headers =
		{
			{ "CARD-ACTION-STATUS", $"Timeout of `{request.Timeout}` miliseconds has expired."},
		},
		StatusCode = HttpStatusCode.OK
	};


	return result;
}
That’s all there is to it in order to send a single reply to your message.
Read more →There’s a relative new feature available in Azure called Managed Service Identity. What it does is create an identity for a service instance in the Azure AD tenant, which in its turn can be used to access other resources within Azure. This is a great feature, because now you don’t have to maintain and create identities for your applications by yourself anymore. All of this management is handled for you when using a System Assigned Identity. There’s also an option to use User Assigned Identities which work a bit different.
Because I’m an Azure Function fanboy and want to store my secrets within Azure Key Vault, I was wondering if I was able to configure MSI via an ARM template and access the Key Vault from an Azure Function without specifying an identity by myself.
As most of the things, setting this up is rather easy, once you know what to do.
The ARM template
The documentation states you can add an identity property to your Azure App Service in order to enable MSI.
"identity": {
    "type": "SystemAssigned"
}
This setting is everything you need in order to create a new service principal (identity) within the Azure Active Directory. This new identity has the exact same name as your App Service, so it should be easy to identify.
Read more →As I mentioned in my earlier post, there are 2 options available to you out of the box for logging. You can either use the TraceWriter or the ILogger. While this is fine when you are doing some small projects or Functions, it can become a problem if you want your Azure Functions to reuse earlier developed logic or modules used in different projects, a Web API for example.
In these shared class libraries you are probably leveraging the power of a ‘full-blown’ logging library. While it is possible to wire up a secondary logging instance in your Azure Function, it’s better to use something which is already available to you, like the ILogger or the TraceWriter.
I’m a big fan of the log4net logging library, so this post is about using log4net with Azure Functions. As it goes, you can apply the same principle for any other logging framework just the implementation will be a bit different.
Creating an appender
One way to extend the logging capabilities of log4net is by creating your own logging appender. You are probably already using some default file appender or console appender in your projects. Because there isn’t an out-of-the-box appender for the ILogger, yet, you have to create one yourself.
Read more →Using certificates to secure, sign and validate information has become a common practice in the past couple of years. Therefore, it makes sense to use them in combination with Azure Functions as well.
As Azure Functions are hosted on top of an Azure App Service this is quite possible, but you do have to configure something before you can start using certificates.
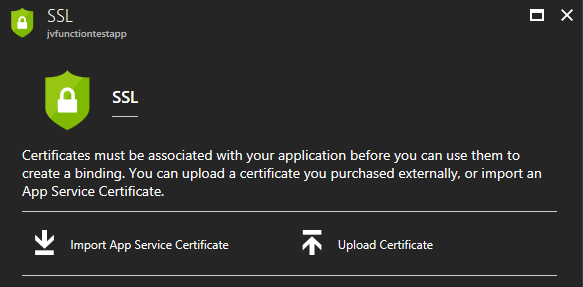
Adding your certificate to the Function App
Let’s just start at the beginning, in case you are wondering on how to add these certificates to your Function App. Adding certificates is ‘hidden’ on the SSL blade in the Azure portal. Over here you can add SSL certificates, but also regular certificates
Keep in mind though, if you are going to use certificates in your own project, please just add them to Azure Key Vault in order to keep them secure. Using the Key Vault is the preferred way to work with certificates (and secrets).
For the purpose of this post I’ve just pressed the Upload Certificate-link, which will prompt you with a new blade from which you can upload a private or public certificate.
![clip_image001[4]](https://jan-v.nl/files/8047a43c-7dd3-4c73-8f80-f76e0789deb4.png)
You will be able to see the certificate’s thumbprint, name and expiration date on the SSL blade if it has been added correctly.
Read more →You might remember me writing a post on how you can set up your site with SSL while using Let’s Encrypt and Azure App Services.
Well, as it goes, the same post applies for Azure Functions. You just have to do some extra work for it, but it’s not very hard.
Simon Pedersen, the author of the Azure Let’s Encrypt site extension, has done some work in explaining the steps on his GitHub wiki page. This page is based on some old screenshots, but it still applies.
The first thing you need to do is create a new function which will be able to do the ACME challenge. This function will look something like this.
public static class LetsEncrypt
{
    [FunctionName("letsencrypt")]
    public static HttpResponseMessage Run(
        [HttpTrigger(AuthorizationLevel.Anonymous, "get", "post", Route = "letsencrypt/{code}")]
        HttpRequestMessage req,
        string code,
        TraceWriter log)
    {
        log.Info($"C# HTTP trigger function processed a request. {code}");
        var content = File.ReadAllText(@"D:\home\site\wwwroot\.well-known\acme-challenge\" + code);
        var resp = new HttpResponseMessage(HttpStatusCode.OK);
        resp.Content = new StringContent(content, System.Text.Encoding.UTF8, "text/plain");
        return resp;
    }
}
As you can see, this function will read the ACME challenge file from the disk of the App Service it is running on and return the content of it. Because Azure Functions run in an App Service (even the functions in a Consumption plan), this is very possible. The Principal (created in the earlier post) can create these type of files, so everything will work just perfectly.
Read more →(Almost) No one likes writing code meant to store data to a repository, queues, blobs. Let alone triggering your code when some event occurs in one of those areas. Luckily for us the Azure Functions team has decided to use bindings for this.
By leveraging the power of bindings, you don’t have to write your own logic to store or retrieve data. Azure Functions provides all of this functionality out of the box!
Bindings give you the possibility to retrieve data (strong-typed if you want) from HTTP calls, blob storage events, queues, CosmosDB events, etc. Not only does this work for input, but also for output. Say you want to store some object to a queue or repository, you can just use an output binding in your Azure Function to make this happen. Awesome, right?
Most of the documentation and blogposts out there state you should define your bindings in a file called function.json. An example of these bindings is shown in the block below.
{
  "bindings": [
    {
      "name": "order",
      "type": "queueTrigger",
      "direction": "in",
      "queueName": "myqueue-items",
      "connection": "MY_STORAGE_ACCT_APP_SETTING"
    },
    {
      "name": "$return",
      "type": "table",
      "direction": "out",
      "tableName": "outTable",
      "connection": "MY_TABLE_STORAGE_ACCT_APP_SETTING"
    }
  ]
}
The above sample specifies an input binding for a Queue and an output binding for a some Table Storage. While this works perfectly, it’s not the way you want to implement this when using C# (or F# for that matter), especially if you are using Visual Studio!
Read more →