When implementing a sharding solution, you will need something which knows in what shard a specific shardlet exists. This is something you will want to store in a single location, so you know for sure you are always using the most recent information. When using the Elastic Scale libraries this is called the Shard Map Manager. The Shard Map Manager keeps track of the location & state of the shardlets and shards. As you can imagine this is quite an important aspect of the sharding solution.
In a perfect world you will generate the Shard Map Manager (SMM) once, telling it which which shardlets reside in a specific shard and never update it again. Since the Shard Map Manager only exists in one location and hardly ever changes, it’s a great candidate for caching. This is why the Elastic Scale libraries are making sure the content of the Shard Map Manager is cached right after the first call to the database. This way the latency between the SMM and the remote location will only be hit once, after this first call it will be in-memory of the invoking location.
In the real world however, the SMM will get some changes from time to time. For example, if you are sharding by continent you might decide you want to narrow them down a bit by changing US to West US and East US. When sharding with ranges (0..100, 100..200, etc.) you might have to add some new ranges from time to time.
Read more →These days we all want to build the next big thing which will be deployed across the world. This of course is all fun and games, but there are also some technical difficulties you have to overcome when creating a software platform which has to be available from everywhere in the world with a responsive interface.
One of these difficulties you will have to face is getting the required data near your customers. Most of the time we are using a database to store this data for us. In the traditional form, this will likely be an on-premise database somewhere in a datacenter (with all disaster recovery aspects in place of course). Note, I’m talking about the traditional relational databases over here, but most of it will also apply on the non-relational databases.
In order to deploy your software globally, the data has to move with it. It doesn’t make much sense to deploy your software solution in a datacenter on the other side of the world when all data still remains far away, because the latency will slow down the experience. There are of course multiple solutions you can think off to solve this problem, one of them is to use sharding in your database.
Read more →For our automated deployments we have several Azure Organizational accounts in place. These are created within the Azure Active Directory.
Because these accounts are meant for services, we don’t want them to inherit the default password policy for renewing their passwords every X days. Lucky for us, you can configure this via PowerShell. A short how-to is written on MSDN.
The thing that isn’t written (or referenced) over there is how to run the MSOL cmdlets.
I kept getting the messages The term 'Set-MsolUser' is not recognized. By searching a bit on this error I found a thread on the Office365 community forums where someone mentioned the “Microsoft Online Service Module for Windows PowerShell”. This set me off to searching in the right direction. Apparently you need to install a (new/extra) PowerShell module on your system in order to use the MSOL cmdlets. These cmdlets are part of the Office365 and Exchange Online services. A page with download links is provided by Microsoft Support. They provide a link to the Microsoft Online Service Sign-in Assistant for IT Professionals and the Azure Active Directory Module for Windows PowerShell (32-bit and 64-bit).
Once installed, you are finally able to use the MSOL cmdlets. Keep in mind though, you have to connect to the MSOL services first using the connection cmdlet.
Read more →While creating the PowerShell scripts for automatic deployment of the project’s Azure environment I discovered there are multiple Azure PowerShell modules.
When you want to manage a single resource, such as storage accounts, websites, databases, virtual machines, and media services, you need the (default) Azure module. However, when you need to manage resource groups, you will need the AzureResourceManager module.
This is useful information if you want to deploy new Azure websites with a specific hosting plan, like Basic or Standard. To create such websites the command Get-AzureResourceGroup is necessary. If you use PowerShell ISE you will notice this command isn’t available. In order to make this command available, run the following:
Switch-AzureMode AzureResourceManager
Doing so will activate the AzureResourceManager module and you will have a couple of different commands available.
If you want to see which commands are available within this module, run this command:
Get-Command -Module AzureResourceManager | Get-Help | Format-Table Name, Synopsis
Switching back to the ’normal’ Azure module is also very easy. You just need to switch back to the different AzureMode again.
Switch-AzureMode -Name AzureServiceManagement
After switching back, all your normal commands are back again.
Keep in mind, if you need both modules, you need to switch between the AzureModes in your script also!
Read more →There are quite a couple of Azure cmdlets made available by Microsoft. All of this sweetness can be installed on your system via the Web Platform Installer. After installing these modules you can start managing your Azure subscription in PowerShell scripts.
Most of the stuff for managing your Azure subscription is implemented in these Azure cmdlets. One of the things which isn’t implemented (yet) is managing the Service Busses in your subscription. It is possible to add, delete and get a new Service Bus namespace with the New-AzureSBNamespace, Remove-AzureSBNamespace and Get-AzureSBNamespace cmdlets, but that’s all you get. You will probably understand, this isn’t enough if you want to deploy your complete environment via a PowerShell script.
Luckily for us we have the ability to use all of the .NET libraries and assemblies on your system. When you search online you will probably find some articles describing how to create service bus queues in C# by using the NamespaceManager. I’ve written some PowerShell which uses this class and creates queues in your subscription.
#First, create a new service bus namespace. This doesn't return the newly created object
New-AzureSBNamespace -Name $servicebusNamespace -Location $locationWestEUDataCenter -CreateACSNamespace $true
#Get the newly created service bus namespace, so we can do stuff with the information.
$azureServicebus = Get-AzureSBNamespace -Name $servicebusNamespace

#We need a tokenprovider for proper credentials
$tokenProvider = [Microsoft.ServiceBus.TokenProvider]::CreateSharedSecretTokenProvider("owner", $azureServicebus.DefaultKey)
#The uri of the namespace
$namespaceUri = [Microsoft.ServiceBus.ServiceBusEnvironment]::CreateServiceUri("sb", $servicebusNamespace, "");
#Now we can finally crate a NamespaceManger which has the power to create new queues.
$namespaceManager = New-Object Microsoft.ServiceBus.NamespaceManager $namespaceUri,$tokenProvider

Write-Host "Creating the queues" -ForegroundColor Green -BackgroundColor Black
#Creating the queues should work by now.
$namespaceManager.CreateQueue($nameOfTheServiceBusQueue)
If you want to start over, you can just delete the complete namespace and run the script again. This can be done with the following command.
Read more →For quite a couple of years now, the SQL Data Sync software has been available to synchronize data between MS SQL Server databases. This SQL Data Sync however has been decommissioned and we have to resort to the the (new) SQL Data Sync (Preview) nowadays.
SQL Data Sync is a solution/feature which allows you to synchronize data between several SQL (Azure) databases. The best thing is, you don’t have to synchronize your complete database. You can choose which tables and columns need to be synchronized. This is a very nice feature if you have, for example, your database scaled out in multiple regions of the world and some of the data has to be kept in sync.
The new SQL Data Sync has been made available through the Azure management portal. When navigating to the SQL Databases tab you will have an option available to Add Sync, which will create a new SQL Data Sync group_._
For the purpose of this post I have created 2 databases, one located in West Europe and one located in East US.
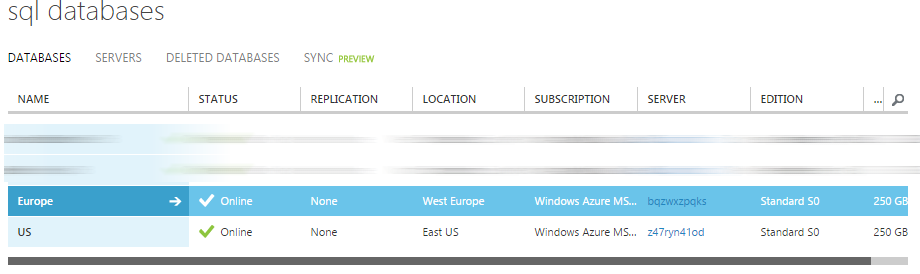
To keep them synchronized I’ve added a new Sync Group via the portal.
When creating the sync group, you have to specify which database will operate as the Hub. Basically this means which database will be the master. It’s also possible to select the conflict resolution in this step. The default value is Hub Wins, but you can also specify the client should win in case of a conflict.
Read more →Sometimes you’re hired by a company which is a bit rigorous on blocking outgoing communication. A security consultant would probably agree on this practice, but most developers won’t. Nowadays a lot of services in the cloud operate on different ports. Azure services don’t always operate on port 80 and 443, hosted noSQL providers have connection strings with (seemingly) random ports, etc. It’s not always easy to get approval to open ports in the company firewall, especially if you’re doing some tests and proof of concept projects. A way to get around this policy is to create a virtual machine in Azure.
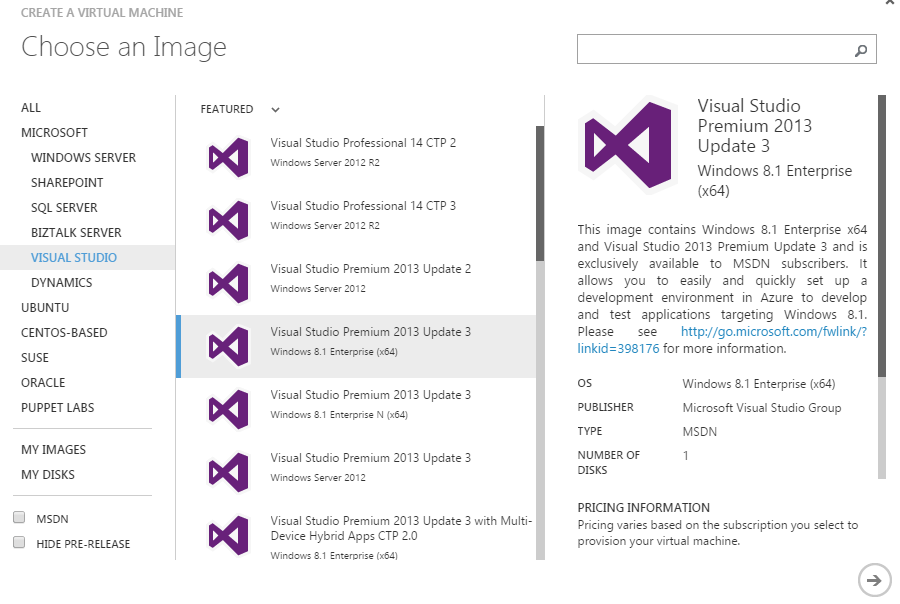
When you choose to create a new virtual machine from the gallery you can create an image with Visual Studio pre-installed on it. Even the latest versions are available!
After completing the wizard you’ll have to wait a few minutes for the machine to spin up.
Don’t be happy just yet. When you try to connect to the machine, you’ll probably get a timeout or some other connection problem. This is because the configured RDP port is probably also blocked by your company firewall. A way to fix this is to set the public RDP port to 80 or 443 (which company would block normal HTTP(S) traffic?). This setting can be configured on the Endpoints tab of the virtual machine.
Read more →At the moment I’m working on a (Orchard) project which is deployed to Windows Azure and uses a SQL Azure database. As my team needed to fix some issues which occurred in the Acceptance and Production environment, I wanted to get a recent database dump so we would be able to reproduce the issues on the development machines.
I couldn’t find an easy way to synchronize the databases or create a backup which I could restore. After doing some extensive searching I discovered there is a way you can restore a SQL Azure database to a local SQL Server 2012 environment.
To do this, you have to create an export in the Azure Management portal and import this export into your SQL Server 2012. I’ll describe the necessary steps below.
First, head to the Azure Management portal and go to the Database tab. On this screen you’ll see the option Export the database at the bottom of the screen.
Clicking on this button pops up a modal dialog. In this dialog you need to specify the name of the export, a bacpac file, which storage account you’ll use, container to save the file and the login credentials of the database.
Read more →