The default Azure Functions runtime comes with quite a lot of bindings and triggers which enable you to create a highly scalable solution within the Azure environment. You can connect to service buses, storage accounts, Event Grid, Cosmos DB, HTTP calls, etc.
However, sometimes this isn’t enough.
That’s why the Azure Functions team has released functionality which enables you to create your own custom bindings. This should make it easy for you to read and write data to any service or location you need to, even if it’s not supported out of the box.
There is some documentation available on how to create a custom binding at this time and even a nice sample on GitHub to get you started. The thing is this documentation and samples are written for Version 1 of the Azure Functions runtime. If you want to use custom bindings in Azure Functions V2, you need to do some additional stuff. There are still changes being made on this subject, so it’s quite possible the current workflow will be broken in the future.
For this post, I’ve created a sample binding which is capable of reading data from a local disk. Nothing fancy and definitely not something you want in production, but it’s easy to test and shows you how the stuff has to be set up.
Read more →You might have noticed I’ve been doing quite a bit of stuff with ARM templates as of late. ARM templates are THE way to go if you want to deploy your Azure environment in a professional and repeatable fashion. Most of the time these templates get deployed in your Release pipeline to the Test, Acceptance or Production environment. Of course, I’ve set this up for all of my professional projects along with my side projects. The thing is, when using the Hosted VS2017 build agent, it can take a while to complete both the Build and Release job via VSTS Azure DevOps.
Being a reformed SharePoint developer, I’m quite used to waiting on the job. However, waiting all night to check if you didn’t create a booboo inside your ARM template is something which became quite boring, quite fast.So what else can you do?
Well, you can do some PowerShell!
The Azure PowerShell cmdlets offer quite a lot of useful commands in order to manage your Azure environment.One of them is called New-AzureRmResourceGroupDeployment.
According to the documentation, this command will “Adds an Azure deployment to a resource group.”. Exactly what I want to do, most of the time.So, how to call it? Well, you only have to specify the name of your deployment, which resource group you want to deploy to and of course the ARM template itself, along with the parameters file.
Read more →Azure Functions are great! HTTP triggered Azure Functions are also great, but there’s one downside. All HTTP triggered Azure Functions are publicly available. While this might be useful in a lot of scenario’s, it’s also quite possible you don’t want ‘strangers’ hitting your public endpoints all the time.
One way you can solve this is by adding a small bit of authentication on your Azure Functions.
For HTTP Triggered functions you can specify the level of authority one needs to have in order to execute it. There are five levels you can choose from. It’s Anonymous, Function, Admin, System and User. When using C# you can specify the authorization level in the HttpTrigger-attribute, you can also specify this in the function.json file of course. If you want a Function to be accessed by anyone, the following piece of code will work because the authorization is set to Anonymous.
[FunctionName("Anonymous")]
public static HttpResponseMessage Run(
    [HttpTrigger(AuthorizationLevel.Anonymous, "get", Route = null)]
    HttpRequestMessage req,
    ILogger logger)
{
    // your code
    return req.CreateResponse(HttpStatusCode.OK);
}
If you want to use any of the other levels, just change the AuthorizationLevel enum to any of the other values corresponding to the level of access you want. I’ve created a sample project on GitHub containing several Azure Functions with different authorization levels so you can test out the difference in the authorization levels yourself. Keep in mind, when running the Azure Functions locally, the authorization attribute is ignored and you can call any Function no matter which level is specified.
Read more →As it happens, I started implementing some new functionality on a project. For this functionality, I needed an Azure Storage Account with a folder (containers) inside. Because it’s a project not maintained by me, I had to do some searching on how to create such a container in the most automated way, because creating containers in storage account isn’t supported. That is, until recently!
In order to create a container inside a storage account, you only have to add a new resource to it. Quite easy, once you know how to do it.
First, let’s start by creating a new storage account.
{
    "name": "[parameters('storageAccountName')]",
    "type": "Microsoft.Storage/storageAccounts",
    "apiVersion": "2018-02-01",
    "location": "[resourceGroup().location]",
    "kind": "StorageV2",
    "sku": {
        "name": "Standard_LRS",
        "tier": "Standard"
    },
    "properties": {
        "accessTier": "Hot"
    }
}
Adding this piece of JSON to your ARM template will make sure a new storage account is created with the specified settings and parameters. Nothing fancy here if you’re familiar with creating ARM templates.
Now for adding a container to this storage account! In order to do so, you need to add a new resource of the type blobServices/containers to this template.
{
    "name": "[parameters('storageAccountName')]",
    "type": "Microsoft.Storage/storageAccounts",
    "apiVersion": "2018-02-01",
    "location": "[resourceGroup().location]",
    "kind": "StorageV2",
    "sku": {
        "name": "Standard_LRS",
        "tier": "Standard"
    },
    "properties": {
        "accessTier": "Hot"
    },
    "resources": [{
        "name": "[concat('default/', 'theNameOfMyContainer')]",
        "type": "blobServices/containers",
        "apiVersion": "2018-03-01-preview",
        "dependsOn": [
            "[parameters('storageAccountName')]"
        ],
        "properties": {
            "publicAccess": "Blob"
        }
    }]
}
Deploying this will make sure a container is created with the name theNameOfMyContainer inside the storage account. You can even change the permission to this container. The default is None, but this can be changed to Blob in order to get file access or Container if you want people to be able to access the container itself.
Read more →There’s a relative new feature available in Azure called Managed Service Identity. What it does is create an identity for a service instance in the Azure AD tenant, which in its turn can be used to access other resources within Azure. This is a great feature, because now you don’t have to maintain and create identities for your applications by yourself anymore. All of this management is handled for you when using a System Assigned Identity. There’s also an option to use User Assigned Identities which work a bit different.
Because I’m an Azure Function fanboy and want to store my secrets within Azure Key Vault, I was wondering if I was able to configure MSI via an ARM template and access the Key Vault from an Azure Function without specifying an identity by myself.
As most of the things, setting this up is rather easy, once you know what to do.
The ARM template
The documentation states you can add an identity property to your Azure App Service in order to enable MSI.
"identity": {
    "type": "SystemAssigned"
}
This setting is everything you need in order to create a new service principal (identity) within the Azure Active Directory. This new identity has the exact same name as your App Service, so it should be easy to identify.
Read more →I’m in the process of adding an ARM template to an open source project I’m contributing to. All of this was pretty straightforward, until I needed to add some secrets and connection strings to the project.
While it’s totally possible to integrate these secrets in your ARM parameter file or in your continuous deployment pipeline, I wanted to do something a bit more advanced and secure. Of course, Azure Key Vault comes to mind! I’ve already used this in some of my other ASP.NET projects and Azure Functions, so nothing new here.
The thing is, the projects I’ve worked on, always retrieved the secrets from Key Vault like the following example:
"adminPassword": {
    "reference": {
        "keyVault": {
        "id": "/subscriptions/<subscription-id>/resourceGroups/examplegroup/providers/Microsoft.KeyVault/vaults/<vault-name>"
        },
        "secretName": "examplesecret"
    }
}
While this isn’t a bad thing per se, I don’t like having the subscription-id hardcoded in this configuration, especially when doing open source development. Mainly because other people can’t access my Key Vault, so they’ll run into trouble when deploying this template. Therefore, I started investigating if this subscription id can be added dynamically.
Introducing the Dynamic Id
Lucky for us the ARM-team has us covered! By changing the earlier mentioned configuration a bit you’re able to use the function subscription().subscriptionId to get your own subscription id.
Read more →You might remember me writing on how to warm up your App Service instances when moving between slots. The use of the applicationInitialization-element is implemented on nearly every IIS webserver nowadays and works great, until it doesn’t.
I’ve been working on a project which has been designed, as I’d like to call it, a distributed monolith. To give you an oversimplified overview, here’s what we have.
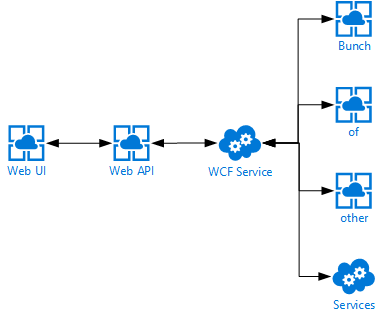
First off we have a single page web application which communicates directly to an ASP.NET Web API, which in turn communicates to a backend WCF service, which in turn also communicates with a bunch of other services. You can probably imagine I’m not very happy with this kind of a design, but I can’t do much about it currently.
One of the problems with this design is having cold-starts whenever a service is being deployed.
Since we’re deploying continuously to test & production there are a lot of cold starts. Using the applicationInitialization-element really helped spinning up our App Services, but we were still facing some slowness whenever the WCF service was being deployed to any of our environments. This service is being deployed to an ‘old-fashioned’ Cloud Service so we figured the applicationInitialization-element should just work as it’s still running on IIS.
Read more →The last two posts had me writing about how logging can be implemented in your Azure Functions and how you can reuse class libraries using a different logging library, like log4net. You probably already have some logging- and monitoring system in place, but if you’re starting to use Azure Functions (or any other Azure service for that matter), the best tooling to use is Application Insights, in my opinion. You don’t even have to use Azure services in order to use Application Insights. You can also integrate it with any other on-premise server or client application.
For those of you who aren’t yet familiar with Application Insights, you should check it out immediately! It’s an awesome tool in Azure which enables you to view logging, metrics, exceptions, performance and more of your applications. It’s also possible to create enormous dashboards, reports and alerts, so everything you need in order to monitor your applications. A real must-have for a professional devops team.
Integrate with Azure Functions
Integrating your Azure Functions (Function App) with Application Insights is pretty straightforward.
The easiest way is to integrate is by selecting Application Insights when creating a Function App. Just press On, the location you want it deployed and proceed with creating the Function App. This will make sure the newly created Application Insights instance will be used by your Function App.
Read more →As I mentioned in my earlier post, there are 2 options available to you out of the box for logging. You can either use the TraceWriter or the ILogger. While this is fine when you are doing some small projects or Functions, it can become a problem if you want your Azure Functions to reuse earlier developed logic or modules used in different projects, a Web API for example.
In these shared class libraries you are probably leveraging the power of a ‘full-blown’ logging library. While it is possible to wire up a secondary logging instance in your Azure Function, it’s better to use something which is already available to you, like the ILogger or the TraceWriter.
I’m a big fan of the log4net logging library, so this post is about using log4net with Azure Functions. As it goes, you can apply the same principle for any other logging framework just the implementation will be a bit different.
Creating an appender
One way to extend the logging capabilities of log4net is by creating your own logging appender. You are probably already using some default file appender or console appender in your projects. Because there isn’t an out-of-the-box appender for the ILogger, yet, you have to create one yourself.
Read more →Creating a solution with multiple small services is great of course. It provides you with a lot of flexibility and scalability.
There are however a couple of things you have to think about when designing and developing a solution with multiple services. One of the things you need to figure out is how to implement proper logging. For an actual production system you need to have this in place in order to monitor and debug the overall solution.
We, developers using Azure Functions, are already blessed with some logging mechanisms and tools provided out of the box! The out of the box stuff is pretty basic, but it gets the job done and will make your life much easier when the need arises to analyze a production issue.
Logging in your function
When first creating your Azure Function you will probably see a parameter being passed in your Run method called log.
public static class Function1
{
    [FunctionName("Function1")]
    public static async Task<HttpResponseMessage> Start(
        [HttpTrigger(AuthorizationLevel.Anonymous, "get", Route = null)]
        HttpRequestMessage req,
        TraceWriter log)
    {
        log.Info("C# HTTP trigger function processed a request.");
        // Logic
    }
}
This log-parameter can be used to do some simple logging inside your Azure Function. When invoking this function you’ll be able to see the specified log entry in your console.
Read more →