There’s a relative new feature available in Azure called Managed Service Identity
. What it does is create an identity for a service instance in the Azure AD tenant, which in its turn can be used to access other resources within Azure. This is a great feature, because now you don’t have to maintain and create identities for your applications by yourself anymore. All of this management is handled for you when using a System Assigned Identity
. There’s also an option to use User Assigned Identities which work a bit different.
Because I’m an Azure Function fanboy and want to store my secrets within Azure Key Vault, I was wondering if I was able to configure MSI via an ARM template and access the Key Vault from an Azure Function without specifying an identity by myself.
As most of the things, setting this up is rather easy, once you know what to do.
The ARM template
The documentation
states you can add an identity property to your Azure App Service in order to enable MSI.
"identity": {
    "type": "SystemAssigned"
}
This setting is everything you need in order to create a new service principal (identity) within the Azure Active Directory. This new identity has the exact same name as your App Service, so it should be easy to identify.
Read more →I’m in the process of adding an ARM template to an open source project I’m contributing to. All of this was pretty straightforward, until I needed to add some secrets and connection strings to the project.
While it’s totally possible to integrate these secrets in your ARM parameter file or in your continuous deployment pipeline, I wanted to do something a bit more advanced and secure. Of course, Azure Key Vault
comes to mind! I’ve already used this in some of my other ASP.NET projects and Azure Functions, so nothing new here.
The thing is, the projects I’ve worked on, always retrieved the secrets from Key Vault like the following example:
"adminPassword": {
    "reference": {
        "keyVault": {
        "id": "/subscriptions/<subscription-id>/resourceGroups/examplegroup/providers/Microsoft.KeyVault/vaults/<vault-name>"
        },
        "secretName": "examplesecret"
    }
}
While this isn’t a bad thing per se, I don’t like having the subscription-id hardcoded in this configuration, especially when doing open source development. Mainly because other people can’t access my Key Vault, so they’ll run into trouble when deploying this template. Therefore, I started investigating if this subscription id can be added dynamically.
Introducing the Dynamic Id
Lucky for us the ARM-team has us covered! By changing the earlier mentioned configuration a bit you’re able to use the function subscription().subscriptionId to get your own subscription id.
Read more →The last two posts had me writing about how logging can be implemented in your Azure Functions
and how you can reuse class libraries using a different logging library, like log4net
. You probably already have some logging- and monitoring system in place, but if you’re starting to use Azure Functions (or any other Azure service for that matter), the best tooling to use is Application Insights
, in my opinion. You don’t even have to use Azure services in order to use Application Insights. You can also integrate it with any other on-premise server or client application.
For those of you who aren’t yet familiar with Application Insights, you should check it out immediately! It’s an awesome tool in Azure which enables you to view logging, metrics, exceptions, performance and more of your applications. It’s also possible to create enormous dashboards, reports and alerts, so everything you need in order to monitor your applications. A real must-have for a professional devops team.
Integrate with Azure Functions
Integrating your Azure Functions (Function App) with Application Insights is pretty straightforward.
The easiest way is to integrate is by selecting Application Insights when creating a Function App. Just press On, the location you want it deployed and proceed with creating the Function App. This will make sure the newly created Application Insights instance will be used by your Function App.
Read more →So you might remember me posting about using the Let’s Encrypt
site extension for Azure App Services, called Azure Let’s Encrypt, created by SJKP.
This has quite well for over a year now and even works for Function Apps
.
However, last month I got notified my SSL certificate was expired on one of my sites. Strange, as an automated job should just handle this for me. I thought the job probably didn’t execute because of some glitch in the matrix. Therefore I logged in manually, started the site extension wizard again and was stuck on this screen.
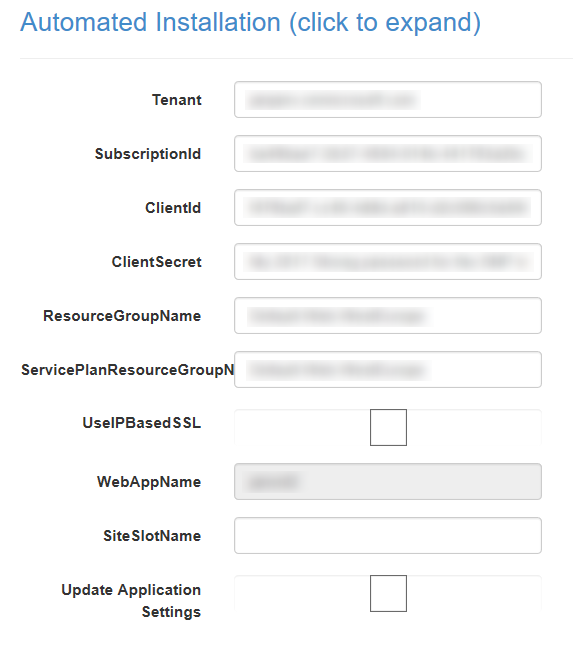
The reason I was stuck was because the ClientId and ClientSecret didn’t work anymore. As these settings hadn’t changed since I started using this extension I found it quite strange.
Apparently, the Server Principal
, which I had created last year, somehow had changed and I didn’t know how to change it back. Lucky for me, managing the AAD isn’t very hard to do nowadays. With a bit of trial and error I was able to create a new SNP and use these details on the Let’s Encrypt site extension.
Creating a new application in AAD
First thing you need to do is add a new Appliction to your AAD. Be sure to pick the option App registrations over here and press the New application registration.
Read more →Warming up your web applications and websites is something which we have been doing for quite some time now and will probably be doing for the next couple of years also. This warmup is necessary to ‘spin up’ your services, like the just-in-time compiler, your database context, caches, etc.
I’ve worked in several teams where we had solved the warming up of a web application in different ways. Running smoke-tests, pinging some endpoint on a regular basis, making sure the IIS application recycle timeout is set to infinite and some more creative solutions.
Luckily you don’t need to resort to these kind of solutions anymore. There is built-in functionality inside IIS and the ASP.NET framework. Just add an applicationInitialization-element inside the system.WebServer-element in your web.config file and you are good to go! This configuration will look very similar to the following block.
<system.webServer>

  ...
	<applicationInitialization>
		<add initializationPage="/Warmup" />
  </applicationInitialization>
</system.webServer>
What this will do is invoke a call to the /Warmup-endpoint whenever the application is being deployed/spun up. Quite awesome, right? This way you don’t have to resort to those arcane solutions anymore and just use the functionality which is delivered out of the box.
The above works quite well most of the time.
However, we were noticing some strange behavior while using this for our Azure App Services. The App Services weren’t ‘hot’ when a new version was deployed and swapped. This probably isn’t much of a problem if you’re only deploying your application once per day, but it does become a problem when your application is being deployed multiple times per hour.
Read more →Using certificates to secure, sign and validate information has become a common practice in the past couple of years. Therefore, it makes sense to use them in combination with Azure Functions as well.
As Azure Functions are hosted on top of an Azure App Service this is quite possible, but you do have to configure something before you can start using certificates.
Adding your certificate to the Function App
Let’s just start at the beginning, in case you are wondering on how to add these certificates to your Function App. Adding certificates is ‘hidden’ on the SSL blade in the Azure portal. Over here you can add SSL certificates, but also regular certificates
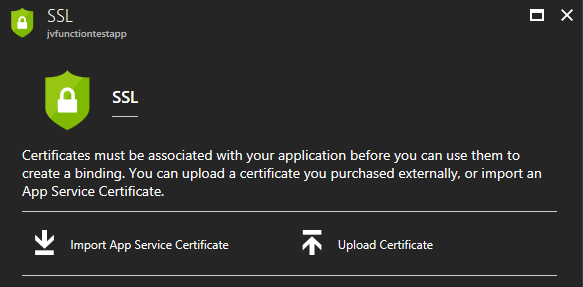
Keep in mind though, if you are going to use certificates in your own project, please just add them to Azure Key Vault
in order to keep them secure. Using the Key Vault is the preferred way to work with certificates (and secrets).
For the purpose of this post I’ve just pressed the Upload Certificate-link, which will prompt you with a new blade from which you can upload a private or public certificate.
![clip_image001[4]](https://jan-v.nl/files/8047a43c-7dd3-4c73-8f80-f76e0789deb4.png)
You will be able to see the certificate’s thumbprint, name and expiration date on the SSL blade if it has been added correctly.
Read more →You might remember me writing a post on how you can set up your site with SSL while using Let’s Encrypt and Azure App Services
.
Well, as it goes, the same post applies for Azure Functions. You just have to do some extra work for it, but it’s not very hard.
Simon Pedersen
, the author of the Azure Let’s Encrypt site extension
, has done some work in explaining the steps on his GitHub wiki page
. This page is based on some old screenshots, but it still applies.
The first thing you need to do is create a new function which will be able to do the ACME challenge
. This function will look something like this.
public static class LetsEncrypt
{
    [FunctionName("letsencrypt")]
    public static HttpResponseMessage Run(
        [HttpTrigger(AuthorizationLevel.Anonymous, "get", "post", Route = "letsencrypt/{code}")]
        HttpRequestMessage req,
        string code,
        TraceWriter log)
    {
        log.Info($"C# HTTP trigger function processed a request. {code}");
        var content = File.ReadAllText(@"D:\home\site\wwwroot\.well-known\acme-challenge\" + code);
        var resp = new HttpResponseMessage(HttpStatusCode.OK);
        resp.Content = new StringContent(content, System.Text.Encoding.UTF8, "text/plain");
        return resp;
    }
}
As you can see, this function will read the ACME challenge file from the disk of the App Service it is running on and return the content of it. Because Azure Functions run in an App Service (even the functions in a Consumption plan), this is very possible. The Principal (created in the earlier post) can create these type of files, so everything will work just perfectly.
Read more →In the past couple of years the software industry has come a long way in professionalizing the development environment. One of the things which has improved significantly is automating the builds and being able to continuously deploy software.
Having a continuous integration and -deployment environment is the norm nowadays, which means I (and probably you as a reader also) want to have this when creating Azure Functions also!
There are dozens of build servers and deployment tools available, but because Azure Functions are highly likely being deployed in Microsoft Azure, it makes sense to use Visual Studio Team Services with Release Management
. I’m not saying you can’t pull this off with any of the other deployment environment, but for me it doesn’t make sense because I already have a VSTS environment and this integrates quite well.
In order for you to deploy your Function App, the first thing you have to make sure is to have an environment (resource group) in your Azure subscription to deploy to. It is advised to use ARM templates for this. There is one big problem with ARM templates though, I genuinely dislike ARM templates. It’s something about the JSON, the long list of variables and ‘magic’ values you have to write down all over the place.
Read more →Lately, I’ve been busy learning more about creating serverless solutions
. Because my main interest lies within the Microsoft Azure stack I surely had to check out the Azure Functions offering
.
Azure Functions enable you to create a serverless solutions which are completely event-based. As it’s located within the Azure space, you can integrate easily with all of the other Azure services, like for example the service bus
, Cosmos DB
, storage
, but also external services like SendGrid
and GitHub
!
All of these integrations are fine and all, but seeing Azure Functions perform in action is still easiest with regular HTTP triggers
. You can just navigate with a browser (or Postman) to a URL and your function will be activated immediately. I guess most people will create these kind of functions in order to learn to work with them, at least that’s what I did.
Creating your Azure Functions App
In order to create Azure Functions, you first have to create a so called Function App in the Azure Portal. Creating such an app is quite easy, the only thing you have to think about is which type of Hosting Plan you want to use. At this time there are 2 options, the Consumption Plan or the App Service Plan.
Read more →It has become increasingly important to have your site secured via some kind of certificate. Even your Google ranking
is affected by it.
The main problem with SSL/TLS certificates is the fact most of them cost money. Now, I don’t have any problem with paying some money for something like a certificate, but it will cost quite a lot if I want to set this up for all of my sites & domains. In theory it’s possible to create a self-signed certificate
and publish your site with it, but that’s not a very good idea as there’s no one who trusts your self-signed certificate besides yourself.
Luckily Mozilla is helping us, poor content-creators, out with their service called Let’s Encrypt. Let’s Encrypt
is a rather new Certificate Authority
which is offering a free, open and automated service to create certificates. Their Getting Started
guide contains some details on how to set this up for your website or hosting provider.
This is all fun and games, but when hosting your site(s) in the Azure App Service ecosystem you can’t do much with the steps defined in the Getting Started guide. At least, I couldn’t make any sense off it.
There’s a developer who has been so kind to create a so called Site extension for an Azure App Service called Azure Let’s Encrypt. It comes in two flavors for both x86 and x64 systems. Depending on which platform you have deployed your site to, you need to activate one corresponding this platform.
Read more →