Splitting and merging with Elastic Scale
Once you have set up your sharding solution with a fully configured Shard Map Manager, modified your data access layer to use Elastic Scale, added fault handling and running your stuff in production, there will be a time when you are in need to split, merge or move shardlets between shards.
This is where the Elastic Scale Split Merge tool comes in place. The team has created a nice web application which will enable you to do this kind of management. In order to use this tooling, you have to download the latest Nuget package (1.0.0.0 at the moment) into your project. This will create a new folder called splitmerge which contains two subfolders (powershell & service).
The folder containing the PowerShell scripts will give you the power to move, merge and split shards via scripting. A preferred solution for most power users.
The service folder contains a package and configuration template to deploy a web application which is able to do the exact same thing as the PowerShell scripts.
As I don’t fancy big PowerShell scripts for blog posts that much, this post will dig into the service part a bit more.
There is a nice tutorial available in the documentation on Elastic Scale describing on how to use and configure the Split Merge service. The basics come down to specifying a connection string to your newly created database and file storage in the configuration file. Afterwards you can create a new cloud service with the package and configuration. If all works well, you are ready to use the tooling. A best practice is to copy the settings of your deployed configuration file somewhere safe and do incremental updates on it when a new version of the Nuget packge is released.
Because you are working with sensitive data, you might want to add a bit more security to the application.
The easiest thing to add is an IP-address restriction.
<NetworkConfiguration>
	<AccessControls>
		<AccessControl name="DenyAll">
			<Rule action="deny" description="Deny all addresses" order="1" remoteSubnet="0.0.0.0/0" />
		</AccessControl>
		<AccessControl name="MyCustomerOffice">
			<Rule action="permit" description="My Customer HQ" order="1" remoteSubnet="288.266.75.87/32"/>
			<Rule action="deny" description="Deny all other addresses" order="2" remoteSubnet="0.0.0.0/0"/>
		</AccessControl>
	</AccessControls>
	<EndpointAcls>
		<EndpointAcl role="SplitMergeWeb" endPoint="HttpIn" accessControl="DenyAll" />
		<EndpointAcl role="SplitMergeWeb" endPoint="HttpsIn" accessControl="MyCustomerOffice" />
	</EndpointAcls>
</NetworkConfiguration>
This is pretty straightforward. Just add the IP-address(es) of your location to the whitelist. This will make sure only this IP-address can access the service.
Of course, you’ll want some extra safety measures when running this service for your production environment. One of these extra safety measures is certificate based login. Start configuring this by specifying a certificate thumbprint in the following elements.
<!--
If the client certificates are not issued by a certification authority that is trusted
by the Windows images loaded into the Windows Azure VMs-for example, if these are self-signed-
copy the thumbprint of the <Certificate name="CA"> specified further below, to force the
installation of these certificates in the Trusted Root Certification Authorities store.
-->
<Setting name="AdditionalTrustedRootCertificationAuthorities" value="2FA6F008D7E863E1BD177B5472856D147C1F3213" />
<!--
The comma-separated list of client certificate thumbprints that are authorized to access
the Web and API endpoints.
-->
<Setting name="AllowedClientCertificateThumbprints" value="635476ccc2bc6f33f9a405fe616ae8272e94f60a"/>
Only users with a certificate installed with the thumbprint specified on AllowedClientCertificateThumbprints can log in to the service. You should only use the AdditionalTrustedRootCertificationAuthorities if you are using a certificate which isn’t known by default in the Windows Azure virtual machines.
Don’t forget to set the following properties to true so certificate based login is enabled.
<!--
Whether or not to configure ASP.NET and MVS to require authentication based on
client certificates specified in 'AllowedClientCertificateThumbprints' below.
Recommended: true.
-->
<Setting name="SetupWebAppForClientCertificates" value="true" />
<!--
Whether or not to configure IIS to negotiate client certificates.
Recommended: true.
-->
<Setting name="SetupWebserverForClientCertificates" value="true" />
One other thing you should not forget is configuring a proper SSL certificate to your service. You wouldn’t want a secured web application and all communication to be transferred in plain text.
<!--
Update the 'thumbprint' attribute with the thumbprint of the certificates uploaded to the
cloud service that should be used for SSL communication.
-->
<Certificate name="SSL" thumbprint="0D0D43BC1F2A582671071D083A691105216318E" thumbprintAlgorithm="sha1" />
<Certificate name="CA" thumbprint="2455328DBE86FE1BD37712382E56D747C013231" thumbprintAlgorithm="sha1" />
The team has also provided a method to secure/encrypt your credential data stored in the database by adding an encryption certificate to the configuration.
<Setting name="DataEncryptionPrimaryCertificateThumbprint" value="2FA6F008DBE87723627299010929277493FK927211" />
and
<Certificate name="DataEncryptionPrimary" thumbprint="2FA6F008DBE87723627299010929277493FK927211" thumbprintAlgorithm="sha1" />
I don’t know what the difference is between these two elements since they both got the same description above them. I’ve just added the same certificate thumbprint to both.
After having configured all of these settings you’ll be able to create a relative secure Split Merge service with the provided package and your configuration.
Note: Upload your certificates to Azure first, otherwise the deployment will fail.
Once deployed and you have navigated successfully to the application, you’ll see the application up and running.
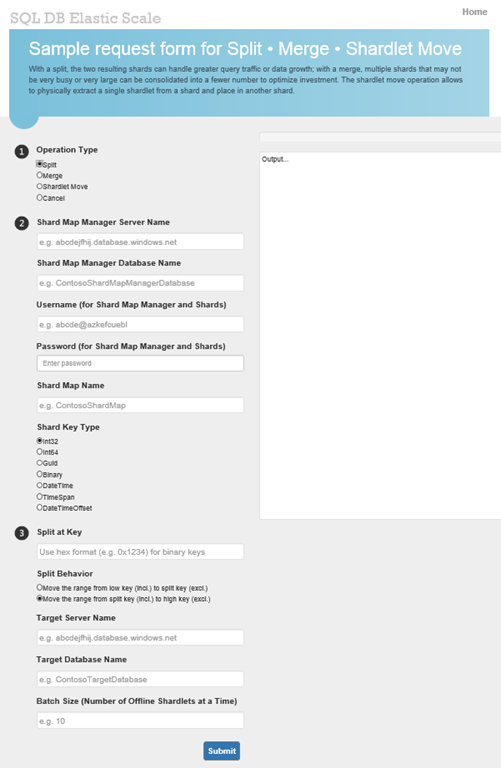
Over here you are able to do all your splitting, merging and moving with Elastic Scale. The big text area on the right is the output window which will notify you of the progress or errors.
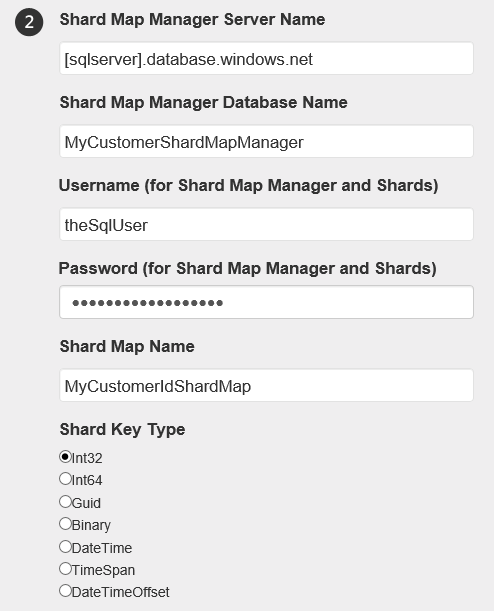
When choosing to move a shardlet, the next step will ask for some information about the databases, shard map and shardlet.
Next step is to specify some information for the target server. Notice you only have to specify the login credentials once? That’s because all databases (shards) should have the same login credentials!
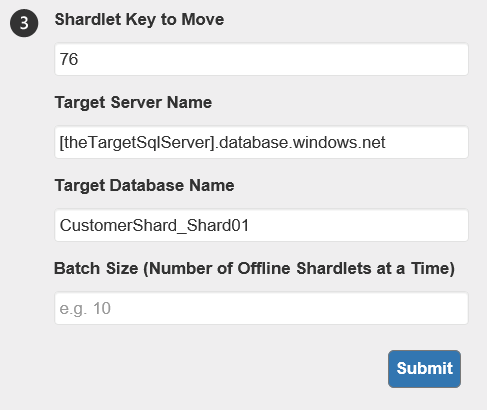
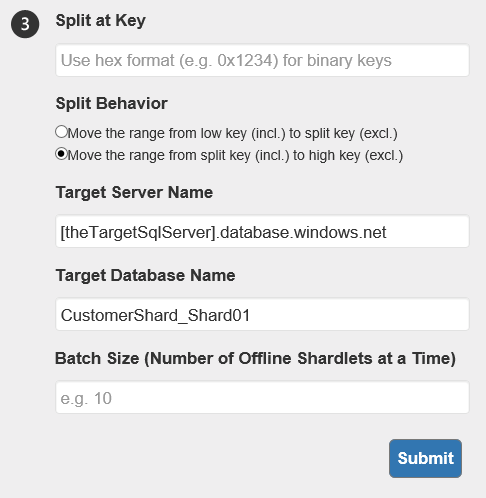
When hitting the Submit button, shardlet 76 will get moved from it’s original shard to the CustomerShard_Shard01. If you have chosen to Merge or Split a shard map, the second step will look much the same. It’s the third step which will look a bit different.
When merging a shard map, you have to specify which ranges you want to merge with each other.
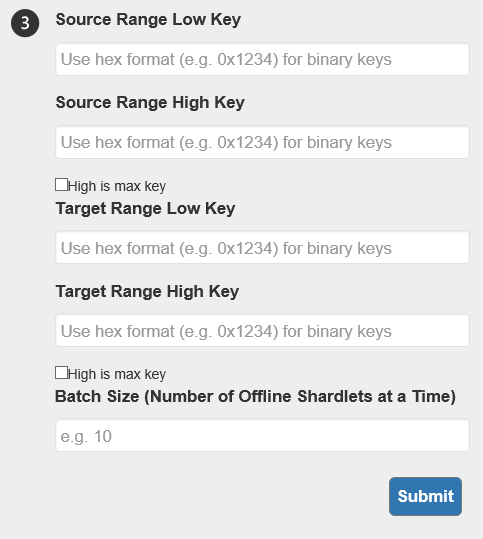
Splitting requires the service to know at which key to split and what the new shard will be. It will calculate the new entry in the shard map by itself.
Note: Don’t refresh the page as you’ll lose the status of your operation. If you do refresh your page, you’ll have to query the (splitmerge) database to check on your progress or run a PowerShell command to fetch the status. I’ve made this mistake more then once and running queries in PowerShell or SQL aren’t as pretty as on the screen.
I hope you have enjoyed the Elastic Scale series of me. This is the last (planned) post about Elastic Scale at the moment. There might be more in the future, but most of the important parts are covered for now.
Good luck and happy sharding!