The default Azure Functions runtime comes with quite a lot of bindings and triggers which enable you to create a highly scalable solution within the Azure environment. You can connect to service buses, storage accounts, Event Grid, Cosmos DB, HTTP calls, etc.
However, sometimes this isn’t enough.
That’s why the Azure Functions team has released functionality which enables you to create your own custom bindings. This should make it easy for you to read and write data to any service or location you need to, even if it’s not supported out of the box.
There is some documentation available on how to create a custom binding at this time and even a nice sample on GitHub to get you started. The thing is this documentation and samples are written for Version 1 of the Azure Functions runtime. If you want to use custom bindings in Azure Functions V2, you need to do some additional stuff. There are still changes being made on this subject, so it’s quite possible the current workflow will be broken in the future.
For this post, I’ve created a sample binding which is capable of reading data from a local disk. Nothing fancy and definitely not something you want in production, but it’s easy to test and shows you how the stuff has to be set up.
Read more →Happy 2019 all!
Just like every other blogger on the world, I also want to write a small retrospective on 2018 and prospective on 2019.
Let’s start with the retrospective first. As I mentioned last year, we were expecting a daughter somewhere in January of 2018. As it happens, she is born on January 24th and very healthy. Even though this was still early in the year, I knew for a fact this day would be the best one of the entire year.
Having 2 small kids growing up in the house is hard, but so gratifying. Being able to work remote is also a great way to see your kids grow up. I think this is very important because everything is happening just too fast!
Aside from blogging quite a lot last year, I’ve also been active in the speaking world. Speaking at a meetup, user group or conference is a great way to spread knowledge to a group of people, interact with them and make new friends. I really love doing this and am grateful for my employer, 4DotNet, is very keen in providing support whenever needed. The best thing about speaking at conferences in different countries is to meet new people and cultures. It’s something I can recommend to everyone.
Read more →I’ve been using my current desktop for almost 8 years now and it’s still running quite fine! In order to support 3 monitors, including at least one 4K, the graphics card did get an update to a GTX 950 a while back. But other than that it’s still exactly the same and quite performant.
Development is snappy enough, browsing still superb and doing some light modifications in Lightroom or Photoshop is doable.
So, why do I want to upgrade? Well, I want to focus a bit more on semi-pro photography. While it is quite doable to import and modify photo’s on the current system, it’s too slow if you need to do this often.
Being a proper nerd I have read almost every news article, announcement and review of all of the hardware which was released or will be released in the near future. All in order to make the ‘best’ build I can afford.
From the information I had gathered, the ‘smart’ choice for a processor appears to be AMD. Those processors are rather cheap, have got quite a bit of threads and a decent clock speed. The main problem with them is�they aren’t Intel. You can call me stupid, but I still prefer to have an Intel processor in my system.
Read more →You might have noticed I’ve been doing quite a bit of stuff with ARM templates as of late. ARM templates are THE way to go if you want to deploy your Azure environment in a professional and repeatable fashion. Most of the time these templates get deployed in your Release pipeline to the Test, Acceptance or Production environment. Of course, I’ve set this up for all of my professional projects along with my side projects. The thing is, when using the Hosted VS2017 build agent, it can take a while to complete both the Build and Release job via VSTS Azure DevOps.
Being a reformed SharePoint developer, I’m quite used to waiting on the job. However, waiting all night to check if you didn’t create a booboo inside your ARM template is something which became quite boring, quite fast.So what else can you do?
Well, you can do some PowerShell!
The Azure PowerShell cmdlets offer quite a lot of useful commands in order to manage your Azure environment.One of them is called New-AzureRmResourceGroupDeployment.
According to the documentation, this command will “Adds an Azure deployment to a resource group.”. Exactly what I want to do, most of the time.So, how to call it? Well, you only have to specify the name of your deployment, which resource group you want to deploy to and of course the ARM template itself, along with the parameters file.
Read more →Azure Functions are great! HTTP triggered Azure Functions are also great, but there’s one downside. All HTTP triggered Azure Functions are publicly available. While this might be useful in a lot of scenario’s, it’s also quite possible you don’t want ‘strangers’ hitting your public endpoints all the time.
One way you can solve this is by adding a small bit of authentication on your Azure Functions.
For HTTP Triggered functions you can specify the level of authority one needs to have in order to execute it. There are five levels you can choose from. It’s Anonymous, Function, Admin, System and User. When using C# you can specify the authorization level in the HttpTrigger-attribute, you can also specify this in the function.json file of course. If you want a Function to be accessed by anyone, the following piece of code will work because the authorization is set to Anonymous.
[FunctionName("Anonymous")]
public static HttpResponseMessage Run(
    [HttpTrigger(AuthorizationLevel.Anonymous, "get", Route = null)]
    HttpRequestMessage req,
    ILogger logger)
{
    // your code
    return req.CreateResponse(HttpStatusCode.OK);
}
If you want to use any of the other levels, just change the AuthorizationLevel enum to any of the other values corresponding to the level of access you want. I’ve created a sample project on GitHub containing several Azure Functions with different authorization levels so you can test out the difference in the authorization levels yourself. Keep in mind, when running the Azure Functions locally, the authorization attribute is ignored and you can call any Function no matter which level is specified.
Read more →As it happens, I started implementing some new functionality on a project. For this functionality, I needed an Azure Storage Account with a folder (containers) inside. Because it’s a project not maintained by me, I had to do some searching on how to create such a container in the most automated way, because creating containers in storage account isn’t supported. That is, until recently!
In order to create a container inside a storage account, you only have to add a new resource to it. Quite easy, once you know how to do it.
First, let’s start by creating a new storage account.
{
    "name": "[parameters('storageAccountName')]",
    "type": "Microsoft.Storage/storageAccounts",
    "apiVersion": "2018-02-01",
    "location": "[resourceGroup().location]",
    "kind": "StorageV2",
    "sku": {
        "name": "Standard_LRS",
        "tier": "Standard"
    },
    "properties": {
        "accessTier": "Hot"
    }
}
Adding this piece of JSON to your ARM template will make sure a new storage account is created with the specified settings and parameters. Nothing fancy here if you’re familiar with creating ARM templates.
Now for adding a container to this storage account! In order to do so, you need to add a new resource of the type blobServices/containers to this template.
{
    "name": "[parameters('storageAccountName')]",
    "type": "Microsoft.Storage/storageAccounts",
    "apiVersion": "2018-02-01",
    "location": "[resourceGroup().location]",
    "kind": "StorageV2",
    "sku": {
        "name": "Standard_LRS",
        "tier": "Standard"
    },
    "properties": {
        "accessTier": "Hot"
    },
    "resources": [{
        "name": "[concat('default/', 'theNameOfMyContainer')]",
        "type": "blobServices/containers",
        "apiVersion": "2018-03-01-preview",
        "dependsOn": [
            "[parameters('storageAccountName')]"
        ],
        "properties": {
            "publicAccess": "Blob"
        }
    }]
}
Deploying this will make sure a container is created with the name theNameOfMyContainer inside the storage account. You can even change the permission to this container. The default is None, but this can be changed to Blob in order to get file access or Container if you want people to be able to access the container itself.
Read more →There’s a relative new feature available in Azure called Managed Service Identity. What it does is create an identity for a service instance in the Azure AD tenant, which in its turn can be used to access other resources within Azure. This is a great feature, because now you don’t have to maintain and create identities for your applications by yourself anymore. All of this management is handled for you when using a System Assigned Identity. There’s also an option to use User Assigned Identities which work a bit different.
Because I’m an Azure Function fanboy and want to store my secrets within Azure Key Vault, I was wondering if I was able to configure MSI via an ARM template and access the Key Vault from an Azure Function without specifying an identity by myself.
As most of the things, setting this up is rather easy, once you know what to do.
The ARM template
The documentation states you can add an identity property to your Azure App Service in order to enable MSI.
"identity": {
    "type": "SystemAssigned"
}
This setting is everything you need in order to create a new service principal (identity) within the Azure Active Directory. This new identity has the exact same name as your App Service, so it should be easy to identify.
Read more →I’m in the process of adding an ARM template to an open source project I’m contributing to. All of this was pretty straightforward, until I needed to add some secrets and connection strings to the project.
While it’s totally possible to integrate these secrets in your ARM parameter file or in your continuous deployment pipeline, I wanted to do something a bit more advanced and secure. Of course, Azure Key Vault comes to mind! I’ve already used this in some of my other ASP.NET projects and Azure Functions, so nothing new here.
The thing is, the projects I’ve worked on, always retrieved the secrets from Key Vault like the following example:
"adminPassword": {
    "reference": {
        "keyVault": {
        "id": "/subscriptions/<subscription-id>/resourceGroups/examplegroup/providers/Microsoft.KeyVault/vaults/<vault-name>"
        },
        "secretName": "examplesecret"
    }
}
While this isn’t a bad thing per se, I don’t like having the subscription-id hardcoded in this configuration, especially when doing open source development. Mainly because other people can’t access my Key Vault, so they’ll run into trouble when deploying this template. Therefore, I started investigating if this subscription id can be added dynamically.
Introducing the Dynamic Id
Lucky for us the ARM-team has us covered! By changing the earlier mentioned configuration a bit you’re able to use the function subscription().subscriptionId to get your own subscription id.
Read more →Normally when you are creating new appointments via Outlook in your organization you are inviting everyone who should join the meeting. This works quite alright, but not something I wanted to do for a couple of meetings I am planning. The meetings I’m organizing are optional to everyone inside the company, therefore I don’t want to spam the inbox of everyone with a meeting most of them (probably around 95%) aren’t interested in.
What I want to do is share the appointment with all of the people inside (or outside) the organization via a shared portal, like Yammer, SharePoint, Slack, etc., and let them choose to add or ignore the meeting.
Sounds easy right?
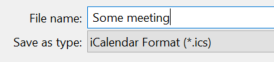
Normally you will do this by opening the meeting, save it as an ICS file and share it.
However, this didn’t work for me this time!
When people opened this ICS file in Outlook, they were not able to send a response as the meeting was stating “As the meeting organizer, you do not need to respond to the meeting.” with a big button shown in the ribbon saying “No Response Required”.
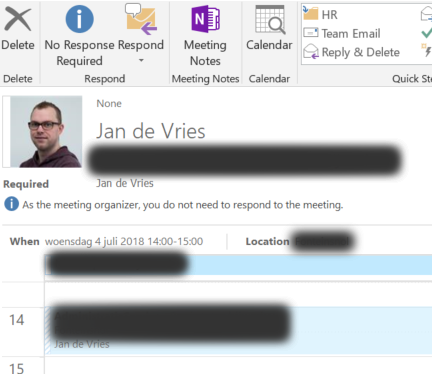
This struck me as quite strange as sending the invitation by inviting people (the normal flow) does work properly.
Read more →You might remember me writing on how to warm up your App Service instances when moving between slots. The use of the applicationInitialization-element is implemented on nearly every IIS webserver nowadays and works great, until it doesn’t.
I’ve been working on a project which has been designed, as I’d like to call it, a distributed monolith. To give you an oversimplified overview, here’s what we have.
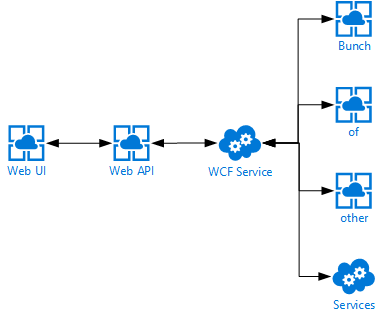
First off we have a single page web application which communicates directly to an ASP.NET Web API, which in turn communicates to a backend WCF service, which in turn also communicates with a bunch of other services. You can probably imagine I’m not very happy with this kind of a design, but I can’t do much about it currently.
One of the problems with this design is having cold-starts whenever a service is being deployed.
Since we’re deploying continuously to test & production there are a lot of cold starts. Using the applicationInitialization-element really helped spinning up our App Services, but we were still facing some slowness whenever the WCF service was being deployed to any of our environments. This service is being deployed to an ‘old-fashioned’ Cloud Service so we figured the applicationInitialization-element should just work as it’s still running on IIS.
Read more →