Some time ago, someone assigned me a task to retrieve data from several data sources residing in multiple Azure subscriptions, using a Logic App.
Creating these shouldn’t be very difficult when using API Connections and using the data repositories’ connection strings. However, I don’t like specifying these connection strings anywhere in my ARM template nor Key Vault.
What I DO want to use is the listKeys function in my deployment template. With this function, you can retrieve Primary- and Secondary Keys of a resource and use it. Using the following implementation will retrieve the primary shared access key of a Storage Account.
"azuretables_sharedkey": {
    "value": "[listKeys(resourceId(variables('subscriptions').mySubscription, variables('deployments').theResourceGroup, 'Microsoft.Storage/storageAccounts', variables('deployments').theActualResourceName), providers('Microsoft.Storage', 'storageAccounts').apiVersions[0]).keys[0].value]"
}
When using this in an ARM template, across subscriptions, the service principal (used by the service connection) needs access to all subscriptions (and resources).
Making the management of this a bit easier, I decided to use Management Groups.
By leveraging this Azure resource, I can assign the Service Principal, which Azure DevOps uses, the appropriate permissions on the Management Group instead of providing these details on each subscription. While this doesn’t look like a lot of work, it will make sure all roles are consistent across all environments.
What are Management Groups
As the name suggests, it’s a group that you can manage.
You can put other Management Groups and Subscriptions inside it. This way, one can make an Azure environment reflect the business or different domains in an organization.
Read more →I recently had to create a Logic App, which is responsible for copying data from one Cosmos DB database to another.
To do this, you can use the standard building blocks available in a Logic App workflow.
While doing so, I did stumble across one issue. When you supply a Partition Key for a specific collection, and some entries have null as a value for this Partition Key, you’ll get into a bit of trouble.
For my regular flow, for documents WITH an actual Partition Key, the step I used looks pretty much like the following piece of code
"The_name_of_my_step": {
    "type": "ApiConnection",
    "inputs": {
        "host": {
            "connection": {
                "name": "@parameters('$connections')['documentdb']['connectionId']"
            }
        },
        "method": "post",
        "body": "@items('For_each_document')",
        "headers": {
            "x-ms-documentdb-is-upsert": true,
            "x-ms-documentdb-raw-partitionkey": "@{items('For_each_document')['MyPrimaryKeyValue']}"
        },
        "path": "/dbs/@{encodeURIComponent('myDatabase')}/colls/@{encodeURIComponent(items('For_each_collection'))}/docs"
    },
    "runAfter": {}
}
Over here, I create a POST request to the endpoint of my Cosmos DB collection. I’m specifying the Partition Key and telling the engine it should be an Upsert in the header. Relatively straightforward and something you’ll get out of the box.
However, when the value of @{items('For_each_document')['MyPrimaryKeyValue']} is a null value, you’ll receive an error message stating the following:
The partition key supplied in x-ms-partitionkey header has fewer components than defined in the collection
Read more →
In one of my most recent live coding sessions, I had an issue with my PowerShell configuration. When running any of the Azure PowerShell cmdlets I got the message
The ‘[command]’ command was found in the module ‘Az.[someModule]’, but the module could not be loaded. For more information, run the ‘Import-Module Az.someModule’
Running the Import-Module command didn’t help much, because the module was already loaded. I even tried Import-Module Az and verified everything was installed correctly with the Get-InstalledModule -Name Az* command. This all appeared to be correct.
After my session, I researched the matter a bit more and read the Stack Overflow post with the title ‘Import powershell module fails’. This one pointed me in the right direction.
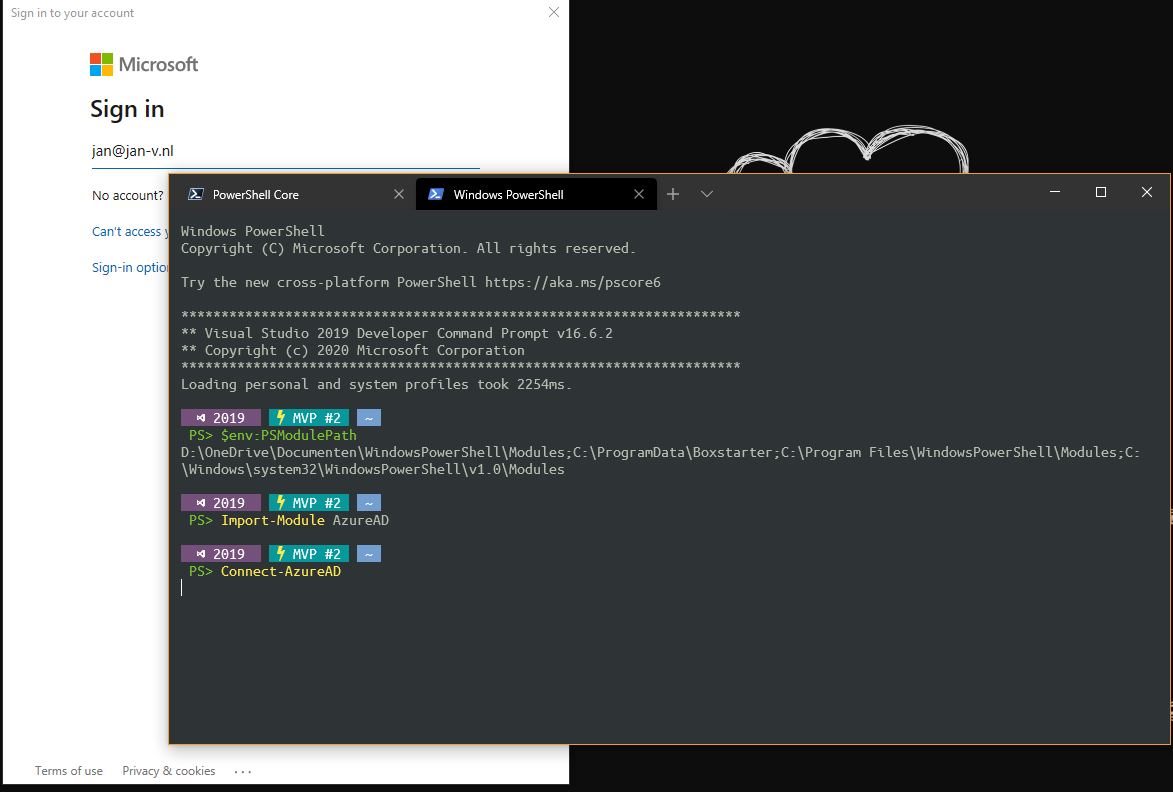
After printing the $env:PSModulePath I saw at least one of the folders was pointing to my Documents folder, which has its location redirected to OneDrive.
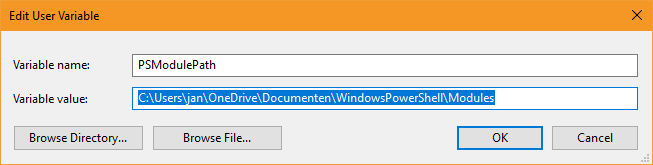
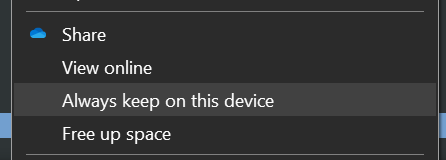
Nowadays, OneDrive has a nice feature where files aren’t downloaded automatically, but you can choose which files/folders to sync on your machine. The WindowsPowerShell folder wasn’t synced, yet.
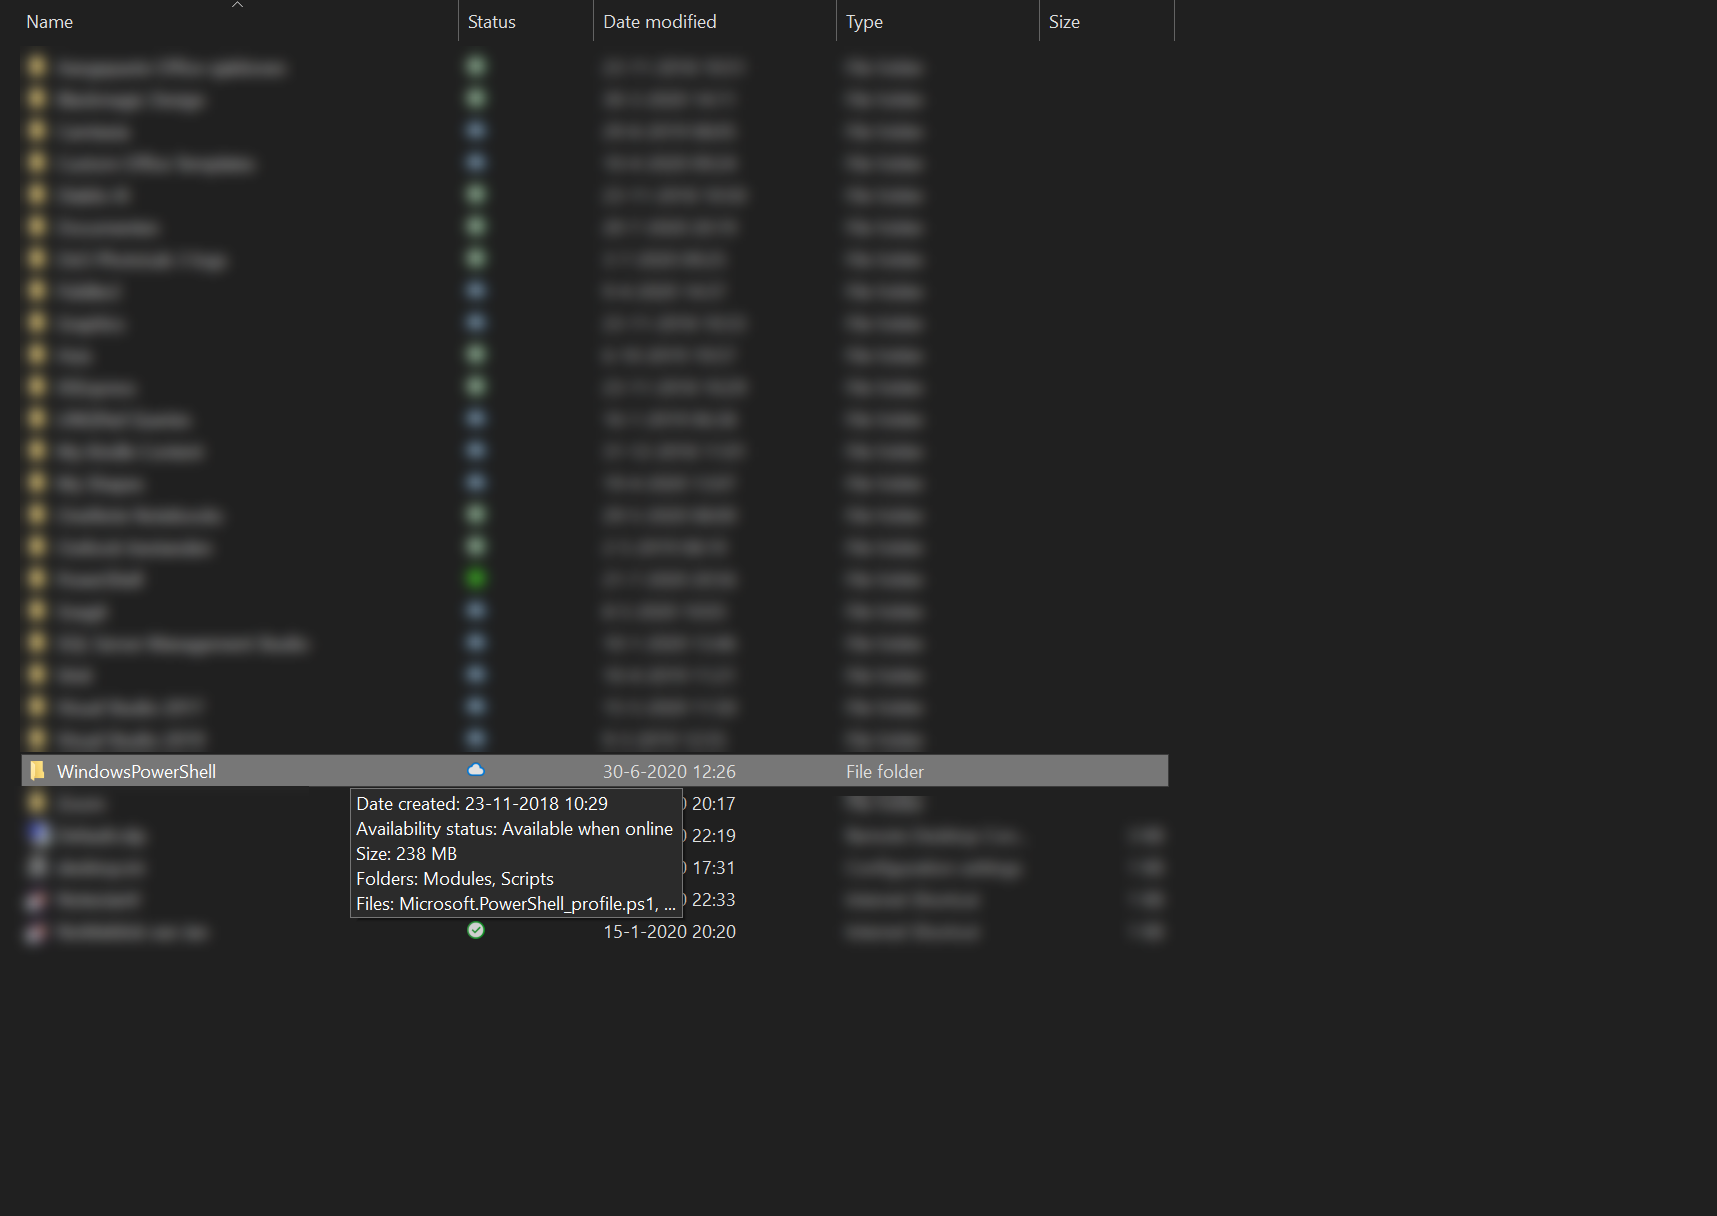
This can be solved by selecting the Always keep on this device option in OneDrive
Once all files & modules are loaded, you can start working with Azure via PowerShell again.
Read more →Another small post, but a solution to a problem which has annoyed me a lot.
Changing the power profile or power scheme in Windows is quite a hassle if you ask me. I have created a ‘High Performance’ profile on my laptop for when I’m doing development work on the machine and also have the ‘Balanced’ profile, which is the default in Windows. However, switching between these profiles is a lot of work (in my opinion).
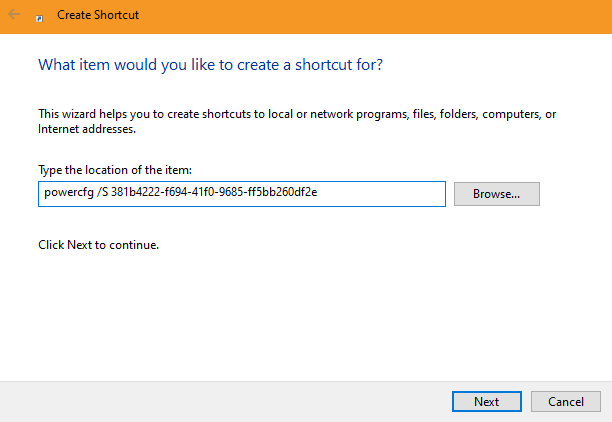
I found out switching profiles can also be done with the powercfg tool, via the command-line. To do so, you first need to know which profiles are configured on your system. You can do this by running the powercfg /L command from the terminal.
The output will be something similar to the one below.
 pwsh> powercfg /L

Existing Power Schemes (* Active)
-----------------------------------
Power Scheme GUID: 381b4222-f694-41f0-9685-ff5bb260df2e  (Balanced) *
Power Scheme GUID: 8c5e7fda-e8bf-4a96-9a85-a6e23a8c635c  (High performance)
Power Scheme GUID: a1841308-3541-4fab-bc81-f71556f20b4a  (Power saver)
You can use these unique identifiers to switch between profiles. Run powercfg /S 8c5e7fda-e8bf-4a96-9a85-a6e23a8c635c to switch to the ‘High performance’ profile and powercfg /S 381b4222-f694-41f0-9685-ff5bb260df2e to switch back to ‘Balanced’.
Remembering GUIDs isn’t very user-friendly either, so what can you do more? Well, creating shortcuts on the desktop or in the start menu!
Read more →This won’t be a long post, but useful nonetheless. It’s more like a script-dump as a post.
A while ago, someone assigned a task to me where I had to retrieve all the existing secrets in a specific Key Vault and list them. These secrets were to be placed in another Key Vault on a shared location. The exact reasons for this migration don’t matter for this post, but it has something to do with having a single Key Vault instance compared to having a Key Vault ‘per domain’, which I like a bit better.
It is possible to extract the secrets via the UI, but I didn’t feel much for doing this manually. Most of the time, when something is possible in the Azure Portal, it can also be done via the Azure CLI or Azure PowerShell.
I quickly navigated to the az keyvault documentation to see which commands are available.
The information I got from over there pointed me to the secret list and secret show commands.
Because I had to extract the secrets of multiple Key Vault instances in several subscriptions, a small function was in order. This is what I came up with.
Function GetKeyVaultEntries(
    [string]$subscriptionName,
    [string]$keyVaultName
)
{
    az account set --subscription $subscriptionName
    $keyVaultEntries = (az keyvault secret list --vault-name $keyVaultName | ConvertFrom-Json) | Select-Object id, name

    Write-Host "Secret values of '$($subscriptionName)' for key vault '$($keyVaultName)'"
    Write-Host "| key | secret value |"
    Write-Host "| --- | ------------ |"
    foreach($entry in $keyVaultEntries)
    {
        $secretValue = (az keyvault secret show --id $entry.id | ConvertFrom-Json) | Select-Object name, value
        Write-Host "| " $secretValue.name " | " $secretValue.value " |"
    }
    Write-Host ""
}
This will list all of the secrets in your console if you invoke the function like so:
Read more →A couple of days ago a friend asked me the question ‘How should I authenticate services with each other using roles’. I wanted to point him to a post I wrote last year, ‘Using an Azure Managed Identity to authenticate on a different App Service’, but I noticed this post wasn’t as complete as I remembered it to be.
While it does explain how to enable authentication in your service and using a Managed Identity for this, it doesn’t cover how to add roles in your application and assign them to a user or service principal (like a Managed Identity). So, let me cover the missing parts for the role-based authentication over here.
Adding roles to your App Registration
Wouldn’t it be nice if there was a possibility to add roles to your App Registration via the UI?
Well, that doesn’t exist.
You have to add your application roles in the manifest of the application, which is a big piece of JSON. I’m going to assume you have created an App Registration, as mentioned in the linked post above, and can navigate to the ‘Manifest’ blade of this application.
Over there you’ll see a property called appRoles.
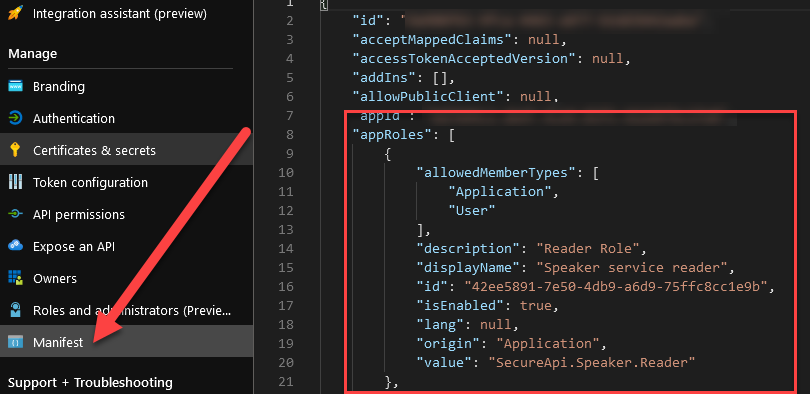
As you can see in the image above, I’ve defined a role over there with a description Reader Role, meant for reading access in the application. For reference sake, here’s the JSON:
Read more →I’ve been creating solutions for customers on my development laptop for years now. This works great as it’s a portable device and we get to have some great hardware in a compact form nowadays. However, laptops are still quite slow when you compare them to a desktop. This has become quite noticeable to me as I’ve been doing more development on my new desktop.
You can get some nice laptops with desktop-like performance, but most of the time it’ll cost a lot of money and will add a couple of pounds in weight. As I like to travel light, when travel is allowed again, a heavy laptop isn’t ideal.
Seeing there’s lots of horsepower in the cloud, it occurred to me I can just as well spin up a beefy virtual machine in Azure and develop on there. The main downside to this scenario is you need a (stable) internet connection to do any development. But to be honest, I need an internet connection anyways to do some actual development.
I do need this virtual machine to be safe and secure, so spinning up a VM and connecting to it via a public IP through RDP isn’t advised. To protect a virtual machine from the big bad internet you can add it in a virtual network and connect to it via a private IP-address. Of course, this makes the initial deployment a bit complex.
Read more →My last post was on integrating your Azure App Service with a virtual network (VNet). This post is the other way around. It’s on how to put your App Service in a VNet, or rather, behind a VNet.
If you want to put your Azure App Service inside a VNet, you’ll have to look for the App Service Environment (ASE). This is an offering of dedicated machines that are placed inside a VNet and you’re paying a rather hefty fee for this. While I like the concept, I think it’s quite expensive for most scenarios. Sure, an ASE has its uses, but most customers and projects I’ve come across don’t need it for the current price.
There is one thing that most customers DO want, protecting their services from the outside world. The public cloud, like Azure, is a PUBLIC cloud. By default, anyone can access your services.
Lucky for us, most Azure services have rather decent protection and can also be integrated into a virtual network, though some need an additional price/service tier to make it possible. The same goes for Azure App Services. For quite some time now it is possible to add an access restriction that only allows traffic from a specific virtual network (VNet).
Read more →It’s always a good idea to secure the resources in your Azure subscriptions. One way to do this is by using virtual networks. In a lot of cases, you will put SQL Azure servers, storage accounts and, other services in a virtual network. This will make sure the services can’t be accessed from the public internet unless you explicitly say so.
There are many more advantages to putting services in a virtual network, which I won’t be covering in this post.
This post is on how to integrate an App Service to a virtual network.
The different VNet integration types
At this time, there are 2 types of VNet integration for App Services. They are called ‘Regional VNet Integration’ and ‘Gateway-required VNet Integration’
If you’re running a relatively simple setup, located in a single region, and don’t require a fancy networking setup, it’s probably a good idea to go with the Regional VNet Integration. This one is rather easy to set up and manage.
With this VNet integration, you can still use NSGs (Network Security Groups), route tables, private endpoints, ExpressRoute, and connect to resources in the same region you’re app is located in.
If there’s a need to connect to one or more VNets in another region, the Gateway-required VNet Integration is the way to go. With this integration your service plan can connect to multiple VNets (each app can only connect to a single one), you can manage your DNS and get to create a point-to-site VPN between the different VNets. This is a bit overkill for most scenarios I’m seeing, but if you’re at a large customer or going global, it makes sense to go with this option.
Read more →Some time ago, about 7 months, I had to build a service that creates a PDF document from HTML. The library of choice was IronPDF. Creating PDF documents with this library is a breeze, but we stumbled across a small issue.
The HTML-to-PDF-converter-service is hosted inside an Azure Function, for reasons.
We noticed creating the documents took quite a lot of time. After inspecting the allocated instances we discovered both the CPU and Memory were constantly spiking to maximum capacity. That’s not good.
What made things worse, the generation sometimes took up to 37 minutes to complete! That’s not acceptable if your customers are waiting for the document.
This service was deployed on Windows instances, as it’s the default.
Because Linux is more lightweight compared to Windows, we started doing a test if the document rendering would be faster on Azure Functions hosted on Linux instances. The results were staggering!
On the Linux instances, all of the documents being generated never took more than 3 minutes to complete (99th percentile) and the used resources were less. We were still using a lot of CPU and memory, but acceptable levels. That’s the moment we decided to go forward using Linux hosted Azure Functions for this part of the system.
We just had to find out how to deploy them.
Read more →