The latest project I was working on didn’t have a continuous integration and continuous deployment environment set up yet. Creating a continuous integration environment was rather easy as we were already using Teamcity and adding a couple of builds isn’t much of a problem. The next logical step would be to start setting up continuous deployment.
I started out by scripting a lot of PowerShell to manage our Azure environment like creating all SQL servers, databases, service busses, cloud services, etc. All of this worked quite well, but managing these scripts was quite cumbersome.
A colleague of mine told me about Octopus Deploy
. They had started using this deployment automation system on their project and it sounded like the exact same thing I was doing, just a lot easier!
Setting up the main server and it’s agents (tentacles) was quite easy and doesn’t need much explanation. The pricing of the software isn’t bad either. You can start using it for free and when you need to use more as 10 tentacles or 5 projects, you’ll start paying $700 for the professional license. Spending $700 is still a lot cheaper as paying the hourly rate of a PowerShell professional to create the same functionality.
Read more →In my previous post
I’ve described how to use Application Insights and use it within your new web application. Most of us aren’t working in a greenfield project, so new solutions have to be integrated with the old.
The project I’m working on uses log4net
for logging messages, exceptions, etc. In order for us to use Application Insights, we had to search for a solution to integrate both. After having done some research on the subject we discovered this wasn’t a big problem.
The software we are working on are Windows Services and Console Applications, so we should not add the Application Insights package for web applications
. For these kind of applications it’s enough to just add the core package
to your project(s).

Once added, we are creating the TelemetryClient in the Main of the application.
private static void Main(string[] args)
{
	var telemetryClient = new TelemetryClient { InstrumentationKey = "[InstrumentationKey]" };
	/*Do our application logic*/
	telemetryClient.Flush();
}
You will notice we are setting the InstrumentationKey property explicitly. That’s because we don’t use an ApplicationInsights.config file, like in the web application example
and this key has to be specified in order to start logging.
This final flush will make sure all pending messages will be pushed to the Application Insights portal right away.
Read more →Some time ago the Application Insights became available as a preview in the Azure portal. Application Insights helps you monitor the state of an application, server, clients, etc. As said, it’s still in preview, but it’s rather stable and very easy to use and implement in your applications.
The documentation is still being worked on, but with all the getting started guides
on the Microsoft site you can kick start your project with it in a couple of minutes.
The main reason for me to dig into Application Insights is because we still had to implement a proper logging solution for our applications which are migrating to the Azure Cloud. As it happened, Application Insights just became available at the time and because of the tight Azure integration we were really eager to check it out (not saying you can’t use it with non-Azure software of course).
If you want to start using Application Insights, the first thing you will have to do is creating a new Application Insights application. You will be asked what type of application you want to use.
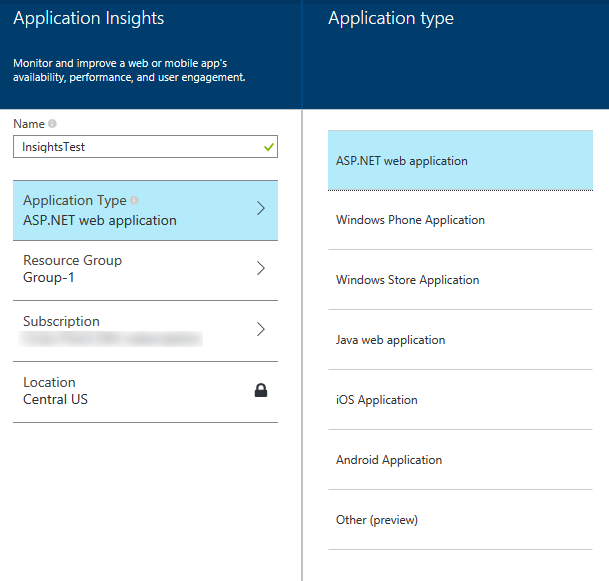
It’s wise to select the proper application type over here, because a lot of settings and measuring graphs will be set for you depending on the choice made over here. For this example I’ll choose the ASP.NET web application. After having waited for a few minutes the initial (empty) dashboard will be shown.
Read more →Once you have set up your sharding solution
with a fully configured Shard Map Manager
, modified your data access layer to use Elastic Scale
, added fault handling
and running your stuff in production, there will be a time when you are in need to split, merge or move shardlets between shards.
This is where the Elastic Scale Split Merge tool
comes in place. The team has created a nice web application which will enable you to do this kind of management. In order to use this tooling, you have to download the latest Nuget package (1.0.0.0 at the moment) into your project. This will create a new folder called splitmerge which contains two subfolders (powershell & service).
The folder containing the PowerShell scripts will give you the power to move, merge and split shards via scripting. A preferred solution for most power users.
The service folder contains a package and configuration template to deploy a web application which is able to do the exact same thing as the PowerShell scripts.
As I don’t fancy big PowerShell scripts for blog posts that much, this post will dig into the service part a bit more.
There is a nice tutorial available in the documentation
on Elastic Scale describing on how to use and configure the Split Merge service. The basics come down to specifying a connection string to your newly created database and file storage in the configuration file. Afterwards you can create a new cloud service with the package and configuration. If all works well, you are ready to use the tooling. A best practice is to copy the settings of your deployed configuration file somewhere safe and do incremental updates on it when a new version of the Nuget packge is released.
Read more →There are quite a lot of differences between having an on-premise data center and using the cloud. One of these differences is the (guaranteed) uptime and the latency between the different servers. When creating your local on-premise datacenter you will have a pretty stable network connection between the different servers and it’s probably really fast. The cloud can be pretty fast also, especially when you are located in the same datacenter/container. However, you don’t have any real guarantees on where your stuff gets deployed, let alone the latency or connection between the servers.
This might lead to some small problems when you have to hit a different server, like when accessing files from storage or querying a database. This is why the Microsoft Patterns & Practices team has published the Transient Fault Handling Application Block
. This application block states there are several transient exceptions which can occur when you try to access a service. These exceptions are known to sometimes be automatically be resolved over a small period of time, therefore retrying within a small period of time might fix the problem.
Basically, all this application block does is helping you add a retry-mechanism so you don’t have to worry much about these transient errors yourself. There are a couple of retrying strategies available out of the box
when using the Entity Framework. The SQL team has also provided a new retrying mechanism to be used with the Elastic Scale libraries
.
Read more →Now that you have configured Elastic Scale
for your solution there are still some changes to be made in your application.
At the moment there are 2 sample applications available, one using plain old SQL-queries (ADO.NET) and another one using the Entity Framework. I would suggest checking out these samples before doing any serious Elastic Scale work.
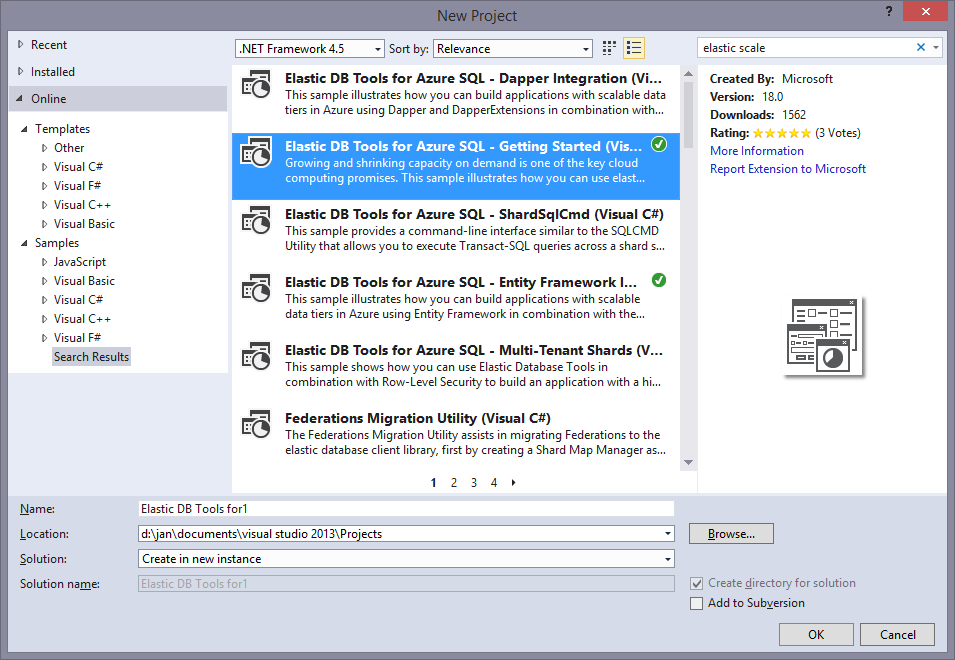
You will probably notice there are some small differences between the ADO.NET sample and the Entity Framework sample. One of them is the Entity Framework not having a sample for doing multi sharded queries. This is because Entity Framework (or any other ORM for that matter) can’t use the multi shard connection objects which are used by the Elastic Scale libraries. I’ve developed a small work around (hack) for this which is shown at the end of this post.
First, let’s step through the basics on how the Elastic Scale library is supposed to be used.
As stated in my earlier posts
about this subject, Elastic Scale should be used when you are creating different shards each with subsets of data. In order to connect to the a shard all you need to do is use the Elastic Scale library.
// Looks up the key in the shard map and opens a connection to the shard
using (SqlConnection conn = shardMap.OpenConnectionForKey(customerId, credentialsConnectionString))
{
	// Create a simple command that will insert a new order
	SqlCommand cmd = conn.CreateCommand();

	//Execute your commands, the way you would normally do.
}
As you can see, all you need is the shard map you want to use, the identifier to search for and (the shardlet) and a credentialsConnectionString. The shardlet is specified in the ShardMap of the ShardMapManager
. The connection string is something you will have to create yourself. It should only contain the credentials to log in to a database as the Elastic Scale library will find out the server and database by itself. The sample application has a nice helper method for it which you can use of course.
Read more →When implementing a sharding solution, you will need something which knows in what shard a specific shardlet exists. This is something you will want to store in a single location, so you know for sure you are always using the most recent information. When using the Elastic Scale libraries
this is called the Shard Map Manager. The Shard Map Manager keeps track of the location & state of the shardlets and shards. As you can imagine this is quite an important aspect of the sharding solution.
In a perfect world you will generate the Shard Map Manager (SMM) once, telling it which which shardlets reside in a specific shard and never update it again. Since the Shard Map Manager only exists in one location and hardly ever changes, it’s a great candidate for caching. This is why the Elastic Scale libraries are making sure the content of the Shard Map Manager is cached right after the first call to the database. This way the latency between the SMM and the remote location will only be hit once, after this first call it will be in-memory of the invoking location.
In the real world however, the SMM will get some changes from time to time. For example, if you are sharding by continent you might decide you want to narrow them down a bit by changing US to West US and East US. When sharding with ranges (0..100, 100..200, etc.) you might have to add some new ranges from time to time.
Read more →These days we all want to build the next big thing which will be deployed across the world. This of course is all fun and games, but there are also some technical difficulties you have to overcome when creating a software platform which has to be available from everywhere in the world with a responsive interface.
One of these difficulties you will have to face is getting the required data near your customers. Most of the time we are using a database to store this data for us. In the traditional form, this will likely be an on-premise database somewhere in a datacenter (with all disaster recovery aspects in place of course). Note, I’m talking about the traditional relational databases over here, but most of it will also apply on the non-relational databases.
In order to deploy your software globally, the data has to move with it. It doesn’t make much sense to deploy your software solution in a datacenter on the other side of the world when all data still remains far away, because the latency will slow down the experience. There are of course multiple solutions you can think off to solve this problem, one of them is to use sharding in your database.
Read more →For our automated deployments we have several Azure Organizational accounts in place. These are created within the Azure Active Directory.
Because these accounts are meant for services, we don’t want them to inherit the default password policy for renewing their passwords every X days. Lucky for us, you can configure this via PowerShell. A short how-to is written on MSDN
.
The thing that isn’t written (or referenced) over there is how to run the MSOL cmdlets.
I kept getting the messages The term 'Set-MsolUser' is not recognized. By searching a bit on this error I found a thread
on the Office365 community forums where someone mentioned the “Microsoft Online Service Module for Windows PowerShell”. This set me off to searching in the right direction. Apparently you need to install a (new/extra) PowerShell module on your system in order to use the MSOL cmdlets. These cmdlets are part of the Office365 and Exchange Online services. A page with download links is provided by Microsoft Support
. They provide a link to the Microsoft Online Service Sign-in Assistant for IT Professionals
and the Azure Active Directory Module for Windows PowerShell (32-bit
and 64-bit
).
Once installed, you are finally able to use the MSOL cmdlets. Keep in mind though, you have to connect to the MSOL services first using the connection cmdlet.
Read more →The past couple of days I’ve had the pleasure to start using a Git server as the new version control system at my customer. I’ve already had the pleasure to use GitHub and BitBucket in the past, which works like a charm with tools like GitHub for Windows and SourceTree. Because I’m used to using these tools, I really wanted to use them on my day job also.
Because we chose to use SSH keys as a validation mechanism I had to create one. Once you know how to do this it’s quite easy, but till 2 days ago I didn’t had a clue.
Lucky for me there’s a nice tutorial on how to create SSH keys on the GitHub help pages
. Also Atlassian has provided an extensive help document
with a couple of steps. In retrospect I think the Atlassian help page is the most useful for helping out with local Git servers. However, these help documents don’t take into account the usage of SourceTree and you will need to do some extra steps to get this working.
For future reference, I’ll describe the steps I had to take below.
First thing you want to do is install Git
, the Git Extensions
and if you haven’t already, SourceTree
.
Read more →