Doing your DevOps stuff with Azure Functions instead of Logic Apps
So, a couple of weeks back I wrote about leveraging the power of Logic Apps to retrieve Alerts from within your Azure ecosystem and send them to Microsoft Teams. This works great and a fellow Azure MVP, Tom Kerkhove, has enhanced the Logic Apps Template when handling Azure Monitor events.I’m starting to become a pretty big van of Logic Apps, but there are some (obvious) downsides to it.
First, they live inside your Azure Portal. You can create, modify and export them from within the Portal, which is great, unless you want to integrate them in your ‘regular’ development cycle.The export feature enables you to copy/paste the Logic Apps to your ARM templates, but this is suboptimal in my opinion. There’s also the Azure Logic Apps Tools for Visual Studio extension, which makes the integration a bit better, but it still feels a bit quirky.Another downside is the ’language’. When exporting a Logic App you’ll be seeing a lot of JSON. While there might be a good reason for this, it’s not something I like working in and create (complex?) workflows.If you can overcome, or accept, these downsides I’d really advice you to look into Logic Apps. If not, well read on!
Azure Functions to the rescue
If your IT organization consists of mostly developers it might make more sense to use Azure Functions to glue different systems with each other instead of Logic Apps. The biggest downside of Azure Functions in this scenario is, you don’t have all of the building blocks from a Logic App to your availability. You have to create your own logic for this.However, the major benefit of using Azure Functions as the glue to your solution is they are written in the language of your choice and can be deployed via your ’normal’ CI/CD process.The only thing the Logic App in the previous post did was receive a HTTP POST message, parsing it and send a message to Teams. All of this can also be done via a standard HTTP triggered Azure Function. And because I prefer writing C# code instead of dragging-dropping building blocks (or write JSON if you’re really hardcore), the Azure Functions approach works best for me.
How to start with this?
The first thing you need to do, besides creating an HTTP triggered Azure Function, is to deserialize the incoming message from Azure Monitor.
The easiest way to get the complete Alert object is by copying the complete JSON message and use the Paste JSON As Classes option in Visual Studio. This will create a model with all of the properties and complex types which are available in alert. At the moment it will look very similar to the following model.
/// <summary>
/// Generated via `Paste JSON as Classes`
/// </summary>
public class IncomingAzureMonitorCommonAlertSchema
{
    public string schemaId { get; set; }
    public Data data { get; set; }
}
public class Data
{
    public Essentials essentials { get; set; }
    public Alertcontext alertContext { get; set; }
}
public class Essentials
{
    public string alertId { get; set; }
    public string alertRule { get; set; }
    public string severity { get; set; }
    public string signalType { get; set; }
    public string monitorCondition { get; set; }
    public string monitoringService { get; set; }
    public string[] alertTargetIDs { get; set; }
    public string originAlertId { get; set; }
    public DateTime firedDateTime { get; set; }
    public string description { get; set; }
    public string essentialsVersion { get; set; }
    public string alertContextVersion { get; set; }
}
public class Alertcontext
{
    public object properties { get; set; }
    public string conditionType { get; set; }
    public Condition condition { get; set; }
}
public class Condition
{
    public string windowSize { get; set; }
    public Allof[] allOf { get; set; }
    public DateTime windowStartTime { get; set; }
    public DateTime windowEndTime { get; set; }
}
public class Allof
{
    public string metricName { get; set; }
    public string metricNamespace { get; set; }
    public string _operator { get; set; }
    public string threshold { get; set; }
    public string timeAggregation { get; set; }
    public Dimension[] dimensions { get; set; }
    public float metricValue { get; set; }
}
public class Dimension
{
    public string name { get; set; }
    public string value { get; set; }
}
Once you have this model, you can deserialize the incoming alert message and start creating a message for Teams.
So, what do I send?
You’re quite restricted in what you can send to a Microsoft Teams channel via a webhook. When searching for this you’ll quickly find the different Adaptive Cards. These look nice and possibilities are also great. However, you can’t use them via a webhook. Adaptive Cards only work when using a Bot, something I really don’t want to do/configure at the moment.The only cards which are supported in Teams, which you can send directly via a webhook, are the legacy Message Cards. While these work fine, I do hope the support for Adaptive Cards will be added soon.What I did in the previous post was sending out a message with only a title and a text property in a JSON object. This works and might be useful in a couple scenario’s, but most of the time you want to do more as only informing the users. When an alert pops up, someone probably has to do something with the failing (?) resource.
If this ‘action’ can be automated some way, you can add a button to your message which is able to invoke some HTTP endpoint. This is great, because now we can configure an Azure Functions, Logic App, Automation Job, App Service, etc. to be the endpoint which fixes the root cause of the alert. You just have to remember Microsoft Teams has to be able to invoke the endpoint, which means it has to be a public available endpoint.
In order to add buttons to your Message Card, you have to add Actions to your message. What I came up with is the following type of message.
{
    "@type": "MessageCard",
    "@context": "https://schema.org/extensions",
    "summary": "More as 100 messages on queues",
    "themeColor": "0078D7",
    "sections": [
        {
            "activityImage": "https://jan-v.nl/Media/logo.png",
            "activityTitle": "More as 100 messages on queues",
            "activitySubtitle": "05/02/2019 19:32:20",
            "facts": [
                {
                    "name": "Severity:",
                    "value": "Sev3"
                },
                {
                    "name": "Resource Id:",
                    "value": "3b3729b4-022a-48b5-a2eb-48be0c7e7f44:functionbindings"
                },
                {
                    "name": "Entity:",
                    "value": "correct-implementation-netframework"
                },
                {
                    "name": "Metric value:",
                    "value": "10000"
                }
            ],
            "text": "There are a lot of messages waiting on the queue, please check this ASAP!",
            "potentialAction": [
                {
                    "@type": "HttpPOST",
                    "name": "Fix the stuck Service Bus",
                    "target": "https://serverlessdevops.azurewebsites.net/api/FixFailingServicebus?code=WVq4Ta3ba0i53a3qzHbLWHLnCiRNA8UnhHICIl1UfURskh/Cx0J8IQ==",
                    "body": "{\"ResourceId\": \"3b3729b4-022a-48b5-a2eb-48be0c7e7f44:functionbindings\",\"Entity\": \"correct-implementation-netframework\" }"
                }
            ]
        }
    ]
}
This defines a Message Card which looks like this inside Microsoft Teams.
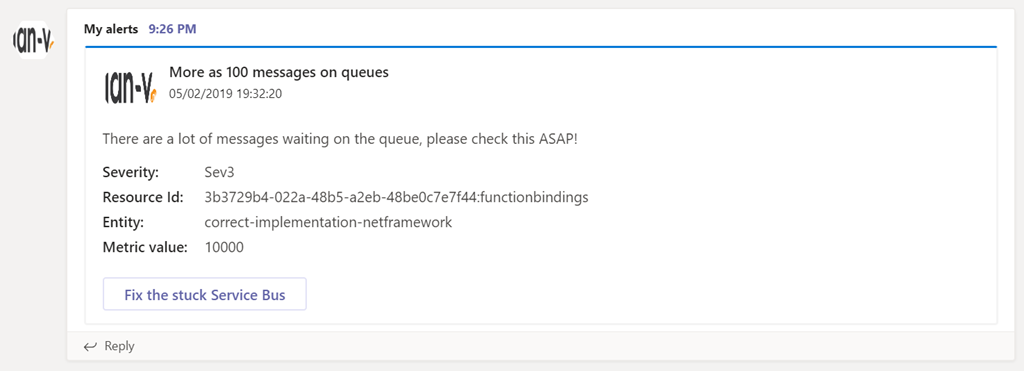
As you can see there’s a big button in the card which enables me to do something. You can add multiple buttons over here. Aside from a fix-button I also add a button with a deeplink to the resource in the Azure Portal most of the time.
You have to keep in mind though, the only type of HTTP methods you can do are GET and POST. When making a POST request a body can be added by adding the optional body property to the message.
The JSON sent over here looks a bit more advanced, but as you can see, the message is also a lot more useful.
Looking great so far, can we do more?
Yes we can!
I’ll be writing some more on what you can do with Azure Functions and Microsoft Teams in a couple of my next posts. I think this integration can really help a lot of DevOps teams in keeping their environments in a healthy state, so I’m keen on sharing my experiences with it. If you can’t wait for the blogposts to appear, you can also follow along the progress in my Serverless DevOps repository on GitHub. If you take a look over there, you can see what I’m doing in order to send and receive messages in Teams & Azure Functions.