DevOps easier with Logic Apps and Teams
I’ve written about empowering your Teams with Azure Functions a while back, but this isn’t the only way to create value. You can also use Azure Logic Apps.
Logic Apps are a way to express powerful integrations with (several different) systems in a visual workflow based way. It has a lot of similarities with other (Microsoft) workflow systems from the past, so it should strike very familiar to most (Enterprise) developers.
Being a visual workflow solution, it doesn’t warm the heart of most developers. However, the world doesn’t consist solely of developers and this solution being visual is a very big advantage if you’re not a coder or like to deliver value instead of just more code.
First step
The first step you need (or actually, WANT) to take is create a Webhook connector on a channel. You can check my previous post on how to do this.
Posting to this channel has to be done in a similar way. You will still need to post some JSON in a predefined format to this webhook.
Next step: Setting up Alerts
In order to make your DevOps process a bit easier, it’s very useful to leverage the power of Application Insights and Alerts. For this to work, you need to know what metrics you actually want to be alerted for. I’m going to assume you already have some monitoring in place with appropriate metrics. If not, you should definitely define some. They can be tuned afterward.
Adding or modifying new alerts is as easy as clicking on the Alerts option in your service.
On this blade, you’ll see an overview of all alerts which are already defined and can create new ones.
![clip_image001[7]](https://jan-v.nl/files/6cf50854-458c-4d81-b397-97870a830f99.png)
When creating new alert rules you have to specify which signal type you want to create an alert for. At the moment there are three different types you can choose from Metrics, Log Search and Activity Log.
The other filter you can use is the Monitor Service.
If you leave both options to All, you’ll see all possible type of signals to create alert rules for.
![clip_image001[9]](https://jan-v.nl/files/02825a83-3bef-41fb-8271-45bd64ddc719.png)
In my case, I like to receive an alert when my service plan is hitting its limits, like a high CPU, Memory usage or low response times. You can configure all of this, and more, on this page. The one on the image below shows you how to set an alert when the CPU has an average usage of at least 60%.
![clip_image001[5]](https://jan-v.nl/files/55873c94-4d51-4bc0-8f5b-6863f4fabb33.png)
By selecting the proper resource group and condition you want to get alerted for, you can specify one or more so-called Action Groups.
![clip_image001[1]](https://jan-v.nl/files/0e6f0732-d82d-4245-9396-da3a7e3e48b8.png)
A single action group is responsible for handling one specific action, like sending data to a webhook, as shown over here.
![clip_image001[3]](https://jan-v.nl/files/d465d041-a934-45fd-b908-f3eb966c1bb7.png)
Keep in mind though, you should NOT fill out the webhook from the Teams channel over here. Posting a message to a Teams channel requires a specific JSON message, which isn’t compatible with the JSON sent via an Alert. The webhook you want to specify over here is the location to the handler of your JSON message, like the logic app we’ll create in the next step.
Handling the Alerts
After having set up your alerts and having made sure they actually work, it’s time to handle them. In order to check if the alerts worked, I’ve lowered the thresholds a bit in order to receive alerts in an orderly fashion.
You can view which alerts have been triggered via the Alerts page in Azure Monitor.
![clip_image001[7]](https://jan-v.nl/files/79702d22-8106-4f7a-8b60-d8e00194f1b2.png)
What we need to do now, is receive the JSON of the Alert and send it in a different format to our Teams webhook. As I already mentioned, the easiest way to do this is via Azure Logic Apps. You can even make external calls to other systems, Azure Functions, etc.
The first thing you need to do in your logic app is to specify the JSON scheme which is sent to the app. There is quite a bit of documentation available on this, but I find the easiest way is to fail fast and go from there.
What I mean with this is, create the Logic App without a good schema and save it.
By doing so you will now have the webhook address of your Logic App. You can now go back to your Alert Action Group and fill out this address in the webhook textbox.
Going back to the Logic App, you will now probably see a couple of failed events.
![clip_image001[9]](https://jan-v.nl/files/075bc088-fb59-463a-a0e2-b48edc513ebc.png)
If not, make sure to trigger one or two Alerts in order to get these failed events. What’s great about this is the complete context of this event is stored, including the JSON message.
![clip_image001[11]](https://jan-v.nl/files/f93800c2-16e7-4697-9489-d1ef029ea3fd.png)
For now, the only thing you need to do is to copy the contents of the body element.
This content can be pasted inside your step When a HTTP request is received on the link Use sample payload to generate schema.
![clip_image001[13]](https://jan-v.nl/files/cb547182-0459-4ae0-b3e3-4bc77748ad66.png)
This saves you from going through the docs, only to discover something is missing or something even worse. The schema of your message is now auto-created.
This enables us to create a new HTTP-step in order to POST a message to our Teams channel
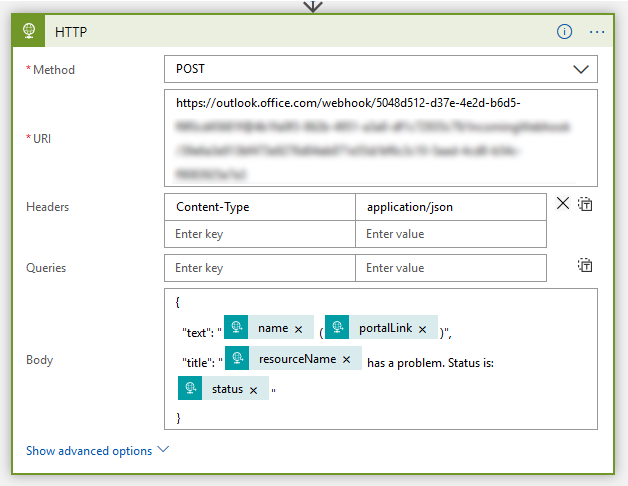
Of course, you can make this message as fancy as you’d like, but this is about all the basics you need in order to create a basic alert on Teams.

This all looks very complex
Well, if you gloss over it, it might look like this. Especially if you know there are also out of the box Teams actions which you can leverage in a Logic App.
![clip_image001[15]](https://jan-v.nl/files/c7f2371d-f0ac-4e1e-b69f-b3a87e8e3168.png)
The ‘downside’ (or maybe it’s an upside) to these actions is they need an Identity known in Teams (= your Office 365 tenant). While it’s possible to create a special identity for this, it’s not something I like much for this specific case.
One other thing, you still need to do everything yourself when using the default Teams actions. The only thing it’ll make a bit easier is POST’ing the message to Teams. While the JSON body might look a bit hard at first, it’ll grow on you and will enable you to create messages with a bit more flexibility.
But if you’re not a developer or operations person, the out of the box actions might be good enough for you.
That’s it for now. I’ll continue this series with some other posts on how to use all of this in your production environment and save you some time on repetitive operational work.