Creating Octopus Deploy packages with Visual Studio and Teamcity
In my previous post I’ve talked about creating new projects in Octopus Deploy in order to deploy projects to different environments. In this post I’ll explain a bit on how to create Octopus Deploy packages for your Visual Studio projects via Teamcity.
To enable packaging for Octopus you’ll need to include the Octopack NuGet package to the project you are packaging. In my case this will be the Worker project since I’m only working with Microsoft Azure solutions at the moment.
Once this package is successfully installed you will have to modify the project file also to enforce adding files in the Octopus package.
The following line will have to be added to the propertygroup of your build configuration
<OctoPackEnforceAddingFiles>True</OctoPackEnforceAddingFiles>
For reference, a complete propertygroup:
<PropertyGroup Condition=" '$(Configuration)|$(Platform)' == 'Release|AnyCPU' ">
    <DebugType>pdbonly</DebugType>
    <Optimize>true</Optimize>
    <OutputPath>bin\Release\</OutputPath>
    <DefineConstants>TRACE</DefineConstants>
    <ErrorReport>prompt</ErrorReport>
    <WarningLevel>4</WarningLevel>
    <OctoPackEnforceAddingFiles>True</OctoPackEnforceAddingFiles>
</PropertyGroup>
Your project is now ready to start packing. In my case I had to add a nuspec file also, because the worker project contained an application which has to be deployed to on an Azure Cloud Service.
A nuspec file for Octopus Deploy looks exactly the same as one you would create for NuGet itself. Mine looks like this:
<?xml version="1.0"?>
<package xmlns="https://schemas.microsoft.com/packaging/2011/08/nuspec.xsd">
	<metadata>
		<version>$version$</version>
After installing the plugin, three new runner type features will be available when creating a new build step.

I’m just using the Create release option, since this one is also capable of deploying a release to an environment. We don’t use the Promote release option as we want this to be a conscious, manual, step in the process.
There’s also a new section in the Visual Studio (sln) runner type which enables you to run OctoPack on the solution/projects.

If you want to use this for a build step, just enable the checkbox and be sure to set a proper build number in the OctoPack package version box.
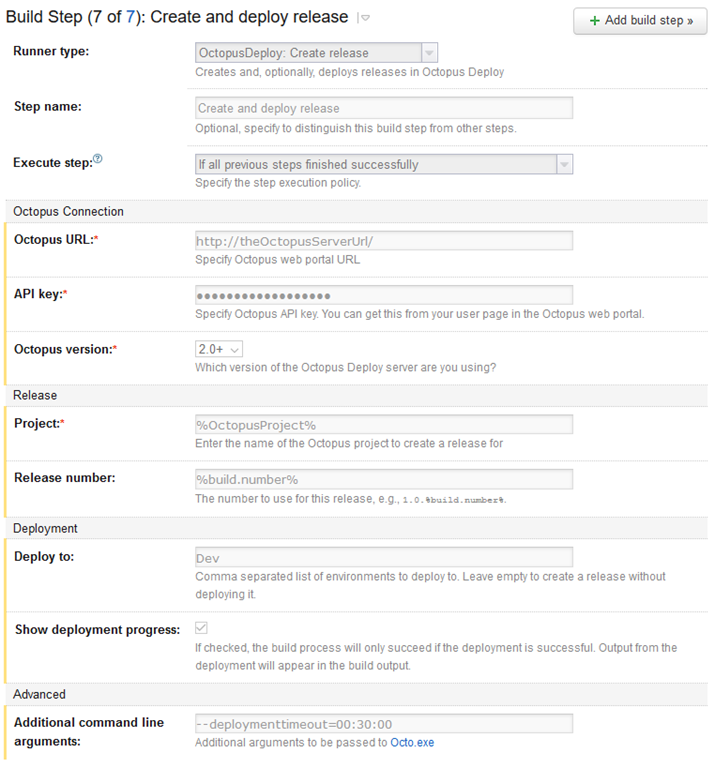
On the image below you can check out the settings I’m using to create a new release with Octopus Deploy.

As you can see, I’ve added an additional command line argument telling the deployment timeout to be set on 30 minutes.
--deploymenttimeout=00:30:00
This is because the current builds take about 12 to 17 minutes to be deployed to a Cloud Service and the default (configured) Teamcity build timeout is set lower amount. Therefore all deployment builds will be marked as failed if you don’t add this argument.
I’ve also marked the Show deployment progress. This will make sure all Octopus Deploy output will get printed into Teamcity. If something fails, you’ll be able to check it out within Teamcity, assign someone to the failed build and he/she will have all information necessary to fix the failure.
Well, that’s about it on creating a nice starter continuous deployment environment. You can expand this in a way of your liking of course, but these are the basics.
