Create and configure Azure Traffic Manager using Bicep
There are a ton of useful Azure resources, and one that I don’t read or hear a lot about is Azure Traffic Manager.
According to the docs:
Azure Traffic Manager is a DNS-based traffic load balancer. This service allows you to distribute traffic to your public facing applications across the global Azure regions. Traffic Manager also provides your public endpoints with high availability and quick responsiveness.
Meaning it’s a very good service to make sure the requests to your backend are routed to the backend that’s able to respond the fastest. I’m using this service for two of my side-projects, the URL-minifier service, and the Guid service. The services are deployed to the United States, Europe and Australia, making sure just about everyone will have a similar experience in terms of speed.
An added benefit is you get high availability too, because if one region is down, requests will be routed to another region.
It’s also very cheap to use, about $0,50 per billion requests per month.
When combined with Cloudflare as a CDN and frontline DNS, it’s costing me just about nothing to use.
The setup
You can add the Azure Traffic Manager via the Azure Portal and add Endpoints to the resource. There are different type of endpoints you can use.
- Azure endpoint
To be used for Azure resources and gives a very point and clicky experience. - External endpoint
When hosting services outside of Azure, this is the go to endpoint to use. Provide the FQDN or IP address to validate and you’re good to go. - Nested endpoint Used for more complex scenario’s, when some flexible routing is necessary. Should probably not be used for regular side-projects, but might be applicable for enterprise or production workloads.
For my services, I’m using the Azure endpoint option, and add the three different backends.
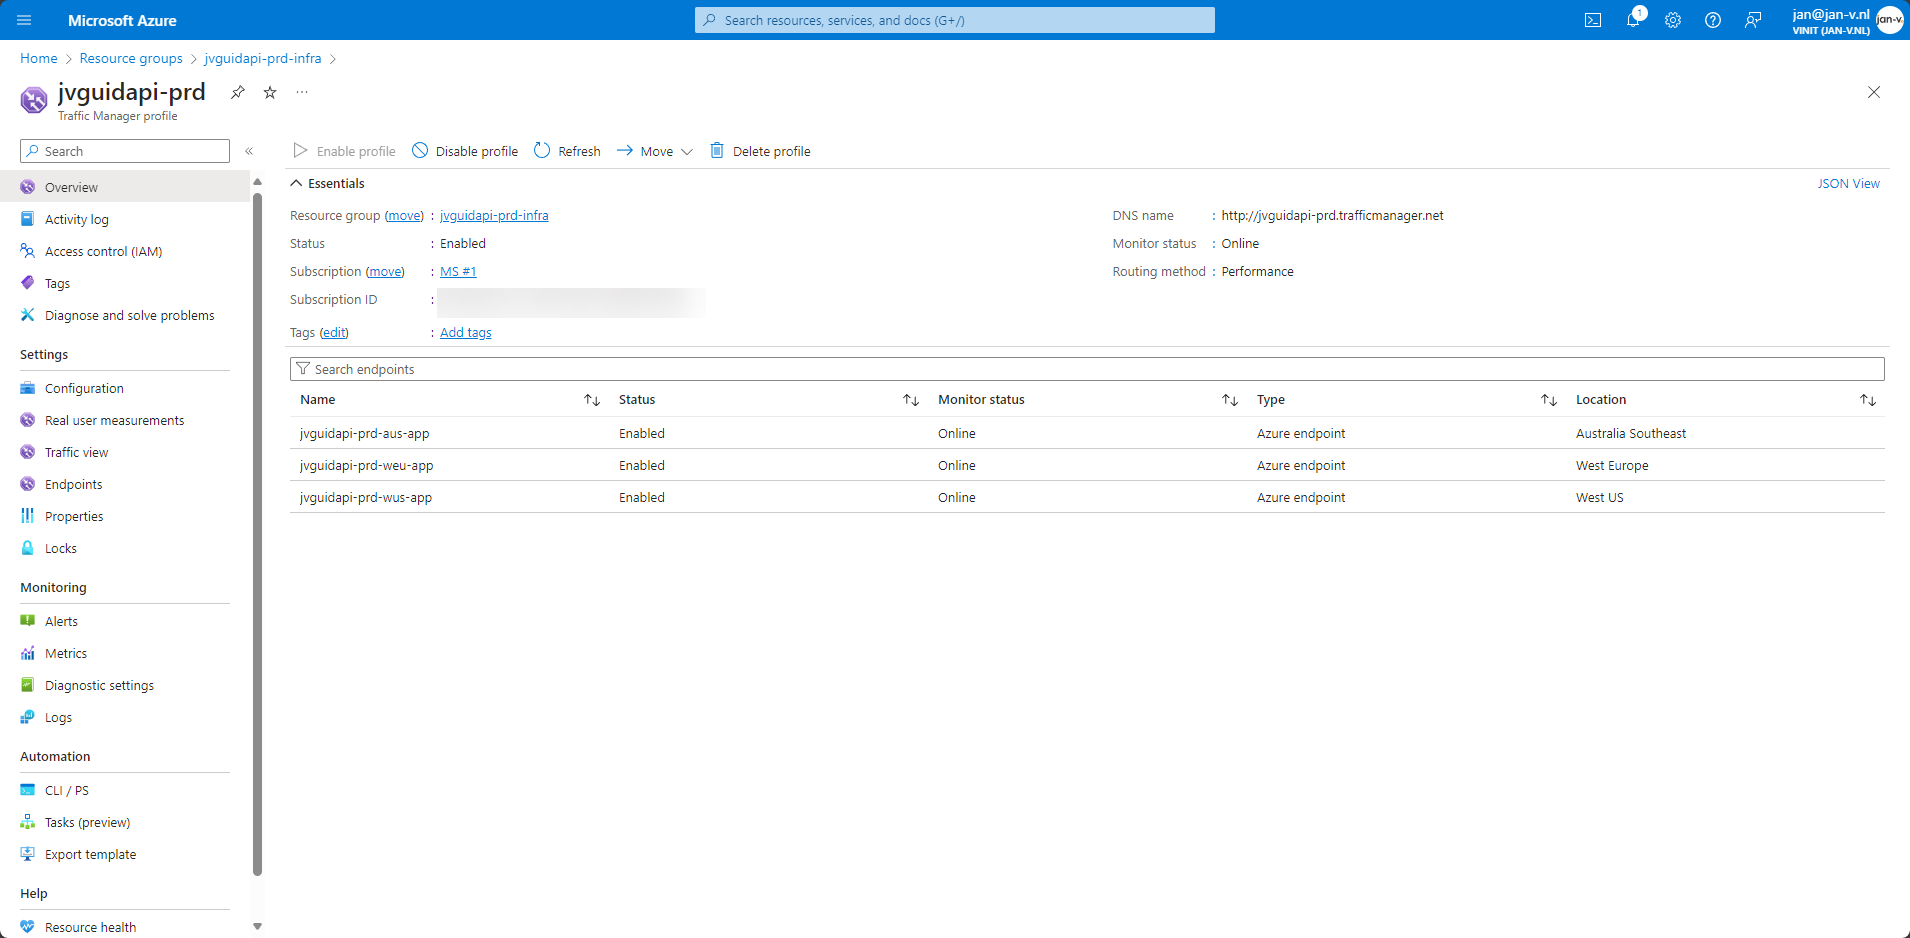
One thing to note is you need to provide a Configuration to the Traffic Manager. This configuration is used to determine what routing strategy is used. For me it’s Performance.
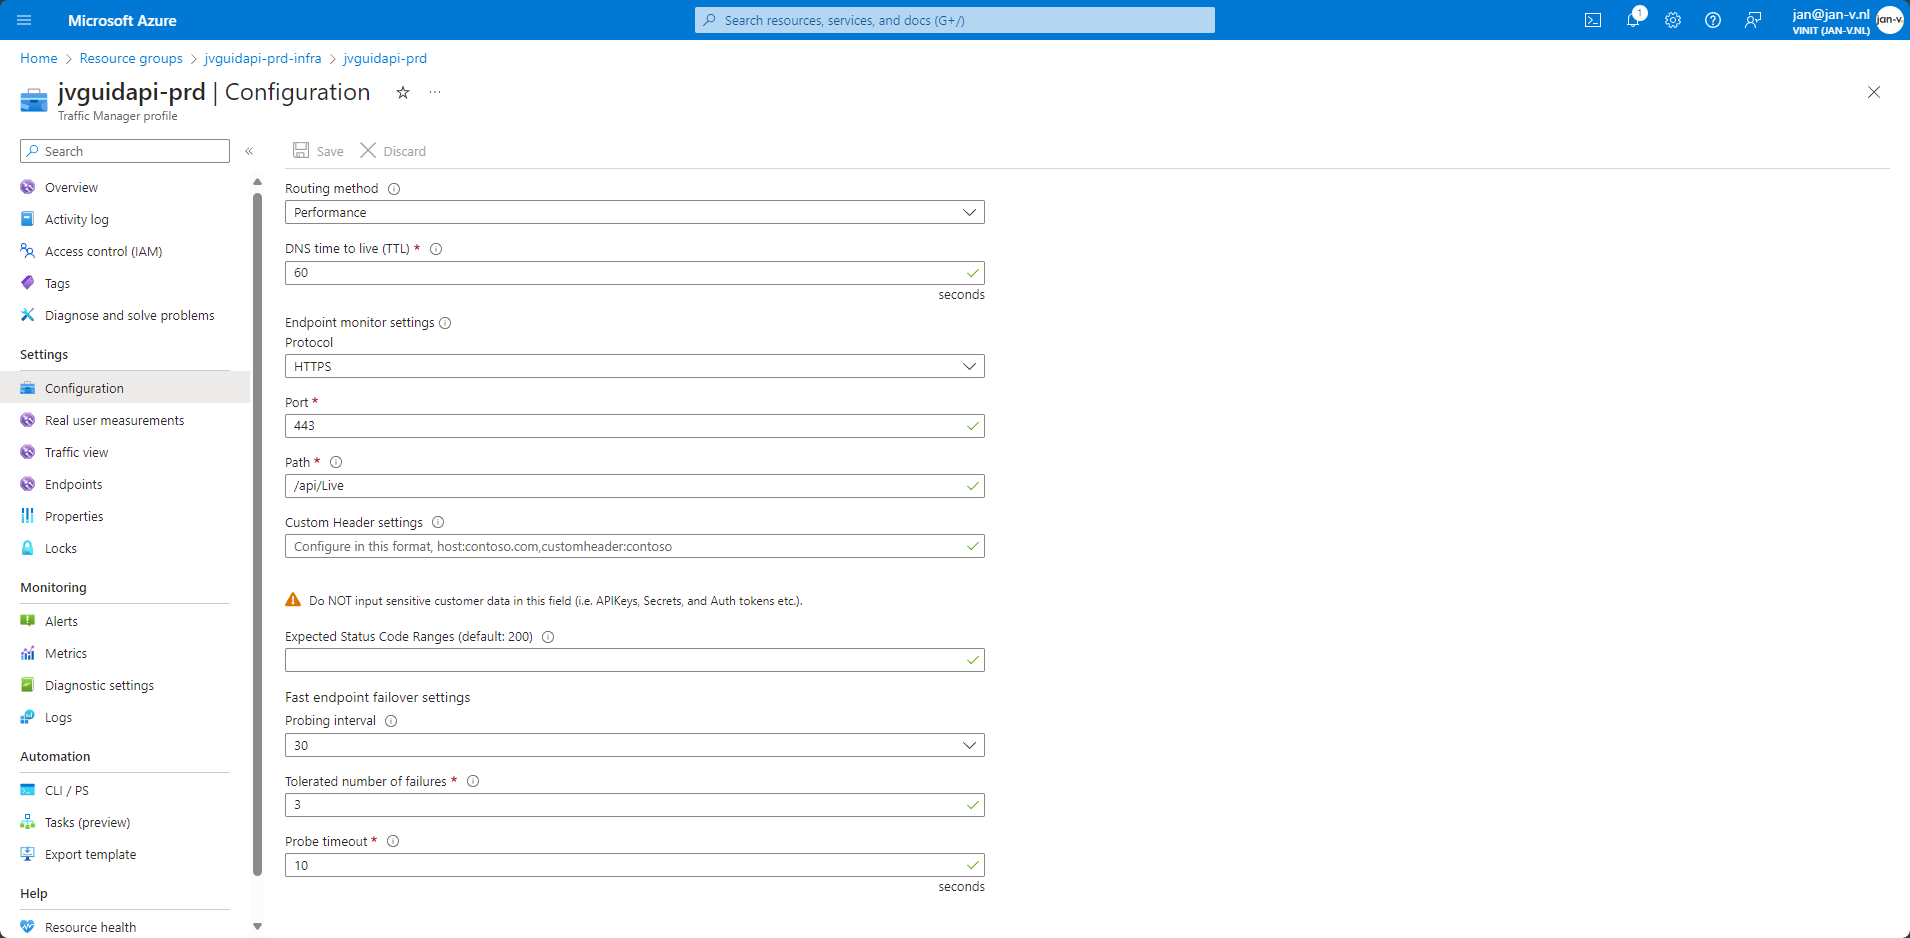
In the above image you might notice the Path is pointing to /api/Live.
This endpoint is used by Azure Traffic Manager to determine the health of the backend service. When healthy, it should respond with a response code 200. When any other code is returned, and no Expected Status Code Ranges is specified, Traffic Manager will assume an unhealthy backend and stop routing requests to the failing instance.
The Bicep templates
Azure Traffic Manager is a global service, meaning it’s not bound to the region of your Resource Group, similar to resources like Azure CDN, Azure Front Door, etc.
Because of this, it doesn’t really matter which resource group you will deploy it to. I like putting these type of resources into a dedicated infrastructure resource group.
To get started, you need the Azure Traffic Manager resource which is a trafficmanagerprofiles.
resource trafficManagerProfile 'Microsoft.Network/trafficmanagerprofiles@2018-08-01' = {
  name: trafficManagerProfileName
  location: 'global'
  properties: {
    dnsConfig: {
      relativeName: trafficManagerProfileName
      ttl: 60
    }
    profileStatus: 'Enabled'
    trafficRoutingMethod: 'Performance'
    monitorConfig: {
      profileMonitorStatus: 'Online'
      protocol: 'HTTPS'
      port: 443
      path: relativeLiveEndpoint
      timeoutInSeconds: 10
      intervalInSeconds: 30
      toleratedNumberOfFailures: 3
    }
  }
}
Glossing over this excerpt you’ll see the same configuration values when compared to the earlier shared screenshot.
Of course, just having this resource doesn’t do much. Next up is to add the different backend endpoints.
This isn’t rocket-science, but does need some thought to make the template reusable for every backend. What I ended up with is the following.
First, create a Bicep module responsible to create the Azure endpoints.
param trafficManagerProfileName string
param webAppEndpoints array

resource webAppResources 'Microsoft.Web/sites@2021-02-01' existing = [for i in webAppEndpoints: {
  name: i.webAppNameToAdd
  scope: resourceGroup(i.webAppResourceGroupName)
}]

resource endpoints 'Microsoft.Network/trafficManagerProfiles/azureEndpoints@2018-08-01' = [for (webAppEndpoint, index) in webAppEndpoints: {
  name: '${trafficManagerProfileName}/${webAppResources[index].name}'
  properties: {
    endpointStatus: 'Enabled'
    endpointMonitorStatus: 'Online'
    targetResourceId: webAppResources[index].id
    target: 'https://${webAppResources[index].name}.azurewebsites.net/'
    endpointLocation: webAppResources[index].location
    weight: 1
    priority: webAppEndpoint.priority
  }
}]
This module will iterate over the collection of webAppEndpoints and add the backends appropriately.
In my main Bicep template, I use the following construct.
module endpoints 'Network/trafficManagerProfilesEndpoint.bicep' = {
  name: 'trafficManagerProfileEndpoints'
  dependsOn: [
    trafficManagerProfile
    applicationAustraliaSouthEast
    applicationWestEurope
    applicationWestUs
  ]
  params: {
    trafficManagerProfileName: trafficManagerProfile.outputs.instanceName
    webAppEndpoints: [
      {
        webAppNameToAdd: applicationAustraliaSouthEast.outputs.webApplicationName
        webAppResourceGroupName: rgAustraliaSouthEast.name
        priority: 1
      }
      {
        webAppNameToAdd: applicationWestEurope.outputs.webApplicationName
        webAppResourceGroupName: rgWestEurope.name
        priority: 2
      }
      {
        webAppNameToAdd: applicationWestUs.outputs.webApplicationName
        webAppResourceGroupName: rgWestUs.name
        priority: 3
      }
    ]
  }
  scope: rgInfrastructure
}
What’s important to note over here is the priority property. The value for this needs to be the same for an endpoint for every deployment. I had first used a counter, or the index of the item in the array, for this. When tinkering with the templates this caused issues, so I opted for this hard-coded approach. It also gives control of priority to the caller, and not the individual module, which can be seen as an added benefit.