Creating a native Teams app with Dataverse integration
I’ve been working with the Power Platform for a couple of weeks now, and I’m pretty impressed by the functionality it offers.
Lots of scenarios can be covered by using these tools as a frontend for applications we need to serve to our customers, and there’s also a very nice integration with Microsoft Teams! However, there’s always this special little snowflake that can’t easily be accomplished within a Power App. The keyword over there is ’easily'.
To overcome this, you can also create native Teams applications.
To create these types of applications, you need to install the Teams Toolkit for Visual Studio or Teams Toolkit for Visual Studio Code. Both work fine, but when working with something new I prefer using full Visual Studio so that’s what I’ve been using for this first application.
When installed, you’ll have a new project option called Microsoft Teams App.

This will create a new Teams App project, and you can even choose if you only want it to be a Tab-application, a Bot-application, or both.
Once the project is finished creating all of the files, you’ll probably see some familiarities with a Blazor application. That’s because the Teams Application is a Blazor UI application! There’s also a nice GettingStarted.txt file that details how to run & set up your environment.
Starting the new application
Before you start adding functionality to the application, it’s probably a good idea to check if you can get this default application to work.
If you’ve selected Bot capabilities, you might need to set up Ngrok first. Also, for this Teams Application to work, there needs to be done some configuration.
You can find all of the steps in the getting started file. The most important parts are the following:
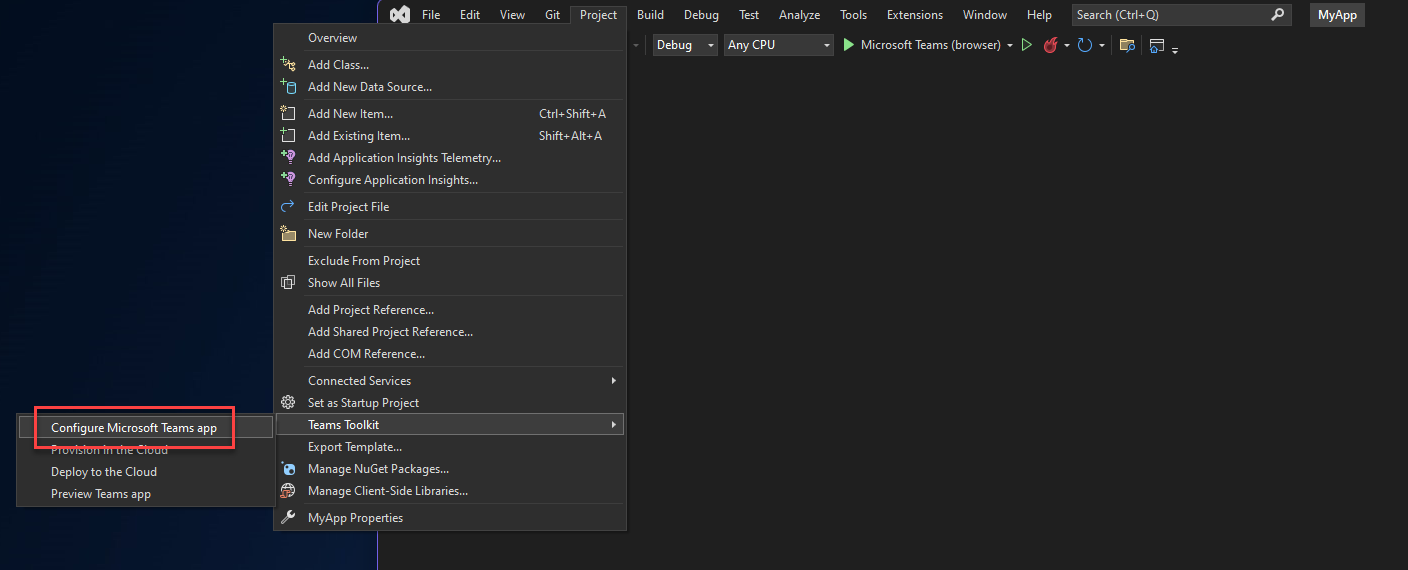
- Select the Project > Teams Toolkit > Configure Microsoft Teams app menu in Visual Studio. When prompted, sign in using your M365 account.
and
Select ‘Project > Teams Toolkit > Provision in the Cloud’ to create resources in Azure and Microsoft 365 for your app, but no code is copied to the resources.
These steps will configure the application in Microsoft 365 and Azure Active Directory.
The appsettings.Development.json should now look similar to the following example:
{
  "Logging": {
    "LogLevel": {
      "Default": "Information",
      "Microsoft": "Warning",
      "Microsoft.Hosting.Lifetime": "Information"
    }
  },
  "AllowedHosts": "*",
  "TeamsFx": {
    "Authentication": {
      "ClientId": "a4774a4d-baad-4c7e-984a-e3d177da58b5",
      "ClientSecret": "9tZSB2YWx1ZSB0aGlzIGlzIGFuZCBJIGRvbnQgd2tub3cgd2h",
      "OAuthAuthority": "https://login.microsoftonline.com/76ffb559-59c6-4ffc-be99-184854e23d0d"
    }
  }
}
As you can imagine, these actions require quite a bit of permission from the tenant you’re deploying to. Try this out on your personal environments first, because most of us don’t have this much permission on our regular developer accounts.
Note: Make sure you don’t commit the
ClientSecretin your repository!
The same could be said for theClientIdand tenant identifier. While those aren’t secrets by definition, you don’t need to advertise them in the repository either.
Once the initial setup is done, you should be able to start a debugging session & see the sample app is loaded in the Microsoft Teams context. Because the ‘Provision in the Cloud’ is also executed, the app will use the App Registration which is now added to your tenant.
Now that everything is (or should be) working, check out the project structure & configuration values to understand what is necessary for a native Teams application.
Connecting to Dataverse REST API
Microsoft Dataverse has a REST API which can be used to invoke CRUD actions on the tables & entities.
This API can very well be used in this native Teams application.
But before you can invoke the API, you’ll need a JWT bearer token with the appropriate scopes defined.
Getting permission
To get the appropriate scope the App Registration, which was created earlier, first needs to have permission to get get the user_impersonation scope for Dynamics 365.
You can add this permission by navigating to Azure Active Directory, searching for the App Registration, and navigating to the API permission blade. Over there you’ll be able to add new permissions.
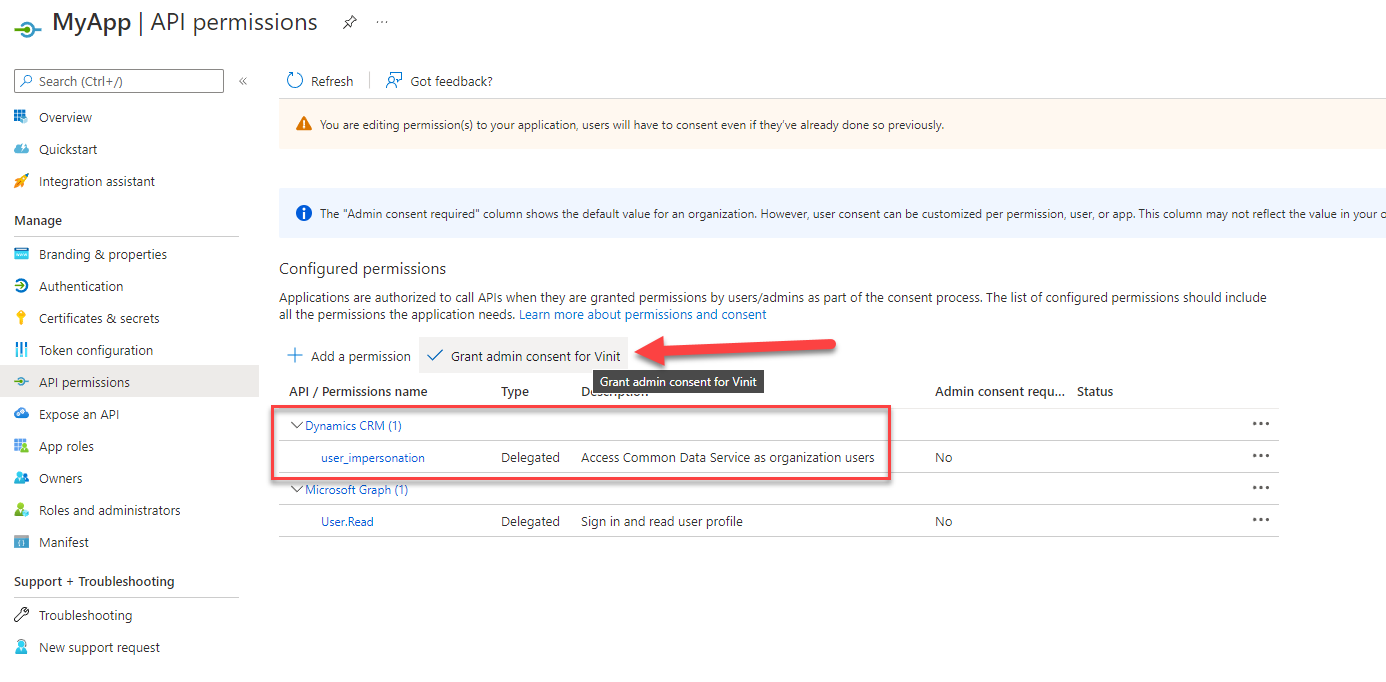
Don’t forget to press the button Grant admin consent for [organization]. If you do, your users will get an error message when providing their consent to the Teams Application later in the process.
Creating the JWT bearer token
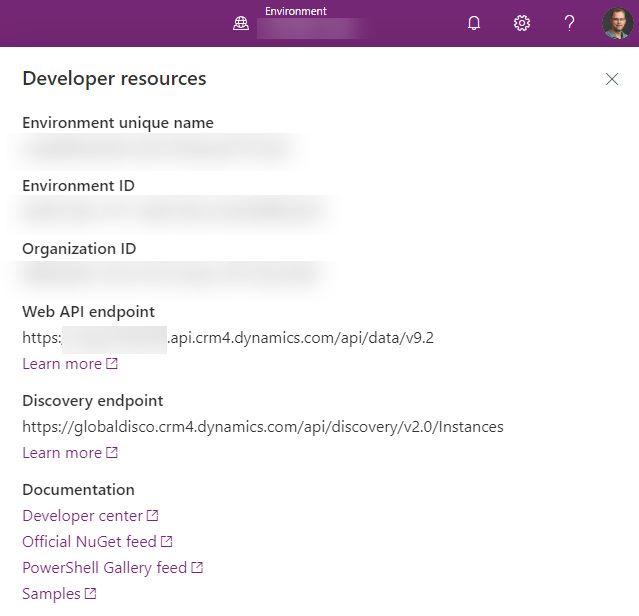
The Teams application can now create a bearer token with the user_impersonation scope for Dynamics 365. To do so, you first need to get the Web API endpoint for your environment. The easiest way to get this is by navigating to the environment in the browser and searching for the ‘Developer resources’ in settings.
The sample project has a component called Graph (file: Graph.razor) which has a couple of nice helper methods, which can be reused for getting access to the Dataverse REST API.
Please find an example in the code below:
private string dynamicsResource = "https://[thePowerPlatformEnvironment].api.crm4.dynamics.com/";
private string dynamicsScope = "user_impersonation";

private async Task ConsentAndShow()
{
    try
    {
        await teamsUserCredential.LoginAsync(new[] { _scope, dynamicsResource + dynamicsScope });
        NeedConsent = false;
        await ShowProfile();
        await ShowDynamicsUserId();
    }
    catch (ExceptionWithCode e)
    {
        ErrorMessage = e.Message;
    }
}
If the user hasn’t given consent to both scopes (User.Read and the Dynamics 365 user_impersonation), a popup will appear in which the user can give their consent for this application.
A token with the user_impersonation-scope can now be created like this:
var dynamicsToken = (await teamsUserCredential.GetTokenAsync(new TokenRequestContext(new string[] { dynamicsResource + dynamicsScope}), new System.
By adding this in the Authorization-header you’ll be able to query the API.
Query the REST API
Now that a token can be generated, we can check out some user details by invoking the WhoAmI-endpoint.
private async Task ShowDynamicsUserId()
{
    try
    {
        var dynamicsToken = (await teamsUserCredential.GetTokenAsync(new TokenRequestContext(new string[] { dynamicsResource + dynamicsScope}), new System.Threading.CancellationToken())).Token;
        var httpClient = HttpClientFactory.CreateClient();
        httpClient.DefaultRequestHeaders.Authorization = new System.Net.Http.Headers.AuthenticationHeaderValue("Bearer", dynamicsToken);
        var whoAmIResponse = await httpClient.GetAsync(dynamicsResource + "/api/data/v9.2/WhoAmI");

        if (whoAmIResponse.IsSuccessStatusCode)
        {
            JObject body = JObject.Parse(whoAmIResponse.Content.ReadAsStringAsync().Result);
            Guid userId = (Guid)body["UserId"];

            _dynamicsUserId = userId.ToString("D");
        }
        else
        {
            ErrorMessage += "Web API call failed";
            ErrorMessage += "Reason: " + whoAmIResponse.ReasonPhrase;
        }
    }
    catch (ExceptionWithCode e)
    {
        ErrorMessage = e.Message;
    }
}
A more interesting example is to query the records within Dataverse. This can also be accomplished with the REST API, which uses OData for querying.
private async Task LoadDataverseData()
{
    var dynamicsToken = (await teamsUserCredential.GetTokenAsync(new TokenRequestContext(new string[] { dynamicsResource + dynamicsScope}), new System.Threading.CancellationToken())).Token;
    var httpClient = HttpClientFactory.CreateClient();
    httpClient.DefaultRequestHeaders.Authorization = new System.Net.Http.Headers.AuthenticationHeaderValue("Bearer", dynamicsToken);
    var accountsResponse = await httpClient.GetAsync(dynamicsResource + "/api/data/v9.2/accounts?$select=name,revenue&$orderby=revenue desc&$top=3");

    if (accountsResponse.IsSuccessStatusCode)
    {
        var topAccountsWithRevenue = await JsonSerializer.DeserializeAsync<Models.Dataverse.Accounts.WithRevenue.Rootobject>(
                                        await accountsResponse.Content.ReadAsStreamAsync());
        _accountCollection.Clear();
        _accountCollection.AddRange(topAccountsWithRevenue.value);
    }
    else
    {
        ErrorMessage += "Web API call failed";
        ErrorMessage += "Reason: " + accountsResponse.ReasonPhrase;
    }
}
Want to get started?
Eager to get started? I’ve published my code on GitHub, which might be a good starting point to try out this stuff: https://github.com/Jandev/TeamsAppWithDataverseApiConnection.
It also provides a bit more context to the code. Do note, that this isn’t production-ready code, so be aware of that when copy-pasting the stuff!