Using Application Roles for authentication in Your Services
A couple of days ago a friend asked me the question ‘How should I authenticate services with each other using roles’. I wanted to point him to a post I wrote last year, ‘Using an Azure Managed Identity to authenticate on a different App Service’, but I noticed this post wasn’t as complete as I remembered it to be.
While it does explain how to enable authentication in your service and using a Managed Identity for this, it doesn’t cover how to add roles in your application and assign them to a user or service principal (like a Managed Identity). So, let me cover the missing parts for the role-based authentication over here.
Adding roles to your App Registration
Wouldn’t it be nice if there was a possibility to add roles to your App Registration via the UI?
Well, that doesn’t exist.
You have to add your application roles in the manifest of the application, which is a big piece of JSON. I’m going to assume you have created an App Registration, as mentioned in the linked post above, and can navigate to the ‘Manifest’ blade of this application.
Over there you’ll see a property called appRoles.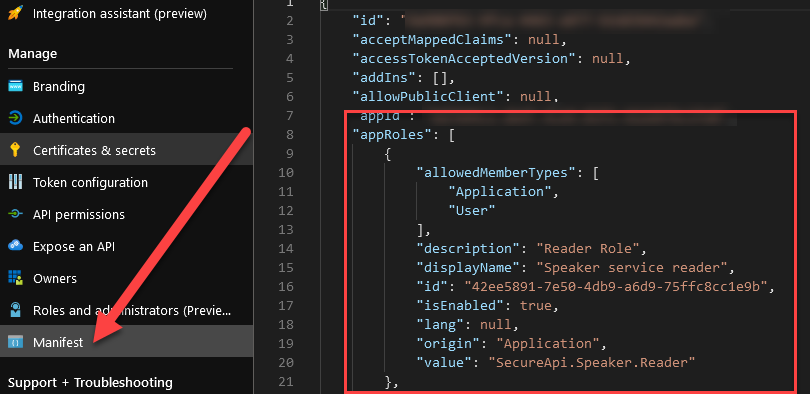
As you can see in the image above, I’ve defined a role over there with a description Reader Role, meant for reading access in the application. For reference sake, here’s the JSON:
{
    "allowedMemberTypes": [
        "Application",
        "User"
    ],
    "description": "Reader Role",
    "displayName": "Speaker service reader",
    "id": "42ee5891-7e50-4db9-a6d9-75ffc8cc1e9b",
    "isEnabled": true,
    "lang": null,
    "origin": "Application",
    "value": "SecureApi.Speaker.Reader"
}
Let’s strip this down a bit.
The allowedMemberTypes property, lets you define if users, applications, or both can be assigned to the role. For managed identities, you only need to have Application defined over here, but I like to test stuff myself also (from within my IDE using my account), so I always add User also for development purposes.
The description and displayName don’t need much explaining.
The id has to be a unique identifier. It’s a string, so everything goes, but I think it’s a good practice to use a GUID for this. You have to remember this value (or write it down) as you’ll be needing it later on.
I’m going to skip the other properties, except for value. The value is the value of the role you will be using throughout your application in the Authorize-attributes, like so:
[HttpGet]
[Authorize(Roles = "SecureApi.Speaker.Reader")]
public IEnumerable<Domain.Contracts.Model.Speaker> Get()
{
    return this.speakers;
}
You can add as many roles as you like to the Manifest, but I try to keep them limited as they all need management as well.
Configuring your application
Check out the chapter called ‘Configuring your App Registration’ in my earlier post. It covers everything you need to do (for the most basic implementation).
When you’re finished with the configuration part, you can add the Authorize attribute, with the created roles, to your endpoints.
Assigning roles to users and managed identities
You can assign the roles via either the Azure PowerShell cmdlets or the Azure CLI.
For the Azure PowerShell cmdlet, you’ll be needing the New-AzureADServiceAppRoleAssignment command.
I’m more fond of using the Azure CLI, for which I couldn’t find an equivalent method. This means I had to resort to using the Graph REST API. A call will look pretty similar to the following two examples.
# Adding a role to the Managed Identity
az rest `
--method post `
--uri https://graph.microsoft.com/beta/servicePrincipals/[TheObjectIdOfTheEnterpriseApplicationBelongingToTheConfiguredAppRegistration]/appRoleAssignments `
--headers "{'content-type': 'application/json'}" `
--body "{
'appRoleId': '[IdentifierOfTheAppRoleYouWantToAssign]',
'principalId': '[ObjectIdOfTheManagedIdentity]',
'principalType': 'ServicePrincipal',
'resourceId': 'TheObjectIdOfTheEnterpriseApplicationBelongingToTheConfiguredAppRegistration'}"

# Adding a role to a user
az rest `
--method post `
--uri https://graph.microsoft.com/beta/servicePrincipals/[TheObjectIdOfTheEnterpriseApplicationBelongingToTheConfiguredAppRegistration]/
--headers "{'content-type': 'application/json'}" `
--body "{
'appRoleId': '[IdentifierOfTheAppRoleYouWantToAssign]',
'principalId': '[ObjectIdOfTheUser]',
'principalType': 'User',
'resourceId': 'TheObjectIdOfTheEnterpriseApplicationBelongingToTheConfiguredAppRegistration'}"
When you’re finished assigning all the roles to your users and service principals, you can see the assigned identities on the ‘Users and groups’ blade of the Enterprise Application.
The assigned identities will now be able to make an authenticated call, with their assigned roles, to the service and will be granted access to the endpoints with having the Authorize-attribute with a corresponding role.
Something you might also want to do is set the ‘User assignment required’ flag to Yes.
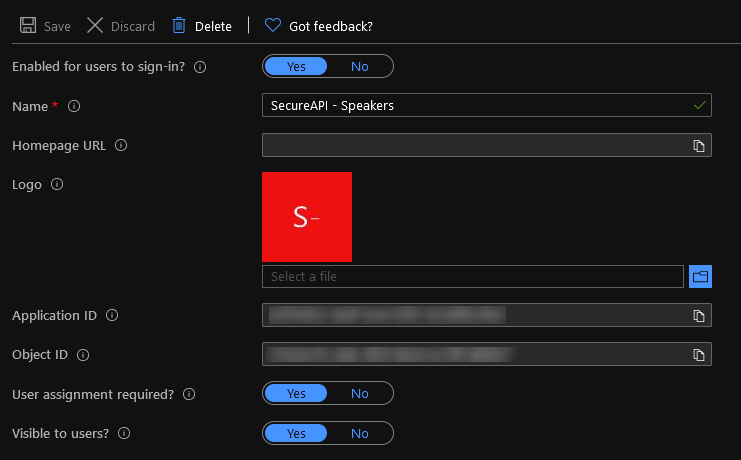
This flag will make sure only users who are authenticated will be able to access your application. This will save some unnecessary authentication in your application as it’s handled via AAD if I understand correctly.
So, that’s all there is to it. Let me know if it has helped you or if I didn’t explain something correctly or are just plain wrong on some details.