Securing Your App Service with a Vnet
My last post was on integrating your Azure App Service with a virtual network (VNet). This post is the other way around. It’s on how to put your App Service in a VNet, or rather, behind a VNet.
If you want to put your Azure App Service inside a VNet, you’ll have to look for the App Service Environment (ASE). This is an offering of dedicated machines that are placed inside a VNet and you’re paying a rather hefty fee for this. While I like the concept, I think it’s quite expensive for most scenarios. Sure, an ASE has its uses, but most customers and projects I’ve come across don’t need it for the current price.
There is one thing that most customers DO want, protecting their services from the outside world. The public cloud, like Azure, is a PUBLIC cloud. By default, anyone can access your services.
Lucky for us, most Azure services have rather decent protection and can also be integrated into a virtual network, though some need an additional price/service tier to make it possible. The same goes for Azure App Services. For quite some time now it is possible to add an access restriction that only allows traffic from a specific virtual network (VNet).
How to put an App Service behind a VNet in the portal
This is rather easy!
First, head down to the App Service you want to restrict access to. On the Networking blade, you’ll see a block called ‘Access restrictions’.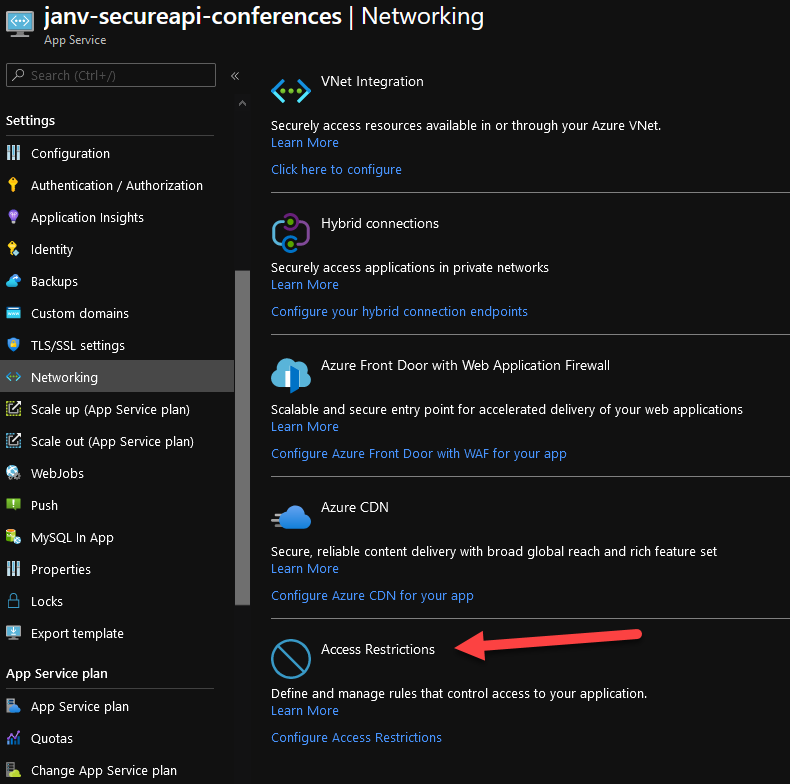
From over there you’re able to add a new access restriction to your site.

When clicking on the ‘Add rule’ you’ll see a new blade getting into the screen.
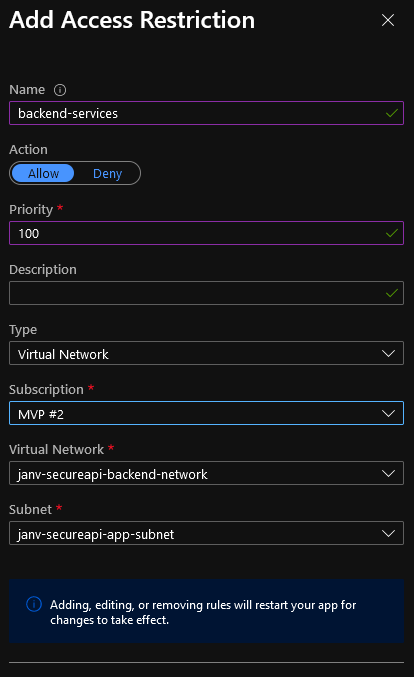
You should be able to select the option Virtual Network and select the virtual network + subnet you want to allow traffic from. You’ll need to have created a virtual network + subnet beforehand.
Adding the rule takes a couple of seconds.
When browsing to this App Service you’ll notice you won’t be able to connect to it anymore. Only traffic from the specified virtual network/subnet is now able to connect to this service.
It’s good to note the SCM site doesn’t have the same access restrictions applied. There is an option you can check to make the same rules apply, but it’s off for a reason.
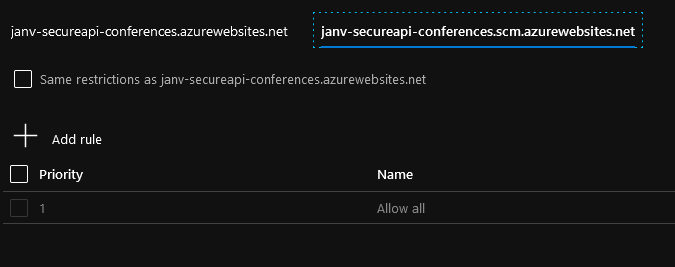
Most of the time you still want to manage the App Service from your development machines and if you aren’t careful, you might lock yourself out. I do recommend adding an access restriction over here, but it probably doesn’t have to be the same one as your default site.
You might want to create a management network where you connect to using a VPN or use a stepping stone technology like Azure Bastion. Anyway, be careful not to lock yourself out over here.
How to put an App Service behind a VNet using ARM templates
Working from the portal is quick and easy to do, it’s not something I recommend doing in a professional environment. I even recommend using a scriptable and repeatable way of deploying your resources for side-projects.
Creating access restrictions for App Services isn’t hard if you know where to put all of the necessary values. While this hasn’t taken me a lot of time to figure out, I do think it’s worth having the full JSON over here.
In my Variables block of the ARM template I have an entry which looks like the following.
"backendVirtualNetwork": {
    "instanceName": "[concat(variables('projectPrefix'), '-backend-network')]",
    "addressPrefixes": [
    "10.1.0.0/16"
    ],
    "subnets": {
        "appSubnet": {
            "instanceName": "[concat(variables('projectPrefix'), '-app-subnet')]",
            "properties": {
            "addressPrefix": "10.1.1.0/24",
            "serviceEndpoints": [
                {
                "service": "Microsoft.Web",
                "locations": [
                    "*"
                ]
                }
            ],
            "delegations": [
                {
                "properties": {
                    "serviceName": "Microsoft.Web/serverFarms"
                },
                "name": "webapp"
                }
            ]
            }
        }
    }
}
As you can see, I’ve added the Service Endpoint property over here. This is necessary to add an App Service to the VNet. The delegations property is there so I can integrate App Services to my VNet.
The following piece of JSON is what I’m using to create a virtual network & subnet.
{
  "name": "[variables('backendVirtualNetwork').instanceName]",
  "type": "Microsoft.Network/VirtualNetworks",
  "apiVersion": "2020-04-01",
  "location": "[resourceGroup().location]",
  "dependsOn": [],
  "properties": {
      "addressSpace": {
        "addressPrefixes": "[variables('backendVirtualNetwork').addressPrefixes]"
      },
      "subnets": [
        {
          "name": "[variables('backendVirtualNetwork').subnets.appSubnet.instanceName]",
          "properties": "[variables('backendVirtualNetwork').subnets.appSubnet.properties]"
        }
      ]
  }
},
Nothing very fancy over here.
To add the access restriction of only allowing traffic from the virtual network/subnet you need to add the ipSecurityRestrictions property to the config section of the App service. This ends up looking pretty much like the following piece of JSON.
{
    "apiVersion": "2018-02-01",
    "name": "web",
    "type": "config",
    "dependsOn": [
    "[resourceId('Microsoft.Web/Sites/', variables('apis').conferences.instanceName)]",
    "[resourceId('Microsoft.Network/virtualNetworks/', variables('backendVirtualNetwork').instanceName)]"
    ],
    "properties": {
        "webSocketsEnabled": false,
        "alwaysOn": true,
        "requestTracingEnabled": true,
        "httpLoggingEnabled": true,
        "logsDirectorySizeLimit": 40,
        "detailedErrorLoggingEnabled": true,
        "ipSecurityRestrictions": [
            {
                "vnetSubnetResourceId": "[resourceId('Microsoft.Network/virtualNetworks/subnets', variables('backendVirtualNetwork').instanceName, variables('backendVirtualNetwork').subnets.appSubnet.instanceName)]",
                "action": "Allow",
                "tag": "Default",
                "priority": 100,
                "name": "backend-services"
            },
            {
                "ipAddress": "Any",
                "action": "Deny",
                "priority": 2147483647,
                "name": "Deny all",
                "description": "Deny all access"
            }
            ],
            "scmIpSecurityRestrictions": [
            {
                "ipAddress": "Any",
                "action": "Allow",
                "priority": 1,
                "name": "Allow all",
                "description": "Allow all access"
            }
        ],
        "scmIpSecurityRestrictionsUseMain": false
    }
},
As you can see, I’m referencing the resource id of the virtual network its subnet and name the rule ‘backend-services’, just like in the example of the Portal. You’re also seeing over here how to add access restrictions for the SCM site and you can even set scmIpSecurityRestrictionsUseMain to true if you think both sites need the same kind of protection.
You can see the full ARM template I’m using over here on my GitHub repository: https://github.com/Jandev/secure-apis/blob/master/deployment/secureapi.deployment.json