Developing in an Azure Virtual Machine
I’ve been creating solutions for customers on my development laptop for years now. This works great as it’s a portable device and we get to have some great hardware in a compact form nowadays. However, laptops are still quite slow when you compare them to a desktop. This has become quite noticeable to me as I’ve been doing more development on my new desktop.
You can get some nice laptops with desktop-like performance, but most of the time it’ll cost a lot of money and will add a couple of pounds in weight. As I like to travel light, when travel is allowed again, a heavy laptop isn’t ideal.
Seeing there’s lots of horsepower in the cloud, it occurred to me I can just as well spin up a beefy virtual machine in Azure and develop on there. The main downside to this scenario is you need a (stable) internet connection to do any development. But to be honest, I need an internet connection anyways to do some actual development.
I do need this virtual machine to be safe and secure, so spinning up a VM and connecting to it via a public IP through RDP isn’t advised. To protect a virtual machine from the big bad internet you can add it in a virtual network and connect to it via a private IP-address. Of course, this makes the initial deployment a bit complex.
Deployment of the infrastructure
To connect to a virtual machine securely, this is what you need:
- The virtual machine (duh)
- A virtual network
- A virtual network gateway
- A public IP address
You also need one or more hard disks and a nic, these are all resources to be deployed in Azure also. As you can see, quite a lot of stuff.
Start with Farmer
My friends at Farmer have already done a lot of work in this space. There is even a virtual machine builder available which already creates most of the stuff I need!
The only thing missing over here is the virtual network gateway so I can make a VPN tunnel to the virtual network.
To get me started, I created a small F# program.
open Farmer
open Farmer.Builders

let developmentEnvironment = vm {
    name "dev-jan"
    username "jan"
    vm_size Vm.Standard_F8s_v2
    operating_system Vm.WindowsServer_2019Datacenter
    os_disk 128 Vm.StandardSSD_LRS
    add_ssd_disk 512
}

let deployment = arm {
    location Location.WestEurope
    add_resource developmentEnvironment
}

deployment
|> Writer.quickWrite "..\\deployment\\development-environment"
This little program creates a big ARM template with all the resources mentioned in the docs mentioned earlier.
As you can see, much easier to read & comprehend compared to creating a big JSON file with the ARM resources inside yourself.
On a side note, I can recommend using Farmer for any type of project, if only to get you started! It’ll create the resources you want or need and the generated template can act as a baseline to get you started. You can even deploy the resources via Farmer, but I like to tune things up a bit myself.
Tune it up
As I already mentioned the virtual network gateway isn’t created via the Farmer VM builder, because this resource isn’t supported (yet!). Also, by default, the generated public IP address is connected to the virtual machine. I want this public IP to be connected to the virtual network gateway, as it’ll be my input to the virtual network.
What I did over here is add a (small) piece of JSON to the ARM template which adds the virtual network gateway to my environment.
{
  "type": "Microsoft.Network/virtualNetworkGateways",
  "apiVersion": "2020-04-01",
  "name": "dev-jan-gateway",
  "location": "westeurope",
  "dependsOn": [
    "dev-jan-vnet",
    "dev-jan-ip"
  ],
  "properties": {
    "enablePrivateIpAddress": false,
    "ipConfigurations": [
      {
        "name": "default",
        "properties": {
            "privateIPAllocationMethod": "Dynamic",
            "publicIPAddress": {
                "id": "[resourceId('Microsoft.Network/publicIPAddresses','dev-jan-ip')]"
            },
            "subnet": {
                "id": "[resourceId('Microsoft.Network/virtualNetworks/subnets', 'dev-jan-vnet', 'GatewaySubnet')]"
            }
        }
      }
    ],
    "sku": {
        "name": "Basic",
        "tier": "Basic"
    },
    "gatewayType": "Vpn",
    "vpnType": "RouteBased",
    "enableBgp": false,
    "activeActive": false,
    "vpnClientConfiguration": {
        "vpnClientAddressPool": {
            "addressPrefixes": [
                "172.16.0.0/24"
            ]
        },
        "vpnClientProtocols": [
            "SSTP"
        ],
        "vpnClientRootCertificates": [
        {
            "name": "RootJanHome",
            "properties": {
                "publicCertData": "[variables('rootCertificateThumbprint')]"
            }
        }
        ],
        "vpnClientRevokedCertificates": [],
        "radiusServers": [],
        "vpnClientIpsecPolicies": []
    },
    "vpnGatewayGeneration": "Generation1"
  }
}
The easiest way to get this is by creating it yourself in the portal and navigate the Export Template. The generated template for this resource is quite good and easy to modify in my opinion.
As you can see I’m also adding a root certificate thumbprint to the gateway.
"vpnClientRootCertificates": [
{
    "name": "RootJanHome",
    "properties": {
        "publicCertData": "[variables('rootCertificateThumbprint')]"
    }
}
This is necessary if you’re connecting to the virtual network via a VPN with a private certificate. I’ve written a post on setting up a VPN connection to an Azure Virtual Network back in 2015 and surprisingly, it’s still pretty accurate. Back in the day, I was using makecert, but you can achieve the same with a couple of PowerShell commands also, as explained in the official docs on this subject.
You first need to create the root certificate.
# Self signed root certificate
$cert = New-SelfSignedCertificate -Type Custom -KeySpec Signature `
-Subject "CN=DevEnvRootCert" -KeyExportPolicy Exportable `
-HashAlgorithm sha256 -KeyLength 2048 `
-CertStoreLocation "Cert:\CurrentUser\My" -KeyUsageProperty Sign -KeyUsage CertSign
After having done this you can create private certificates using the following command.
# Self signed client certificate
New-SelfSignedCertificate -Type Custom -DnsName DevEnvClientCert -KeySpec Signature `
-Subject "CN=DevEnvClientCert" -KeyExportPolicy Exportable `
-HashAlgorithm sha256 -KeyLength 2048 `
-CertStoreLocation "Cert:\CurrentUser\My" `
-Signer $cert -TextExtension @("2.5.29.37={text}1.3.6.1.5.5.7.3.2")
The value of $cert is what you need to place inside the ARM template as it’s the thumbprint of the root certificate.
After deploying the template you’ll be able to download the VPN client from the portal and connect to it using the client certificate.
Great stuff!
What type of VM do you need?
Excellent question!
There is a lot of type of virtual machines available in Azure nowadays. Going through the list of different series is a study on itself.
The key things which are important for a ‘regular’ developer, like me, are
- Multiple CPU cores, faster = better
- Memory is important, but 16GB is ‘good enough’
- Fast hard disk is very important! For me, 256GB is enough, but more is better
I created a filter in Azure for machines with 8 to 16 vCPU’s, having 16GB to 64GB of memory, and have support for fast disks. The following list shows which are available and at what cost.
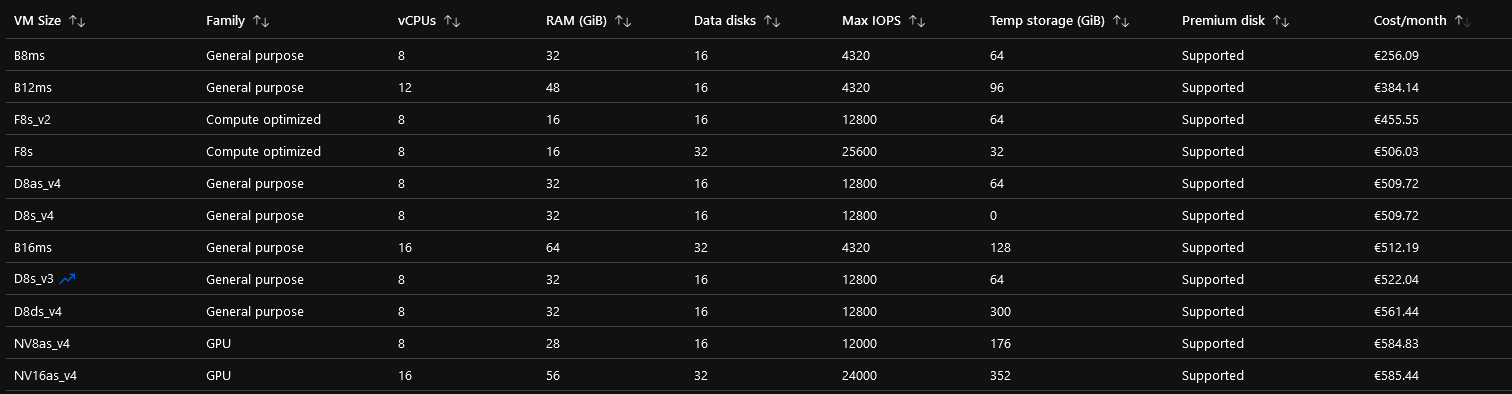
Now keep in mind, these prices are what you’re paying for the machine per month if it’s turned on 24x7. I plan to turn it off when not working (at night & in the weekend), so on average I will only have it turned on for about 220 hours per month. This means I’ll only be paying about 33% of the listed prices which will be about 80 euros per month for the cheapest option and about 180 euros per month for the most expensive option. Still, a lot of money but less as advertised.
The B-series VM’s are quite interesting. You are getting quite beefy machines and the ‘B’ stands for ‘Burstable’. A quote from the docs:
The B-series VMs are ideal for workloads that do not need the full performance of the CPU continuously, like web servers, proof of concepts, small databases, and development build environments. These workloads typically have burstable performance requirements. The B-series provides you with the ability to purchase a VM size with baseline performance and the VM instance builds up credits when it is using less than its baseline. When the VM has accumulated credit, the VM can burst above the baseline using up to 100% of the vCPU when your application requires higher CPU performance.
This sounds great for development also! When I’m working, most time is spent searching, debugging, pondering, typing, etc. There are only a couple of minutes per day when I’m compiling. This means I’d build up lots of credits during and when I need to compile something the machine will burst using up to 100% of its resources. If I’m reading the docs correctly, the B8 can even burst up to 800% of its vCPU performance and the B12 to 1200%!
Naturally, I started with a B-series virtual machine, because this burst mode sounds amazing!
After having installed lots of software using my installation scripts based on Chocolatey and BoxStarter I noticed Docker wasn’t able to start. At first, I blamed Hyper-V & WSL2, but this wasn’t the problem.
The problem was/is, not all virtual machines support nested virtualization, which is something you need when running containers or VM’s inside a VM. There is a list in the Microsoft Virtual Machine docs (in the Azure Compute Unit page) where you can find which VM’s do support nested virtualization.
There are quite a few listed, but what it comes down to (at the moment) is you need a D-series v4 machine or an F-series v2 machine (based on my earlier filtered list).
I couldn’t find many differences between the D- and F-series. Sure, the F-series has some better speeds for CPU but it’s also a bit more expensive and I probably won’t even notice the difference. That’s why I settled for the D8ds_v4 machine. It has 8vCPU, 32GB of memory, and supports fast SSD’s.
If you don’t need to run Docker on your machine I’d recommend using a B-series machine, because it’s way cheaper and has pretty good specs.
I’ll probably switch to the B-series again also after I get some time to convert my Docker scripts to run on something like Azure Container Instances.
Happy developing everywhere!
After having set up a VM in Azure and a VPN to connect to it, you’re now able to do development from practically everywhere and have lots of horsepowers available.
A friend of mine asked why I didn’t opt-in for Visual Studio Codespaces. It’s a (new) service that offers “Cloud-hosted dev environments accessible from anywhere”. While it is a nice service, I do like having the option to tune & modify the complete machine. Also, Codespaces still is under heavy development and not something I can use at my customers yet.
I might revise my opinion in a couple of months, but for, now having a (virtual) development machine is the best in my opinion.
So what’s your favorite way to develop software? Working with a big desktop, light-weight laptop, big and heavy laptop, only working via services like Codespaces? Let me know in the comments below!