Create a service principal to manage your Azure subscriptions with Management Groups
Some time ago, someone assigned me a task to retrieve data from several data sources residing in multiple Azure subscriptions, using a Logic App.
Creating these shouldn’t be very difficult when using API Connections and using the data repositories’ connection strings. However, I don’t like specifying these connection strings anywhere in my ARM template nor Key Vault.
What I DO want to use is the listKeys function in my deployment template. With this function, you can retrieve Primary- and Secondary Keys of a resource and use it. Using the following implementation will retrieve the primary shared access key of a Storage Account.
"azuretables_sharedkey": {
    "value": "[listKeys(resourceId(variables('subscriptions').mySubscription, variables('deployments').theResourceGroup, 'Microsoft.Storage/storageAccounts', variables('deployments').theActualResourceName), providers('Microsoft.Storage', 'storageAccounts').apiVersions[0]).keys[0].value]"
}
When using this in an ARM template, across subscriptions, the service principal (used by the service connection) needs access to all subscriptions (and resources).
Making the management of this a bit easier, I decided to use Management Groups.
By leveraging this Azure resource, I can assign the Service Principal, which Azure DevOps uses, the appropriate permissions on the Management Group instead of providing these details on each subscription. While this doesn’t look like a lot of work, it will make sure all roles are consistent across all environments.
What are Management Groups
As the name suggests, it’s a group that you can manage.
You can put other Management Groups and Subscriptions inside it. This way, one can make an Azure environment reflect the business or different domains in an organization.

Source: https://docs.microsoft.com/en-us/azure/governance/management-groups/overview?WT.mc_id=AZ-MVP-5003246
You can set roles for resources, check the cost, set a budget, and assign Azure Policies (and Blueprints) in Management Groups. Because of this, it’s easier to design your environments and keeping them in check.
At this time, I’m using Management Groups for granting permissions (RBAC) on several resources and assigning Policies for our subscriptions.
I’d advise everyone start using Management Groups, even if there are only 4 (or less) subscriptions. Having just 1 Management Group can help significantly get a compliant environment and makes managing your subscriptions easier in the long run.
Create a Management Group
It’s possible to create a Management Group in Azure Portal and put subscriptions inside them right away. There’s also this Management Group called ‘Root management group’ which, by default, you can’t modify. If this is necessary, the role User Access Administrator has to be granted on your account.

But beware, don’t keep your account in this elevated mode! It opens up a lot of permissions, which aren’t necessary during your day job. Remove this permission as soon as possible.
Creating a Management Group using Azure CLI
While the Azure Portal is great fun and all, I try to use it in read-only mode as much as possible unless I’m playing around, of course.
I prefer using Azure CLI whenever I can because it’s very expressive and clear to read & use.
Creating a new Management Group is a one-liner
az account management-group create --name "MyManagementGroup" --display-name "My Management Group"
It’s also possible to nest them. To do so, specify the --parent attribute in the command.
az account management-group create --name "MyNestedManagementGroup" --display-name "My Nested Management Group" --parent "MyManagementGroup"
Now for the best part, assigning subscriptions to Management Groups. I’m taking a ’traditional’ approach over here with 4 separate subscriptions for Development, Test, Acceptance & Production environments.
az account management-group subscription add --name "MyNestedManagementGroup" --subscription "My DEV subscription"
az account management-group subscription add --name "MyNestedManagementGroup" --subscription "My TEST subscription"
az account management-group subscription add --name "MyNestedManagementGroup" --subscription "My ACC subscription"
az account management-group subscription add --name "MyNestedManagementGroup" --subscription "My PROD subscription"
Managing RBAC on all 4 subscriptions at once, can be achieved by assigning roles to the MyNestedManagementGroup.
The same goes for budgets & Azure Policies.
The service principal
Remember the service principal I wrote about earlier in this post? It’s time to create one which will get access on all subscriptions.
Creating the service principal
It’s possible to create a service principal in the Azure portal, it’s better to script it.
The details of the created service principal are stored in the $createdServicePrincipal variable by running the following command.
$createdServicePrincipal = az ad sp create-for-rbac --name $servicePrincipalName | ConvertFrom-Json
These details are necessary for creating a new service connection in Azure DevOps later on. Only the appId and password are required though, so I’m outputting them in a script.
Write-Output "Service principal for Azure DevOps has been created.
Use the following information in Azure DevOps:
Service Principal Client Id: $($createdServicePrincipal.appId)
Service Principal Client Secret: $($createdServicePrincipal.password)"
Assigning permission to a service principal
Now that both the Management Groups and Service Principal, it’s time to combine the two.
I want my service principal with a Contributor role on the MyNestedManagementGroup. The following command can achieve this.
az role assignment create --role 'Contributor' --assignee $createdServicePrincipal.appId --scope "/providers/Microsoft.Management/managementGroups/MyNestedManagementGroup"
This service principal now has immense power on every resource & subscription that resides in the management group. In an actual project, it’s a good idea to grant a less powerful role on a Management Group level and only assign a more powerful role on the resource where it’s needed.
Setting up a service connection
It’s now possible to create a new Service Connection with the newly created service principal.
Because this identity has access to multiple subscriptions, you’ll be able to choose all of them from the subscription dropdown in a pipeline. It might be a good idea to minimize the number of pipelines which can use this service connection as it’s quite powerful.
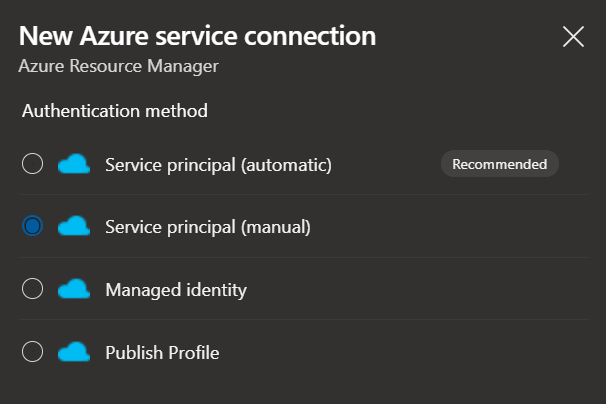
Navigate to ‘Project Settings -> Pipelines - Service connections’ from where it’s possible to create a new connection.

A new service principal has just been created. In this screen, it makes the most sense to use Service principal (manual) in this blade. To my knowledge, when using Service principal (automatic), it can only target a specific subscription, not a management group.
After proceeding to the next page, fill out all Azure environment’s details and the newly created service principal.
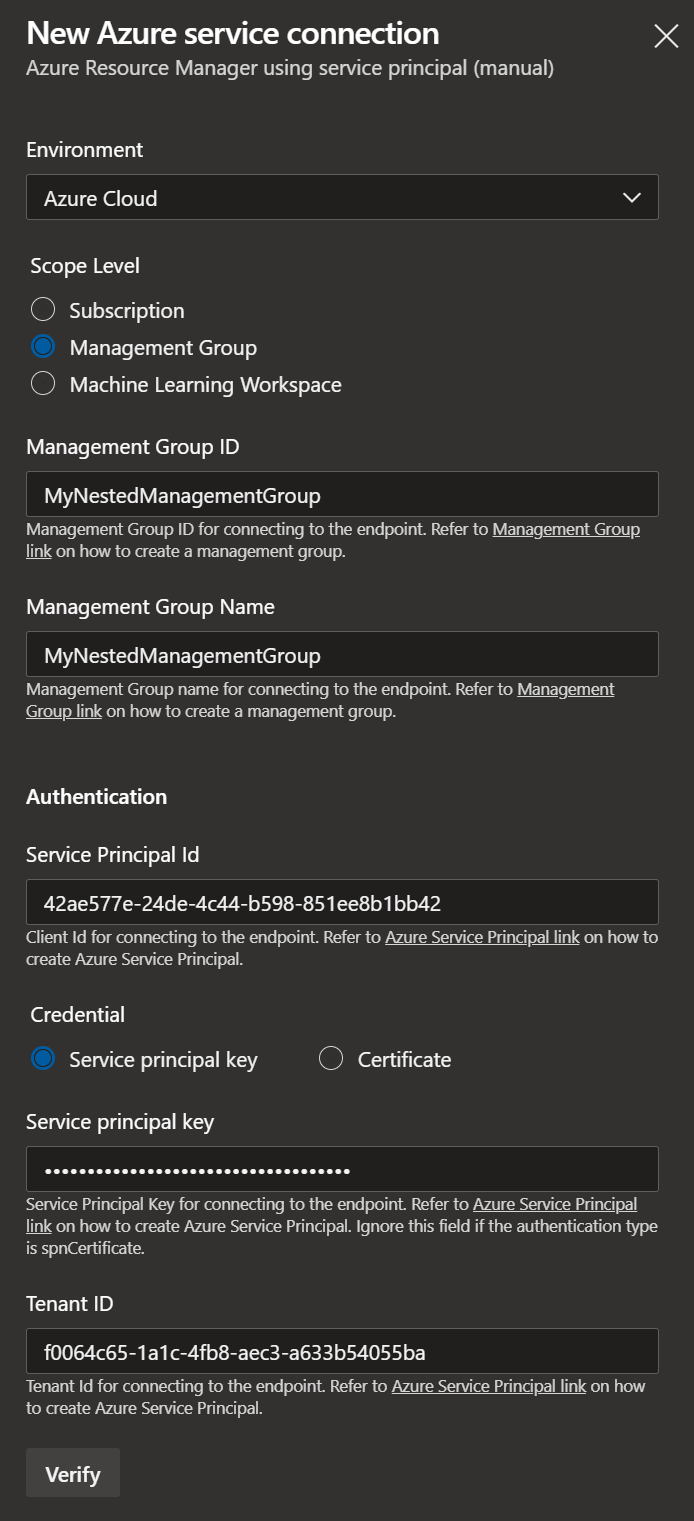
For Service Principal Id you should use appId, and Service principal key is password stored earlier in the $createdServicePrincipal variable. If everything is filled out correctly, pushing the Verify button will show a green checkmark.
Once this service connection has been created and selected in a pipeline, it’s also possible to choose which subscription to deploy.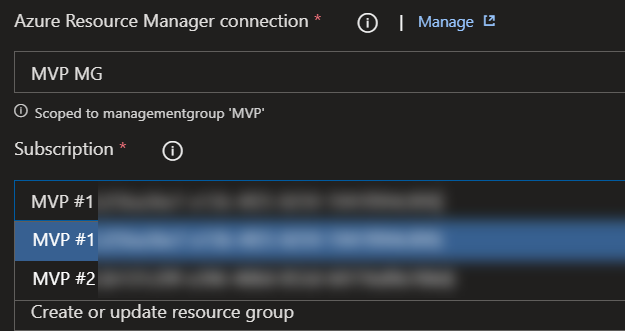
Using Management Groups are pretty convenient when working across multiple subscriptions.
Do use this feature with care as it has great power and should be treated as such.