As of late, there are a couple of Store apps which just won’t install on any of my Windows 10 machines (One Commander and Open Live Writer in case you are interested).
The message shown is:
The error code is 0x80073CF9, in case you need it.
If you do a search on the error number you’ll find numerous posts and articles explaining on how this error might be solved. As it happens, the error also occurs on Windows Phone/Mobile systems.
One of the suggestions I came across is re-installing the Store app.
Uninstalling a Modern App is quite easy with tools like CCleaner. If you don’t have tools like this, it’s also possible to do this via the PowerShell Remove-AppxPackage cmdlet of course.
However, once uninstalled, how will you install the Store, without having a Store.
A System Restore might help, but I didn’t have any usable restore points.
An easier solution is to re-install the Store app via PowerShell. With the following command you will see all the applications which still reside on your system.
Get-AppxPackage -allusers | Select Name, PackageFullName
One of these should have a name similar to Microsoft.WindowsStore.
You can re-install this app by using the Add-AppxPackage cmdlet.
Read more →I’ve just started setting up some continuous deployment for my personal websites. All of the sites are hosted within Azure App Services and the sources are located on either GitHub or BitBucket. By having the source code located on a public accessible repository (be it private or public), it’s rather easy to connect Azure to these locations.
On my day-job I come across a lot of web- and desktop applications which also need continuous integration and deployment steps in order for them to go live. For some of these projects I’ve used Octopus Deploy and currently looking towards Azure Release Management. These are all great systems, but they offer quite a lot of overhead for my personal sites. Currently my, most important, personal sites are so called static websites using MiniBlog (this site) and Hugo (for keto.jan-v.nl). Some of the other websites I have aren’t set up with a continuous deployment path yet.
I don’t really want to set up an Octopus Deploy server or a path in Azure Release Management for these two sites. Lucky for me, the Azure team has come up with some great addition in order to provide some custom deployment steps of your Azure App Service. In order to set this up, you need to enable the automatic deployments via the Deployment Options blade in the Azure portal.
Read more →When doing modern web development you will probably have to start using NPM sooner, rather than later. Not a big deal of course, since it’s a great addition to the frontend development environment.
However, most NPM packages have quite a bit of dependencies to other packages. All of these dependencies get pulled towards your system also. Still not a big problem as you want a working solution.
The problem arises when you are on a Windows environment, there are a lot of dependencies and you want to delete a project folder on your system. You will stumble across the fact that Windows has a rather low limit on how long a path can be. When all dependencies are loaded, you will probably have some paths which are too long for Windows to handle properly.
This will give you quite a bit of a problem as you can’t delete the folder(s) anymore. One way of solving this is by using PowerShell. By executing the following script you will be able to delete the NPM modules in your project.
ls node_modules | foreach {
	echo $("Deleting module..." + $_.Name)
	& npm rm $_.Name
}
This will iterate through the node_modules folder and remove each module inside it.
Read more →As of late I’ve started using the VMWare products for virtualizing my development environments again as a replacement for Hyper-V.
Today I wanted to access some files of my virtual machine on the host in order to write a blog post on some code I had saved in there. The VMWare disk files are stored as a VMDK file and it’s not possible to mount these type of files in Windows like a VHD file.
In order to mount a VMDK file you’ll need some third party software. Most people tell you to download the VMWare Disk Mount Utility (note the date: 2005-11-29). This probably was a valid solution back in the day, but it appears this software isn’t compatible with the recent versions of the Microsoft Windows operating system.
When installing the VMWare Disk Mount Utility I’m receiving the following event when checking out the event viewer:
Windows Installer installed the product. Product Name: VMware DiskMount Utility. Product Version: 1.00.0000. Product Language: 1033. Manufacturer: VMware, Inc.. Installation success or error status: 1603.
While troubleshooting this error you’ll probably stumble across the following KB article which tells you to set the appropriate security permissions on the Program Files folder. I’ve tried setting these permissions for both the SYSTEM account as the Administrators group, but to no avail. So I think it’s safe to assume this software doesn’t work properly anymore.
Read more →With Windows 10 we’ve gotten a lot of nice little features which help us modifying the theme. There is however 1 option which the team hasn’t implemented (yet). The option to select different wallpapers for all of your connected displays.
I’m working with a triple monitor setup at home and at work most of the time with a dual or also a triple setup. Of course I don’t really need different wallpapers on all of my monitors, but it’s a nice feature.
Luckily we are still able to do this, using the ‘old’ control panel pages which are still available in Windows 10. If you type in the following command inside a Windows Explorer address bar or the Run command window you’ll be able to get there.
control /name Microsoft.Personalization /page pageWallpaper
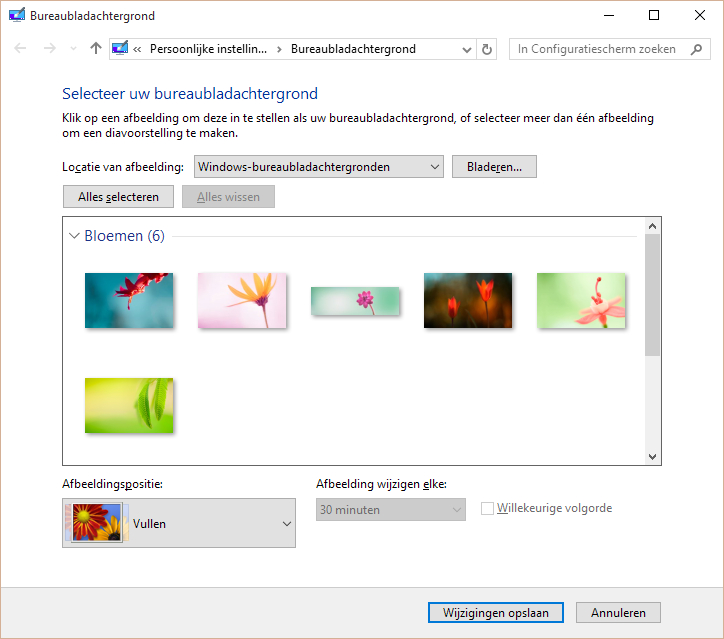
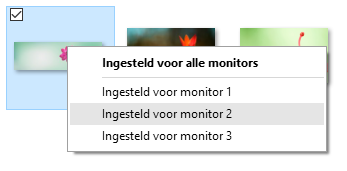
On this screen you are still able to select your wallpaper for every connected display.
Just a little tip, hope it helps.
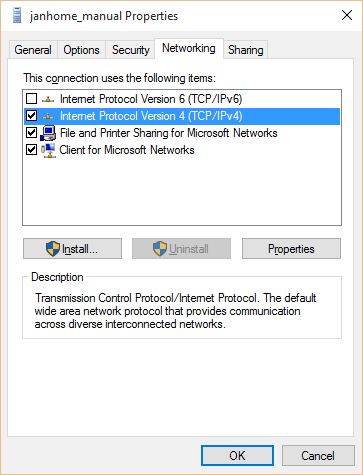
Read more →While I was setting up a VPN connection to my Azure Virtual Network I wanted to uncheck the option to use the Default Gateway of the connected network. Normally you’d do this by clicking on the Properties button of the selected protocol.
However, there appears to be a bug in Windows 10 and VPN connections for this button which causes the Properties window not to appear.
I have solved this with the help of Todorovic Dragan’s post about this matter. Over there he states you can change the Default Gateway setting manually.
Just navigate to the folder C:\Users\[YourUsername]\AppData\Roaming\Microsoft\Network\Connections\Pbk and open the file rasphone.pbk file in your favourite text editory.
This file contains all configuration settings of your dial-in connections, like VPN’s. Search for the configuration block of your connection. For me it’s [janhome_manual] and change the option IpPrioritizeRemote to 0.
Changing this setting will disable the checkbox for using the gateway of the remote network.
Read more →One of the reasons for me to create an Azure virtual network is being able to connect to my development machines in the Cloud from anywhere, without exposing them to the public. In order to do so, all machines have to be added to the virtual network. You also have to select the option to set up a point-to-site VPN connection to the virtual network.
Setting up a point-to-site VPN connection to an Azure virtual network is documented quite well on the Azure documentation pages. Still, I have come across a couple of problems which I’d like to share.
The first problem I had was executing the makecert program via the Visual Studio Command Prompt on my machine. This tool is really useful when creating a self-signed certificate.
d:\Temp\vpnblog>makecert -sky exchange -r -n "CN=RootJanHome" -pe -a sha1 -len 2048 -ss My "RootJanHome.cer"
'makecert' is not recognized as an internal or external command, operable program or batch file.
Apparently the makecert program isn’t installed by default on your machine when installing Visual Studio 2015. You’ll have to install the Windows 10 SDK and tools in order to get it. To fix it, just Modify your Visual Studio installation and select the option which installs these bits.
Read more →Nowadays it’s possible to create virtual networks within your Azure subscription. This can be very useful for managing your Azure resources within a specific network or setting up a point-to-site or site-to-site connection to expand your current on-premise network.
To me creating a virtual network sounds like a great way to manage my virtual machines and services for development purposes which I’m running within Azure. It will also let me connect to them without exposing stuff to the public internet. I can imagine a virtual network can also be useful for adding multiple build agents, private nuget repositories, a source control server, domain controller, DNS, etc. By moving all of your machines to the cloud, the only thing you’ll need on-premise is a proper router for connecting to the cloud.
In order to create a new virtual network, you’ll have to navigate to the management portal. This feature is available within the classic and new portal. As I prefer the classic portal all screenshots in this post are from within this portal.
The management portal has a menu option called Networks from where you can manage your virtual networks. The image below shows a virtual network called janhome.
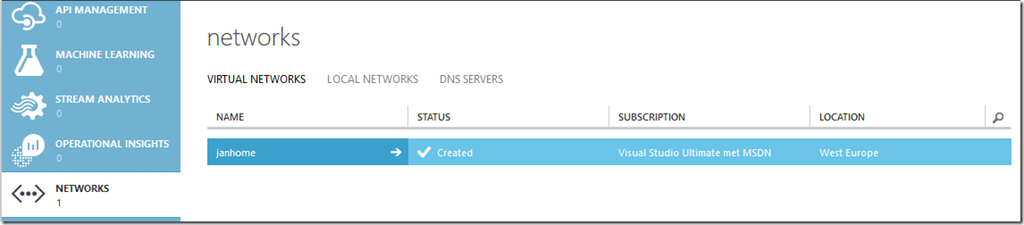
If you want to create a new virtual network by yourself, just select the option from the New menu.
Read more →In my previous post I’ve talked about creating new projects in Octopus Deploy in order to deploy projects to different environments. In this post I’ll explain a bit on how to create Octopus Deploy packages for your Visual Studio projects via Teamcity.
To enable packaging for Octopus you’ll need to include the Octopack NuGet package to the project you are packaging. In my case this will be the Worker project since I’m only working with Microsoft Azure solutions at the moment.
Once this package is successfully installed you will have to modify the project file also to enforce adding files in the Octopus package.
The following line will have to be added to the propertygroup of your build configuration
<OctoPackEnforceAddingFiles>True</OctoPackEnforceAddingFiles>
For reference, a complete propertygroup:
<PropertyGroup Condition=" '$(Configuration)|$(Platform)' == 'Release|AnyCPU' ">
    <DebugType>pdbonly</DebugType>
    <Optimize>true</Optimize>
    <OutputPath>bin\Release\</OutputPath>
    <DefineConstants>TRACE</DefineConstants>
    <ErrorReport>prompt</ErrorReport>
    <WarningLevel>4</WarningLevel>
    <OctoPackEnforceAddingFiles>True</OctoPackEnforceAddingFiles>
</PropertyGroup>
Your project is now ready to start packing. In my case I had to add a nuspec file also, because the worker project contained an application which has to be deployed to on an Azure Cloud Service.
A nuspec file for Octopus Deploy looks exactly the same as one you would create for NuGet itself. Mine looks like this:
<?xml version="1.0"?>
<package xmlns="https://schemas.microsoft.com/packaging/2011/08/nuspec.xsd">
	<metadata>
		<version>$version$</version>
After installing the plugin, three new runner type features will be available when creating a new build step.
Read more →The latest project I was working on didn’t have a continuous integration and continuous deployment environment set up yet. Creating a continuous integration environment was rather easy as we were already using Teamcity and adding a couple of builds isn’t much of a problem. The next logical step would be to start setting up continuous deployment.
I started out by scripting a lot of PowerShell to manage our Azure environment like creating all SQL servers, databases, service busses, cloud services, etc. All of this worked quite well, but managing these scripts was quite cumbersome.
A colleague of mine told me about Octopus Deploy. They had started using this deployment automation system on their project and it sounded like the exact same thing I was doing, just a lot easier!
Setting up the main server and it’s agents (tentacles) was quite easy and doesn’t need much explanation. The pricing of the software isn’t bad either. You can start using it for free and when you need to use more as 10 tentacles or 5 projects, you’ll start paying $700 for the professional license. Spending $700 is still a lot cheaper as paying the hourly rate of a PowerShell professional to create the same functionality.
Read more →